


Using a handheld edger effectively requires positioning the tool correctly and applying consistent downward pressure to achieve crisp, clean lines along walkways or flower beds. Many homeowners struggle with this task because they treat it like mowing, but the mechanics of a manual step-on edger rely on leverage and alignment rather than rotational force. The process is straightforward once you understand how the V-shaped blade interacts with the soil and grass edge.
The primary goal is to create a distinct boundary that separates lawn from hardscape or planting areas. This prevents grass roots from creeping into beds and keeps sidewalks clear of overgrowth. By mastering the technique of lining up the blade and using the footplate for stability, you can reduce physical strain while improving the visual appeal of your outdoor space. This guide explains the specific steps to prepare the tool, execute the cut, and maintain the edge over time.
Mastering the Technique for Clean Edges
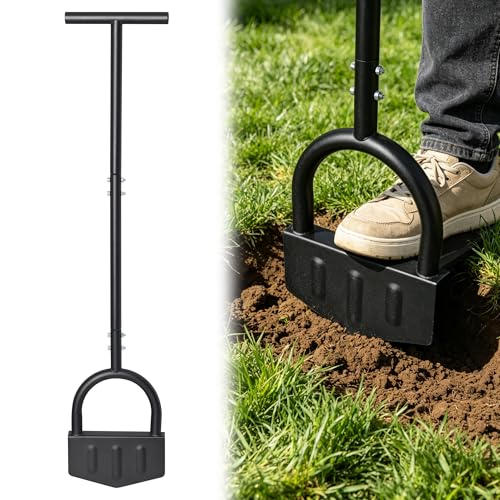
The core mechanism of a manual edger involves aligning the cutting edge with the desired line and using body weight to drive the blade into the ground. Unlike motorized tools that cut through dense thatch with spinning power, a manual edger relies on the sharpness of the steel and the angle of the cut. You must ensure the blade is positioned so that the lawn side remains and the bed or sidewalk side is cleared. This orientation is critical for a professional-looking result.
| Component | Function in Edging |
|---|---|
| V-Shaped Blade | Cuts through grass and shallow roots at the boundary line. |
| Footplate | Provides a stable surface for the user to apply downward force. |
| Handle | Allows the user to guide the tool and control the angle of approach. |
| Long Pole | Offers leverage to reduce knee and back strain during operation. |
Before you begin, ensure the tool is fully assembled and the blade is free of debris. A dull or clogged blade will require significantly more force and may skip over tough spots in the soil. Check the tightness of the bolts and the grip handle to ensure safety during use. The tool should feel rigid and stable before you apply any pressure to the ground.
Positioning is the most common source of frustration for new users, requiring you to walk along the edge while keeping the blade parallel to the existing boundary.
- If the line is straight, you must maintain a consistent distance from the curb or border to ensure accuracy.
- For curved areas, adjust your angle frequently to follow the natural contour of the landscape effectively.
- This consistency is what creates the sharp, defined look that distinguishes a well-maintained yard from others.
When you are ready to cut, place your foot firmly on the footplate. Apply steady, vertical pressure rather than pushing forward. The goal is to drive the blade deep enough to slice through the root layer without digging too far into the bed. If the soil is compacted, you may need to make multiple passes or adjust your stance to generate more force. Listen for the sound of the blade cutting through the turf; a smooth sound indicates proper depth and angle.
After each cut, lift the tool and move it to the next position. Do not drag the blade across the ground, as this will dull the edge and create uneven cuts. Instead, lift and reset for every new segment of the line. This methodical approach ensures that every section of the boundary is treated uniformly. It also allows you to inspect the cut depth and make adjustments as needed.
Preparation and Safety Checks
Proper preparation prevents accidents and ensures the tool performs as expected. Start by inspecting the blade for any signs of damage, such as cracks or excessive wear. A compromised blade can slip or break under pressure, posing a risk to your foot or leg. The steel should be clean and sharp to minimize the effort required for each cut.
Clear the area of rocks, sticks, and other obstacles that could obstruct the blade’s path. Hitting a hidden object can damage the tool or cause it to jump unexpectedly. Wear sturdy footwear with good traction to protect your feet and provide a stable base for applying force. This simple step significantly reduces the risk of slipping on wet or uneven ground.
- Inspect the blade for cracks, rust, or dullness before use.
- Verify that all assembly bolts are tight and secure.
- Clear the edging line of rocks, debris, and hidden obstacles.
- Wear closed-toe shoes with non-slip soles for stability.
- Check the handle grip for wear or looseness.
Safety is paramount when working with any garden tool, especially one that involves applying significant force. Keep your fingers away from the blade area and the moving parts of the handle. If the tool feels unstable or if the blade binds in the soil, stop immediately and investigate the cause. Continuing to force a stuck tool can lead to loss of control or injury.
Executing the Cut for Straight and Curved Lines
For straight lines, such as alongside a driveway or sidewalk, use a visual reference to keep the blade aligned. Walk slowly and maintain a consistent distance from the edge. The footplate should remain parallel to the line you are creating. If the line deviates, correct your position before applying pressure to the blade.
Curved lines require a different approach. You must adjust the angle of the tool frequently as you follow the contour of the flower bed or landscape feature. This may involve stepping slightly to the side or rotating your body to keep the blade perpendicular to the new direction. The key is to make small, controlled cuts rather than long, sweeping motions that can result in an uneven edge.
The depth of the cut is determined by how much pressure you apply. A deeper cut removes more root mass and creates a more defined barrier, but it requires more force. A shallower cut is easier to perform but may not prevent grass from creeping back into the bed. Experiment with different levels of pressure to find the balance that works best for your soil type and grass variety.
If the grass is thick or the thatch layer is dense, you may need to make two passes. The first pass can slice through the top layer of turf, while the second pass cleans up the remaining roots. This technique is particularly useful in areas where the grass has been neglected or where the soil is very hard. It ensures a clean cut without excessive strain on your body.
Maintaining the Edge and Tool Care
Maintaining a sharp edge is essential for the long-term performance of the tool. After each use, clean the blade with a wire brush or stiff brush to remove dirt and grass clippings. Accumulated debris can dull the edge and cause the tool to stick in the soil. A clean blade cuts more efficiently and requires less force to operate.
Store the tool in a dry place to prevent rust and corrosion. If the blade does show signs of rust, treat it with a rust remover and apply a thin coat of oil to protect the metal. Proper storage also prevents the handle from warping or cracking due to exposure to the elements. A well-maintained tool will last for many seasons with minimal replacement parts.
Regularly check the assembly points for wear or loosening. The bolts and nuts that hold the handle and blade together can vibrate loose over time. Tighten them as needed to ensure the tool remains rigid and safe to use. If any parts are worn or damaged, replace them promptly to avoid compromising the tool’s integrity.
Sharpening the blade is another important maintenance task. A dull blade will require more force to cut and can result in an uneven edge. Use a file or grinder to restore the sharpness of the cutting edge, following the original angle of the blade. Sharpening should be done carefully to avoid removing too much metal or altering the blade’s shape. A sharp blade makes edging a much easier and more satisfying task.
Troubleshooting Common Edging Issues
One of the most common issues is the blade skipping over the grass or failing to cut through the thatch. This usually indicates that the blade is dull or that the soil is too compacted. Try sharpening the blade or loosening the soil slightly with a fork before edging. If the problem persists, consider using a different type of blade or a more powerful tool for that specific area.
Another issue is the edge becoming uneven or jagged. This can happen if you are not maintaining a consistent angle or if you are moving the tool too quickly. Slow down and focus on making each cut with the same amount of pressure and at the same depth. Practice on a small section of the line to get a feel for the tool’s behavior before tackling the entire boundary.
If the tool feels unstable or wobbly during use, check the assembly and the footplate. A loose footplate can cause the tool to shift under pressure, making it difficult to control. Ensure that all parts are securely attached and that the footplate is clean and free of debris. A stable tool is a safe tool, and it produces better results.
Physical fatigue is a common complaint among new users. Edging can be physically demanding, especially on large properties or in hard soil. Take breaks as needed and adjust your stance to reduce strain on your back and knees. Using a tool with a longer handle can help by providing more leverage and reducing the need to bend over. Proper body mechanics are key to completing the task without injury.
For those who find manual edging too difficult, there are alternative methods and tools available. Motorized edgers can handle larger areas and tougher conditions more easily, but they require more maintenance and produce noise. Choosing the right tool for your specific needs and physical capabilities is important for a positive gardening experience. A manual edger is a great option for small to medium-sized gardens where precision and quiet operation are valued.
By following these steps and tips, you can master the art of using a handheld edger to create crisp, professional-looking edges in your garden. Consistency, preparation, and proper technique are the keys to success. Take your time, pay attention to detail, and enjoy the satisfying results of a well-edged landscape.
If you are looking to maintain other aspects of your lawn care routine, our guide on sharpening lawn mower blades offers similar practical advice for keeping your cutting tools in top condition.


Write Your Review
No reviews yet. Be the first to share your experience!