


Ragged grass tips and uneven cutting lines often point to a dull mower blade that tears turf rather than slicing it cleanly. Knowing how to sharpen mower blades with a dremel tool allows homeowners to restore factory bevels quickly without lugging heavy bench grinders across the garage. Rotary tools provide focused control and steady material removal, which helps preserve the original cutting geometry on standard and high-lift blades. Maintaining sharp edges is especially critical when operating an electric lawn mower for thick grass, where motor efficiency directly influences clean cutting results. Regular sharpening keeps grass blades healthy and reduces resistance against the mower deck spindle.
Dull cutting edges force mower engines to work harder and leave lawns vulnerable to fungal disease from frayed grass tips. Using dedicated rotary tool guides and aluminum oxide grinding stones simplifies the edge-dressing process, keeping the bevel consistent across the entire cutting flat. Whether you manage a compact yard with an electric mulching lawn mower or maintain a larger suburban turf area, precise blade maintenance prevents premature wear on your equipment. Pairing a high-speed rotary tool with a reliable static balancer ensures that each sharpening session produces balanced, chatter-free mowing performance.

Pros
- Extremely easy to use – simply chuck it in your drill and run it along the blade bevel.
- Versatile enough for multiple tool types beyond just lawn mowers.
- Compact and lightweight at 7 ounces, stores easily in any toolbox or drawer.
- Diamond grit holds its edge far longer than traditional abrasive stones.
Cons
- 120 grit is a medium finish – very dull or nicked blades may require multiple passes or a coarser stone first.
- No angle guide included, so you need a steady hand to maintain the factory bevel angle.
- Not ideal for heavy-duty commercial sharpening or extremely hard blade steels.
If you maintain your own lawn mower, you know that dull blades tear grass instead of cutting it clean. That leads to brown tips and a ragged lawn. The KURSTOL Diamond Lawn Mower Blade Sharpener is a simple solution that turns any power hand drill into an effective sharpening tool. It's not a standalone power tool but an accessory that belongs in every DIY homeowner's workshop.
This sharpener uses a steel matrix base coated with electroplated diamond. The electroplating process exposes more diamond particle surface, which makes the sharpener cut aggressively. In practice, it removes material noticeably faster than common aluminum oxide stones. The 120 grit leaves a fine enough finish for a mower blade. It also works well on axes, shovels, and even drill bits. Just clamp the blade securely, run the rotating sharpener along the existing bevel, and check progress often.
Setup takes literally 10 seconds. The 1/4 inch shank fits any drill with a standard chuck. You want to run it at medium speed around 2000 RPM for best results. The compact 2.95 x 2.36 x 2.36 inch size and 7 ounce weight mean it won't clutter your tool box. It feels solid in hand, and the diamond surface shows minimal wear after several sharpenings.
The main limitation is that 120 grit isn't coarse enough for heavily nicked or extremely dull blades. For those cases, you might need a separate coarse stone to reshape the edge first. Also, there's no built-in angle guide, so you must keep a consistent angle yourself. With a little practice, it becomes second nature. This tool is best suited for homeowners who maintain their own lawn equipment and want to avoid the cost of replacement blades. It also earns a spot in any workshop where you sharpen axes, shovels, or garden tools.
Overall, the KURSTOL Diamond Lawn Mower Blade Sharpener delivers reliable, fast sharpening at a budget-friendly price. It's a practical addition to any DIYer's sharpening kit. If you already own a drill and need to restore dull edges, this is a smart buy.
Product Dimensions: 2.95 x 2.36 x 2.36 inches
Item Weight: 7 ounces
Grit: 120
Shank Size: 1/4 inch (fits most power drills)
Material: Steel matrix with diamond electroplating
Manufacturer: KURSTOL
ASIN: B0FMJQD9V3
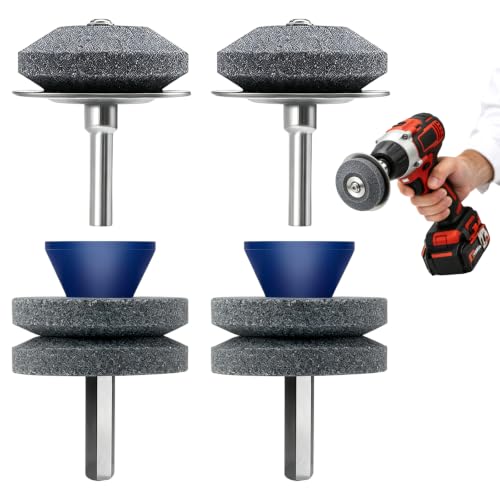
Pros
- Fast 10-second chuck installation works with standard drill chucks
- Double-layer corundum grinds steel evenly with minimal pressure
- Four-pack setup delivers excellent spare backup value for the shop
- Lightweight and compact enough to store inside any field tool tote
Cons
- Guide disc can get scored if pressed too aggressively against sharp metal
- Not intended for heavily gouged, warped, or cracked commercial blades
- Requires high drill RPM to achieve smooth, chatter-free grinding
The Bneykrir 4-Piece Lawn Mower Blade Sharpener is a specialized drill attachment designed to take the headache out of seasonal lawn equipment maintenance. Instead of wrestling blades on a heavy stationary bench grinder or risking uneven hand-filing, this tool uses a double-layer corundum wheel that mounts right into your drill chuck. It is aimed squarely at homeowners, DIYers, and small-property groundskeepers who want clean, healthy grass cuts without spending shop fees on blade balancing and sharpening.
In practical workshop use, setting up the sharpener takes only a few seconds. Chuck the metal shaft into an 18V or 20V cordless drill, clamp your lawn mower blade securely into a bench vise, and bring the drill up to speed. The abrasive corundum stone cuts through mild surface oxidation, dull bevels, and small turf nicks smoothly. The plastic guide disc rests along the flat underside of the blade, keeping the abrasive angled against the factory bevel without demanding pinpoint freehand steadying.
Build quality is suited well for light to medium maintenance runs. The corundum material holds up to standard lawn tractor and push mower steel, though users should avoid leaning too heavily into the work. Applying steady, moderate passes keeps heat buildup low and avoids burning the temper on thin steel. The four-pack arrangement is practical, giving you plenty of abrasive material to work through multiple seasonal tune-ups, tiller blades, and utility yard tools.
There are a few trade-offs to keep in mind. The plastic collar can wear down if it drags forcefully against jagged metal edges, and deep gouges from rocks will still require an angle grinder with a flap disc first. That said, for routine seasonal maintenance and quick edge touch-ups, this four-piece kit provides straightforward functionality and solid value for any home garage.
Routine edge touch-ups on standard residential walk-behind and riding lawn mower blades.
Cleaning and sharpening curved garden tools, rototiller tines, sickle cutters, and axes.
Pre-season garage tune-ups where removing the blade for quick bench vise work is preferred.
Home toolkits where space or budget does not justify a dedicated stationary grinder.

Pros
- Saves significant time over manual sharpening when paired with a drill.
- Sturdy construction with stainless steel base and quality abrasive stones.
- Blade balancer included helps prevent uneven cuts and extends blade life.
- Good value considering the number of replacement stones and included accessories.
Cons
- Requires a drill with variable speed around 4000 RPM; not all drills may reach that speed.
- The sharpener may be too small for very large commercial mower decks.
- Achieving a consistent angle takes a little practice; not as forgiving as a dedicated sharpening jig.
The HIMOEPA Lawn Mower Blade Sharpener is a drill-mounted accessory designed to quickly restore the cutting edge on dull mower blades. It targets homeowners and DIY enthusiasts who already own a power drill and want a fast, cost-effective way to maintain their lawn equipment without replacing blades or paying for professional sharpening.
Real-world performance is straightforward: attach the sharpener to your drill, set the speed around 4000 RPM, and run it along the blade edge. The brown corundum stone bites aggressively without overheating, allowing you to sharpen a standard blade in under a minute. The included blade balancer is a thoughtful addition it lets you check for even sharpening and reduce vibration during mowing, which protects your mower's spindle over time.
Build quality is a strong point. The stainless steel base is a clear upgrade over plastic competitors it won't crack under the torque of a drill or degrade after exposure to moisture in your garage. The stones themselves are dense and hold up well to repeated use. The kit includes two sharpeners and four replacement stones, so you have spares when the abrasive eventually wears down.
One realistic limitation is the speed requirement. Not all drills offer precise RPM control, and running at lower speeds dulls the stone rather than the blade. Also, achieving a consistent sharpening angle takes a few tries; this isn't a precision jig. It's best suited for homeowners with standard walk-behind or riding mowers, not for commercial operators with huge decks. The kit doesn't include a drill, so factor that in if you don't already own one.
Overall, the HIMOEPA sharpener offers excellent value for the price. If you have a drill and a few blades to maintain, this kit pays for itself after the first sharpening session. It's a practical, durable tool that belongs in any DIYer's garage workshop.
Color: Silver
Material: Brown corundum stone, stainless steel base
Dimensions: 1 x 0.5 x 1 inches (each sharpener)
Included: 2 sharpeners, 4 replacement stones, 1 blade balancer
Compatibility: Standard electric drill (not included); recommended speed ~4000 RPM
Weight: Lightweight, easily stored in tool box
Two drill-mounted sharpeners with brown corundum stones
Four replacement stones for extended life
One blade balancer to check even sharpening
All items come in a compact package ready for workshop storage


Pros
- Consistent 30-degree sharpening angle for repeatable results
- Wide compatibility with most rotary tools on the market
- Low cost and includes a grinding bit for immediate use
- Lightweight and easy to handle, even for beginners
- Durable nylon build that holds up to drops and daily use
Cons
- Only sharpens at one fixed angle (30 degrees) which may not suit all blade types
- Requires a rotary tool with a collet that can accept the included bit
- May not be effective on very dull or damaged blades needing more aggressive grinding
The WEN RTA001 Blade Sharpening Guide is a compact accessory designed to turn your rotary tool into a blade sharpener. It attaches to most WEN and Dremel rotary tools, as well as many other brands, and guides the blade at a fixed 30-degree angle for consistent edge restoration. This is a straightforward tool for DIYers, homeowners, and gardeners who want to keep their lawn mower blades, loppers, shears, and similar items sharp without buying a separate sharpening machine.
In real-world use, the guide is easy to set up. You mount the included grinding bit in your rotary tool, then slide the blade into the guide and run the bit along the edge. The 30-degree angle is preset, so you don't have to guess the bevel. It works well for moderately dull blades, but very nicked or heavily worn edges may require multiple passes or a more aggressive approach. The guide is best for light to medium maintenance rather than professional-grade sharpening.
Build quality is solid for the price. The glass-filled nylon body feels tough and resists cracking if dropped. It's also very light, weighing just 0.06 pounds, so it won't add bulk to your tool kit. The compact size lets you toss it in a drawer or toolbox without taking up much space. The included grinding bit is decent for starting out, though you may want to replace it with a finer grit for finishing edges.
One realistic limitation is the fixed 30-degree angle. While that works for many garden and lawn tools, some blades (like kitchen knives or specialized shears) require a different bevel. Also, the guide only works with rotary tools that have a collet capable of holding the included bit, so check compatibility before buying. For very dull or damaged blades, you might need a bench grinder or file to reshape the edge first.
Overall, the WEN RTA001 is a great value for anyone who already owns a rotary tool and wants an easy way to maintain sharp blades. It's not a heavy-duty solution, but for occasional sharpening of lawn equipment and garden tools, it gets the job done without breaking the bank. If you're a DIYer or homeowner looking to extend the life of your blades, this guide is a practical addition to your workshop.
Color: Black
Weight: 0.06 Pounds
Material: Glass-filled nylon
Compatibility: Most WEN and Dremel rotary tools, plus many other brands
Sharpening Angle: 30 degrees
Includes: Blade sharpening guide and grinding bit
Product Group: Tools

Pros
- Simple to set up and use, even if you have no sharpening experience
- Delivers sharp, consistent edges on chainsaws, mower blades, pruners, and shears
- Affordable way to maintain tools instead of buying new ones
- Works with a wide range of Dremel tools, both corded and cordless
Cons
- Requires a compatible Dremel rotary tool, which is sold separately
- Not effective for severely damaged or heavily dulled blades; some manual filing may be needed first
- Chainsaw stone sizes are limited; specialty chains may require additional stones
The Dremel A679-02 Sharpening Attachment Kit is a versatile accessory set designed to turn your Dremel rotary tool into a precision sharpener for common outdoor tools. It comes with three dedicated attachments for chainsaws, lawn mower blades, and garden tools like shears and pruners, plus four grinding stones. This kit is ideal for homeowners, gardeners, and DIY enthusiasts who want to keep their cutting equipment in top shape without learning complicated manual sharpening techniques.
In real-world use, this kit shines at routine maintenance. The attachments lock onto the Dremel tool quickly and include guides that set the correct sharpening angle automatically. Users report that a dull lawn mower blade can be restored to a clean cutting edge in under ten minutes. The chainsaw attachment works well for standard chains, though very worn or damaged chains may need initial filing before the stone can do its job. The included stones cut efficiently and leave a smooth finish, and swapping between attachments is straightforward.
Build quality is solid for an accessory kit. The plastic attachments feel durable enough for occasional to regular use, and the stones hold up well over multiple sharpenings. The screw-on mounting system is secure and doesn't wobble during operation. Because the kit is small and lightweight, it stores easily in a toolbox or drawer. It pairs with most Dremel tools, which is a big plus if you already own one. The instructions are clear, making setup a breeze even for a beginner.
The main drawback is that you need a Dremel rotary tool to use it. Also, if your blades are extremely dull or nicked, the stones alone may not grind away enough material quickly; you might need to do some heavy work with a file first. That said, for regular upkeep of moderately used tools, this kit is a fantastic value. It saves you the hassle and expense of professional sharpening and helps your equipment last longer. If you own a Dremel and care for your garden or workshop tools, this attachment kit is a worthwhile addition.

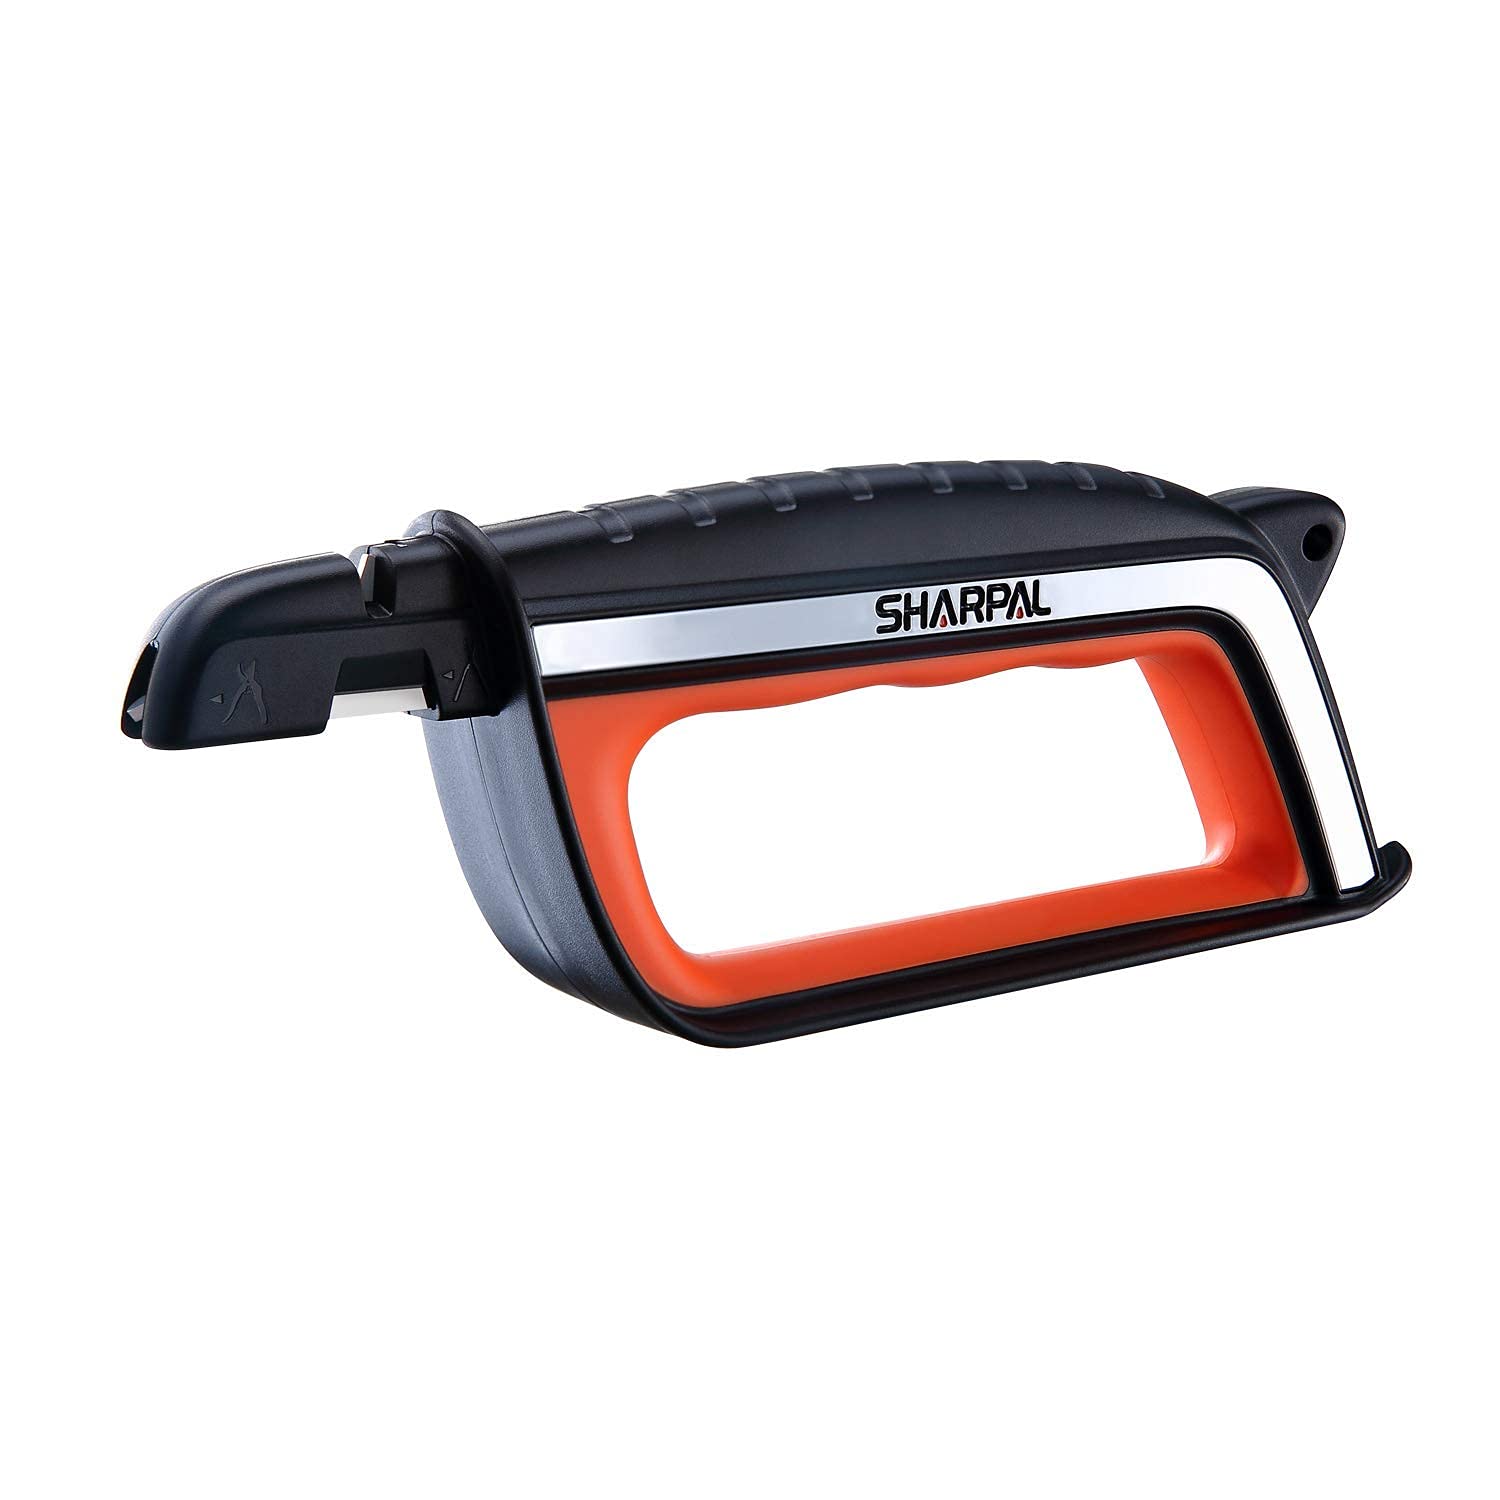
Pros
- Versatile enough for both large garden tools and fine household blades.
- Very easy to use with clear slot guides for angle and pressure.
- Sturdy construction with no moving parts that can fail or require maintenance.
Cons
- Some users find it doesn’t put a razor edge on very dull or thick blades; best for regular touch-ups.
- The carbide slot can remove metal quickly but may leave a slightly rough finish without the ceramic hone.
The SHARPAL 103N is a purpose-built handheld sharpener that stands out for its versatility. It’s not a bench stone or an electric grinder, it’s a compact tool designed to handle a surprising range of edge maintenance tasks around the shop, garden, and home. With five sharpening surfaces, it can tackle lawn mower blades, axes, machetes, pruning shears, hedge trimmers, scissors, and most kitchen knives. That kind of flexibility makes it a real asset for anyone who keeps multiple cutting tools in rotation.
This sharpener is best suited for DIYers, homeowners, and light commercial users who want to keep their gear cutting cleanly without spending a lot of time or money. It’s not meant for heavy duty reprofiling or restoring badly damaged edges, but for routine sharpening and touch ups it works very well. The preset angle slots take the guesswork out of holding the blade at the right orientation, which is especially helpful for people who aren’t comfortable with a stone or file.
In use, the 103N feels solid and secure. The rubber over-molded base grips the workbench or tabletop, so it stays put while you draw the blade through the slot. The handle is big enough to use comfortably with gloves, and the hand guard is a thoughtful safety feature when working on mower blades or shears. Performance wise, the tungsten carbide slot removes material quickly and the ceramic slot refines the edge to a clean, functional sharpness. Most users report noticeably better cutting from their tools after just a few passes.
Build quality is good for the price point. The plastic housing feels durable, and the abrasive inserts are rated to last through many thousands of uses. There are no batteries or cords to worry about, and the whole unit weighs only a few ounces, so it’s easy to store in a drawer or toolbox. Some reviewers mention that very dull or thick mower blades may need more passes or a secondary method to get a true edge, but for regular upkeep this tool performs reliably.
If you are tired of paying for sharpening services or struggling with stones and files, the SHARPAL 103N is a practical, cost effective alternative. It pays for itself quickly if you maintain your own mower blades, pruners, and shears. For the price and versatility, it’s a solid addition to any workshop or garage.
Brand: SHARPAL
Model: 103N
Dimensions: 8.46 x 2.95 x 1.34 inches
Weight: 6.2 ounces (176 grams)
Materials: Tungsten carbide and ceramic abrasives
Grit types: Coarse, medium, fine
Number of sharpening slots: 5 preset angle guides
Color: Orange and black
Warranty: 3 years
Lawn Mower Blade Touch Ups: Use the dedicated carbide slot to quickly restore a clean cutting edge without removing the blade from the mower (if accessible) or with the blade removed on a bench. Ideal for seasonal maintenance.
Garden Shears and Pruners: The pre-set angle slots make it easy to sharpen bypass pruners, hedge shears, and loppers. A few passes bring back factory sharpness.
Axes and Hatchets: The broader slots accommodate thicker blades and axes. Great for campsite or woodlot tool upkeep.
Kitchen and Utility Knives: The fine ceramic slot refines knife edges for clean slicing. Works well on most straight edge kitchen blades.

Pros
- Simple to attach and use with any standard drill
- Durable brown corundum stone and metal base last through many sharpening sessions
- Comes with a blade balancer for more precise results
Cons
- Requires a drill speed around 4000 RPM to work properly; slower drills may not get good results
- The included stone can feel rough and may not produce a razor-sharp edge on very hard blades
- The center screw can shear off under heavy pressure if overtightened
The IRONHIT Lawn Mower Blade Sharpener is a simple, drill-mounted sharpening tool designed for homeowners and DIYers who need to refresh dull mower blades without the expense or space of a bench grinder. It uses a brown corundum abrasive stone mounted on a stainless steel base, attaching directly to any standard power hand drill in about 10 seconds. This kit also includes a blade balancer to help you check your work and keep the blade spinning smoothly.
In real-world use, this sharpener excels at removing nicks and restoring a usable edge on typical lawn mower blades. The stone is coarse enough to cut quickly, but you will want to run your drill at around 4000 RPM for best results. At lower speeds, the stone bogs down and doesn't sharpen effectively. Several users note that the metal base is a big upgrade over plastic-backed sharpeners, as it doesn't flex or break under pressure. The included balancer is a nice touch, letting you verify the blade is even before reinstalling it on the mower.
Build quality is decent for the price. The stainless steel mandrel feels solid, and the stone holds up well to repeated use. However, a few reviewers report that the center retaining screw can shear off if you apply too much force or if the stone binds. This is a limitation of the design, but it's avoidable if you use a light touch and keep the drill speed up. Also, the stone is fairly coarse, so the resulting edge won't be razor sharp; it's more of a working edge that will cut grass cleanly. For most homeowners, that's perfectly adequate.
Overall, the IRONHIT Lawn Mower Blade Sharpener is a practical, budget-friendly solution for anyone with a drill who wants to keep their mower blades in decent shape. It's not meant for professional landscapers who sharpen blades daily, but for the average DIYer or homeowner doing a few blades a season, it gets the job done quickly and without hassle. Just remember to tighten the small center screw before each use and avoid over-torquing it.
Product Dimensions: 2 x 1 x 1 inches
Item Weight: 7.8 ounces
Material: Brown corundum stone, stainless steel base
Compatibility: Any standard power hand drill (chuck size not specified, fits most 3/8 inch and 1/2 inch chucks)
Recommended Speed: Approximately 4000 RPM
Includes: Sharpening stone with mandrel, blade balancer
This sharpener is best suited for DIY homeowners who sharpen their lawn mower blades once or twice per season. It's also handy for small engine repair enthusiasts and anyone with a collection of garden tools like hoes, axes, or hatchets that need a quick touch-up. If you have a drill and a few minutes, you can restore a usable edge without setting up a bench grinder or taking blades to a shop.
A Complete Practical Guide to Sharpening Mower Blades With Rotary Tools
Sharpening a lawn mower blade with a high-speed rotary tool provides an accessible way to recondition cutting edges without removing excessive metal. Rotary tools spin at high revolutions per minute, allowing abrasive grinding stones to smooth out minor nicks and restore the manufacturer bevel quickly. Achieving a clean cut depends on holding a stable angle, maintaining moderate tool pressure, and verifying that the blade remains balanced before reinstallation. Understanding every phase of this maintenance task protects your lawn from shredded grass tips and shields your mower spindle from destructive vibration.
Understanding Mower Blade Edge Geometry and Rotary Tool Mechanics
Lawn mower blades cut grass through high-velocity impact rather than razor-thin slicing action. Most manufacturer specifications call for a cutting bevel between 30 and 35 degrees, leaving a blunt leading edge roughly the thickness of a butter knife. Grinding a blade to a razor-thin point weakens the steel matrix, making the edge prone to chipping, rolling, or denting whenever it contacts small pebbles or dense debris. A rotary tool fitted with an angled sharpening collar ensures that the grinding stone tracks along this predetermined plane consistently across the entire cutting length.
Rotary tools excel at controlled material removal because their lightweight design reduces hand fatigue during repetitive strokes. Unlike heavy angle grinders that can gouge steel rapidly, rotary units allow you to take measured passes along the cutting edge. This precision helps prevent excessive heat buildup, which can ruin the heat treatment and temper of the steel blade. Keeping the metal cool preserves hardness and ensures that your sharpened edge survives multiple mowing sessions without dulling prematurely.
Essential Safety Measures and Deck Disassembly Protocols
Safety preparation must always precede any physical contact with the cutting assembly. Before tilting or reaching under any mower deck, disconnect the spark plug boot on gas models or remove the safety key and battery pack on cordless electric units. Disconnecting the power source prevents accidental engine turnover should the blade rotate while you work. Always wear heavy leather work gloves and impact-resistant safety glasses to shield your hands from sharp edges and protect your eyes from flying metal grit.
Removing the blade from the mower spindle provides the safest and most accurate sharpening experience. Wedge a sturdy scrap wood block between the blade tip and the deck wall to lock the spindle in place while loosening the mounting bolt. Standard blade hardware turns counterclockwise for removal, though certain dual-blade timed systems utilize reverse threads on specific spindles. Mark the bottom face of the blade with a piece of chalk or masking tape to guarantee correct orientation when reinstalling the component later.
Rotary Tool Configuration, Collet Matching, and Abrasive Selection
Setting up your rotary tool properly ensures smooth operation and consistent edge bevels. Attachments like the Dremel A679-02 Sharpening Attachment Kit thread directly onto compatible rotary housings, providing a fixed guide that maintains the recommended 30-degree grinding angle. Similar aftermarket guides, such as the WEN Blade Sharpening Guide for WEN and Dremel or the Upgraded Lawn Mower Blade Sharpener Compatible rotary collar from MAVOREXA, utilize reinforced composite housings to support steady blade contact. Matching the guide collar to your rotary model ensures that the tool rests flat against the blade body throughout each pass.
Abrasive selection dictates how efficiently the rotary tool reshapes dull steel. Aluminum oxide grinding stones, such as the Dremel 932 cylindrical stone, handle carbon steel blades effectively without loading up too quickly. Ensure that your rotary collet matches the stone shank diameter precisely, tightening the collet nut securely to eliminate shaft wobble at high operating speeds. Operating the tool within a moderate speed range of 15,000 to 20,000 RPM delivers steady grinding power while minimizing the risk of overheating the abrasive matrix.
Securing the mower blade in a heavy bench vise ensures stability while grinding. Clamp the blade horizontally or at a slight upward angle with the beveled cutting edge facing toward your working side. Padding the vise jaws with scrap wood or soft jaw covers prevents unwanted gouges in the center section or mounting hole interface. A stable clamping setup keeps your hands steady, enabling smooth, uninterrupted passes along the cutting wing.
Step-by-Step Sharpening Technique and Angle Control
Begin the sharpening process by resting the guide shoe flat against the unsharpened flat surface of the blade. Power on the rotary tool, bringing it up to operating speed before bringing the spinning stone into contact with the steel. Glide the grinding attachment smoothly along the beveled edge from the inside corner outward toward the blade tip. Maintain light to moderate downward pressure, allowing the high-speed abrasive to do the cutting work without bogging down the motor.
Count your passes across each cutting wing to remove an equal amount of material from both ends. Typically, four to six consistent strokes suffice to remove minor dullness and smooth out slight nicks. If you encounter deep gouges caused by rocks, avoid grinding excessively in a single spot to chase the flaw away. Removing too much metal locally alters the blade profile and significantly disrupts rotational balance across the spindle.
Check the surface temperature of the blade frequently during the grinding cycle. If the steel begins to discolour into a blue or purple tint, the metal has become too hot and lost its factory temper. Pause between passes to allow the steel to cool naturally in the air, or wipe the edge with a damp rag to draw heat away. Keeping passes brisk and continuous prevents localized hot spots from forming along the cutting bevel.
Managing the Trailing Burr and Underside Dressing
Grinding the top bevel inevitably pushes a thin ridge of rolled metal, known as a burr, onto the flat underside of the blade. Leaving this burr intact creates a false edge that breaks off during the first few rotations against grass, leaving a jagged surface behind. To remove the burr properly, flip the blade over or access the underside while keeping your tool parallel to the flat plane. Never grind a secondary bevel onto the bottom face of a standard mower blade, as this disrupts airflow and lifting aerodynamics inside the cutting deck.
Deburring requires only a very light pass with a flat abrasive stone or hand file. Lay a fine-grit hand stone or a specialized handheld hone flat against the underside of the cutting wing. Sweep the hone across the flat surface from heel to tip using light, even pressure until the rolled metal flakes away completely. Once the bottom surface feels smooth to a gloved touch, the newly dressed edge is clean, uniform, and ready for balancing.
Blade Balancing and Spindle Vibration Prevention
Balancing is an indispensable step after any blade-sharpening procedure. When one wing carries more weight than the opposite wing, the imbalance produces severe high-frequency vibration when spinning at full throttle. This vibration accelerates wear on spindle bearings, loosens deck hardware, and degrades the cutting performance of mowers built for uneven ground where decks already endure significant mechanical stress. Verifying weight symmetry takes only a couple of minutes and protects your entire cutting deck from premature structural fatigue.
Static cone balancers, such as the stepped units included in kits like the HIMOEPA Lawn Mower Blade Sharpeners or the Lawn Mower Blade Sharpener Rotary Lawnmower Blades set from EINDER, offer a simple testing method. Place the balancer on a level workbench and rest the blade center hole over the corresponding stepped tier. If the blade dips toward one side, the dipping wing is heavier and requires additional metal removal. Precision balancers made from machined zinc or aluminum alloys, such as those supplied with the Kimgsoak Lawn Mower Blade Sharpener kit, provide sensitive feedback for wider commercial or tractor blades.
Correct an imbalance by removing metal exclusively from the heavy wing’s trailing edge or back flat, never from the cutting tip itself. Take a light pass with your rotary tool along the back spine of the heavy side, then return the blade to the balancer cone to recheck level. Repeat this micro-adjustment until the blade rests horizontally without listing to either side. Achieving static balance ensures that both cutting wings rotate smoothly along an identical cutting plane.
Rotary Attachments Versus Drill-Mounted Stones and Manual Sharpeners
Homeowners often weigh rotary tool setups against alternative sharpening tools available on the market. Rotary attachments with dedicated guide collars offer superior angle consistency compared to freehand drill stones. Drill-mounted corundum wheels, such as the Bneykrir 4Pcs Lawn Mower Blade Sharpener,Universal kit or the Lawn Mower Blade Sharpener from IRONHIT, attach via a 1/4-inch shank and spin against the blade at drill speeds around 4,000 RPM. While drill stones work rapidly for coarse maintenance, the flexible plastic or metal guides on rotary tool collars provide tighter control over the finished bevel profile.
Diamond-coated abrasive wheels present another viable option for drill users. The Diamond Lawn Mower Blade Sharpener for Any Power tool from KURSTOL uses a 120-grit electroplated diamond surface on a steel matrix, resisting the grooving and wear common with softer corundum stones. Diamond abrasives cut aggressively and generate less friction, but they lack the integrated guide collar found on specialized rotary attachments. For quick touch-ups without power cords or batteries, manual multi-tools like the SHARPAL 103N All-in-1 Knife Garden Tool utilize preset carbide slots that hone edges safely using hand power alone.
Rotary tools remain a preferred middle ground between handheld manual scrapers and bulky bench-mounted grinders. A rotary setup gives you the speed of power grinding alongside the finesse required to preserve original factory contours. When matched with quality abrasives and sturdy angle guides, rotary tools deliver uniform results without requiring specialized workshop machinery. This flexibility makes rotary sharpening an attractive, space-saving solution for residential garage workstations.
Inspection Boundaries: When to Resharpen and When to Replace
Regular maintenance can extend the working life of standard cutting edges, but every mower blade eventually reaches a mechanical retirement limit. Carefully inspect the blade body for cracks, severe twists, or deep indentations near the center mounting hole before starting any sharpening session. If the blade has struck rocks or tree roots and developed a visible bend, attempting to straighten and sharpen it introduces dangerous structural weak points. In such situations, installing dedicated replacement mower blades ensures safe operation and restores true deck cutting geometry.
Check the thickness of the cutting sail and trailing lift wing during your inspection. High-lift and mulching blades experience constant abrasive wear from sand and soil circulating within the mower deck. If the metal behind the cutting edge has eroded to a paper-thin profile, the sail can fracture during operation and launch dangerous metal fragments across your lawn. Discard any blade that exhibits severe thinning or sail erosion, replacing it with a manufacturer-approved component to maintain safe operating standards.
Reinstalling your sharpened blade with correct mounting hardware and proper torque completes the job safely. Position the blade according to your original orientation marks, ensuring that the curved sail points upward toward the deck undercarriage. Tighten the central blade bolt firmly to manufacturer specifications, using a block of wood to hold the spindle stationary during final torquing. Routine inspection, balanced grinding, and disciplined angle control keep your mower cutting cleanly and your lawn flourishing throughout the growing season.


Write Your Review
No reviews yet. Be the first to share your experience!