


Brake adjustment on a riding lawn mower typically involves tightening the brake cable or replacing worn friction pads to restore stopping power. If your mower rolls when the brake pedal is pressed or takes longer to stop than usual, the brake system likely needs attention. This issue is common in older machines where cables stretch or pads wear down over time.
Many homeowners prefer to handle this maintenance themselves because it is a straightforward mechanical task. Understanding the specific brake type on your mower, whether it is a cable-actuated drum brake or a hydraulic system, is the first step. The options listed below include replacement parts that fit various popular transaxle models, ensuring you have the correct components for your specific machine.

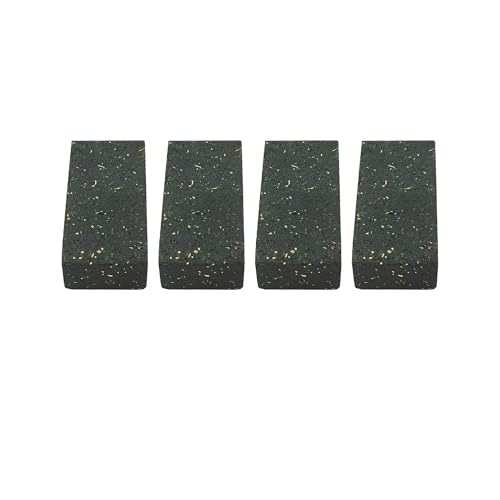


Pros
- Accurately sized to slide directly into original equipment caliper slots
- Restores firm pedal response and reliable parking brake function
- Includes both friction pads required for standard transaxle setups
- Straightforward installation using basic garage hand tools
Cons
- Pucks only; does not include replacement return springs, pins, or caliper hardware
- Requires manual clearance adjustment with feeler gauges for optimal pedal feel
- Limited to specific mechanical transaxle models from older riding tractor generations
The ActyGo 532120951 Friction Puck Set is a specialized replacement brake pad pair built for mechanical disc brakes on residential riding mowers and lawn tractors. Over multiple seasons of mowing, factory friction pucks wear thin, causing loose brake pedal travel, weak parking brake retention, or total loss of stopping power. This two-piece set is tailored for DIY homeowners, farm property managers, and small-engine technicians who prefer fixing mechanical components themselves rather than buying costly complete caliper assemblies.
In terms of build and function, these pads match original equipment specifications closely at 1-5/16 inches long, 1/2 inch wide, and 11/32 inches thick. Constructed from dense friction-resistant composite material, the pucks hold up well against the rotational heat and abrasive grit common around mower deck gearboxes. Once properly seated against the transaxle brake rotor, they restore positive brake engagement, ensuring you can halt the tractor safely on slopes and secure the parking latch during yard work.
Servicing these pucks in the workshop requires only basic mechanic tools, though access usually involves removing the right rear tire and brushing away accumulated grass clippings from the transaxle housing. You will need to inspect your existing caliper pins and mounting bolts carefully, as this kit provides only the friction pucks themselves. Setting the proper gap between the rotor and pads using the caliper adjustment nut is crucial to avoid dragging while mowing.
For anyone maintaining classic Craftsman LT1000 mowers, Husqvarna LT models, or Poulan tractors, this friction puck pack provides a simple and dependable fix. It brings vital safety equipment back to factory spec with minimal bench time, keeping older yard machinery operating reliably season after season.
This friction puck set directly replaces OEM part numbers 532120951 and 120951X. It is designed to fit a wide range of riding lawn tractors manufactured by American Yard Products (AYP), Husqvarna, Craftsman, and Poulan.
Confirmed equipment matches include Craftsman LT1000 models, Poulan PP1242, PP1242A, PP1438B, and PP1442, as well as Husqvarna LR 12, LR 120, LR 121, LT 120, LT 125, and YT 150 series tractors. AYP applications include PP1136J, PP11536K, PP12542J, PP14542K, PP1644J, PP1844K, XC1122B, and Y1846A series.
Always verify your mower's parts manual and measure your worn pads against the stated dimensions (1-5/16 inch length, 1/2 inch width, 11/32 inch thickness) prior to ordering.
Before touching any components, identify the brake mechanism on your specific transaxle. Most walk-behind and riding mowers use a simple cable system that pulls a lever to engage the brake shoes against a drum. Some newer models use hydraulic systems, which require different tools and procedures. Knowing which system you have prevents incorrect adjustments that could damage the mechanism or reduce safety.
| Component | Typical Location | Adjustment Method |
|---|---|---|
| Brake Cable | Under seat or near pedal | Turn adjuster nut to tighten |
| Brake Pads | Inside transaxle drum | Replace if worn below limit |
| Brake Lever | Transaxle housing | Check for free play |
Check the following items before starting the adjustment process to ensure you have the right tools and parts ready.
- Verify the mower is on flat ground with the engine off.
- Locate the brake cable adjuster near the pedal assembly.
- Inspect the brake pads for visible wear or glazing.
- Confirm the correct part number for your transaxle model.
- Ensure you have a wrench or pliers for the cable nut.
Identifying Worn Brake Pads and Cable Issues
Worn brake pads are the most common cause of reduced braking performance. As the friction material wears down, the distance between the shoe and the drum increases, requiring more cable tension to engage the brakes. If the cable is already at its maximum tension and the brakes still feel weak, the pads likely need replacement. Glazed pads, which appear shiny and hard, also lose friction and may not stop the mower effectively.
Cable stretch is another frequent issue. Over time, the internal strands of the cable can elongate, reducing the mechanical advantage of the pedal. This results in a spongy pedal feel and increased travel before the brakes engage. You can check for cable stretch by measuring the pedal travel; if it exceeds the manufacturer’s specified range, the cable may need adjustment or replacement. Always replace cables in pairs if possible to ensure consistent tension.
Step-by-Step Cable Adjustment Procedure
Start by lifting the mower slightly so the wheels can spin freely. This allows you to test the brake engagement without the weight of the machine interfering. Locate the cable adjuster, which is usually a threaded barrel or a nut near the pedal linkage. Turn the adjuster clockwise to tighten the cable and counter-clockwise to loosen it. Make small adjustments, no more than a quarter turn at a time, to avoid over-tightening.
After each adjustment, press the brake pedal and check the wheel movement. The wheel should stop immediately and not roll when the pedal is held. If the wheel still moves, tighten the cable further. If the pedal feels too stiff or the wheel does not spin freely when the brake is released, you have over-tightened the cable. Loosen it slightly until the wheel spins freely without the brake pedal being pressed. This balance ensures responsive braking without dragging.
Replacing Brake Pads for Worn Systems
If cable adjustment does not resolve the issue, the brake pads likely need replacement. Accessing the pads usually requires removing the transaxle cover or the entire transaxle unit. This is a more involved task that may require specific tools. Before removing any parts, photograph the assembly to help with reinstallation. Ensure the new pads match the exact dimensions and part number of the original components. Using incorrect pads can lead to poor braking performance or damage to the drum.
When installing new pads, ensure they are seated correctly in the brake shoes. The friction material should face the drum, and the backing plate should align with the shoe hardware. Apply a small amount of high-temperature grease to the pivot points if specified by the manufacturer. This reduces noise and ensures smooth operation. After reassembly, test the brakes thoroughly. The mower should stop quickly and the wheels should not drag when the brake is released.
Safety Checks and Verification
Always perform brake adjustments on a flat, stable surface. Engage the parking brake if available, and block the wheels to prevent accidental movement. Never work on the brake system while the engine is running or the key is in the ignition. Disconnect the spark plug wire to prevent accidental starting. This simple step prevents serious injury from unexpected movement. Follow the manufacturer’s safety guidelines for your specific mower model.
After completing the adjustment or replacement, perform a test run in a safe, open area to verify the system.
- Drive the mower at a low speed and apply the brakes to check for responsiveness during the test.
- Listen for any grinding or squealing noises, which may indicate improper installation or debris in the system.
- Check the pedal feel; it should be firm but not stiff to ensure proper mechanical function.
- If the brakes feel weak or the mower takes longer to stop, recheck the cable tension and pad seating.
- Properly adjusted brakes are essential for safe operation on slopes and in crowded areas for user safety.
Common Mistakes to Avoid
One common mistake is over-tightening the brake cable. This can cause the brake shoes to remain in contact with the drum, leading to excessive wear and heat buildup. It can also make the mower difficult to start and reduce fuel efficiency. Always ensure the wheels spin freely when the brake pedal is released. Another mistake is ignoring the root cause of the problem. If the pads are worn, adjusting the cable is only a temporary fix. The pads will eventually wear through, causing further damage to the drum.
Using the wrong replacement parts is another frequent error. Brake pads are specific to transaxle models, and using a generic pad that does not match the exact dimensions can lead to poor fit and performance. Always verify the part number and dimensions before purchasing. Additionally, failing to clean the brake drum before installing new pads can introduce debris that scratches the new friction material. Use a clean cloth to wipe down the drum and shoes before assembly. These precautions ensure a long-lasting and reliable brake system.
When to Seek Professional Help
While basic cable adjustment is a DIY task, more complex issues may require professional attention. If the brake lever is bent or the transaxle housing is damaged, a mechanic can assess the extent of the repair. Hydraulic brake systems are more complex and may require specialized tools for bleeding the lines and checking fluid levels. If you are unsure about the procedure or lack the necessary tools, consider taking the mower to a qualified service center. They can ensure the brakes are adjusted to the manufacturer’s specifications.
Regular maintenance is key to preventing brake failures. Check the brake cable tension and pad wear at the start of each mowing season. This proactive approach prevents unexpected issues during use. Keep the brake system clean and free of grass clippings and debris, which can interfere with movement. By following these guidelines, you can maintain safe and effective braking performance on your riding lawn mower. For more information on maintaining other components, see our guide on lawn mower for slopes to understand how braking affects stability on uneven terrain.
Proper brake adjustment is a critical safety task that every mower owner should understand. Whether you are tightening a cable or replacing worn pads, the goal is to ensure the mower stops reliably and safely. Take the time to inspect the system regularly and address any issues promptly. This simple maintenance can prevent accidents and extend the life of your equipment. Always prioritize safety and follow the manufacturer’s instructions for your specific model.




Write Your Review
No reviews yet. Be the first to share your experience!