


Routing the deck belt correctly is the fastest way to restore power to an Ariens zero-turn or riding mower after a replacement. Many owners struggle because the belt path involves multiple pulleys and tensioners that must be engaged in a specific order. Getting this wrong can cause the belt to slip, wear prematurely, or even snap during operation, leading to costly repairs.
This article explains the practical steps for installing a new belt, focusing on safety, correct routing, and tension verification. We will look at how to identify the right belt size, the order in which to thread it around the idler and blade pulleys, and how to ensure the deck is ready for use. If you are also working on the blade assembly, our guide on removing mower blades provides useful context for accessing the deck area safely.

Pros
- Direct OEM dimension match ensures proper pulley seating and belt tension
- Restores blade speed and eliminates belt slip in overgrown turf
- Significantly more affordable than original manufacturer dealership parts
- Simple drop-in replacement using common workshop hand tools
Cons
- Requires dropping the mower deck and loosening pulley guides for installation
- Aftermarket composite may wear faster under heavy commercial turf usage compared to heavy aramid cord belts
The LESIONGO 21546607 is an aftermarket replacement deck belt engineered specifically for Ariens riding lawn tractors equipped with 46-inch cutting decks. When your tractor begins leaving stragglers in tall grass, squealing under load, or losing blade speed entirely, a stretched or glazed belt is usually the main issue. This replacement part directly serves homeowners, rural property owners, and DIY mechanics looking to restore clean cutting action without paying dealership prices.
Built to factory dimensions of 1/2-inch in width and 105-3/4-inch outer length, this belt fits deep into the pulley grooves of the deck assembly. The durable rubber construction flexes easily around spring-loaded idler pulleys while maintaining the tension required to spin dual blades efficiently. By eliminating unwanted slack, the belt transfers torque cleanly from the tractor PTO to the spindles, reducing vibration and preventing belt roll-off during quick throttle shifts.
Replacing a mower belt is a standard seasonal workshop job, requiring basic tools like a socket set, pliers, and jack stands or car ramps. Because the rubber maintains reasonable flexibility right out of the package, threading it through the guide pins and around the spindle pulleys is relatively straightforward once the deck is lowered. DIYers will appreciate that the dimensions match factory routing diagrams, eliminating the trial-and-error often associated with generic universal belts.
Keep in mind that while this belt handles typical residential lawn maintenance with ease, running over thick roots, buried rocks, or heavy wet brush can accelerate wear on any standard rubber belt. Checking pulley alignment, clearing debris from deck guards, and ensuring spindle bearings spin freely will significantly extend the life of the belt. For routine seasonal tune-ups and keeping your Ariens tractor cutting level, this belt is a practical, budget-friendly maintenance fix.
This replacement deck belt replaces OEM part number Ariens 21546607. It is designed to fit 46-inch mower decks on the following Ariens lawn tractor models:
Compatible Models: 936001, 936039, 936050, 936053, 936056, 936057, 936063, 936066, 936071, 936075, 936077, 936085, and 936086.
Before installing, always inspect the underside of your mower deck to verify that your spindle bearings spin freely and your idler pulleys have not developed sharp edges or flat spots that could damage the new belt.
Pros
- Reinforced with durable aramid cords for exceptional heat and stretch resistance
- Direct fit replacement for common OEM numbers across Ariens and Gravely
- Smooth belt profile reduces slippage on pulleys under thick grass loads
- Broad compatibility across multiple popular 42-inch and 50-inch mower decks
Cons
- Installation requires loosening deck tension springs and following proper routing diagrams
- Specific to select models, requiring careful verification of deck size and part numbers before ordering
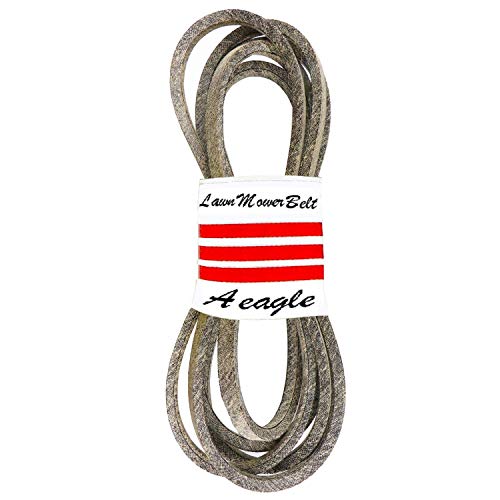
The Aeagle 07200523 Replacement Deck Belt is a specialized outdoor power equipment drive component designed to restore crisp blade rotation on residential zero-turn mowers and lawn tractors. Measuring 1/2 inch in width and 130 inches in outer circumference, this replacement belt transfers power from the mower engine clutch directly to the deck spindle pulleys. It is primarily engineered for suburban homeowners, rural property owners, and DIY lawn care enthusiasts who want to keep their Ariens, Gravely, or Toro equipment cutting cleanly without paying steep dealership markups.
A standout feature of this belt is its aramid cord construction. In demanding mowing conditions, such as cutting damp spring grass or powering through thick summer growth, conventional polyester belts can stretch, glaze, and slip under high friction. Aramid fibers offer superior tensile strength and thermal stability, which helps prevent premature elongation and surface cracking. For homeowners maintaining a large yard before a weekend barbecue, this extra resilience translates to consistent blade tip speed and a cleaner, more even lawn cut.
In practical lawn maintenance, deck belt health directly impacts grass handling. A worn, loose belt leads to uneven cuts, uncut strips of grass, and poor discharge velocity, whether you are mulching clippings back into the turf or ejecting thick growth via side discharge. By matching OEM dimensions for Ariens 07200523 and Toro 93-3884, this belt seats securely into pulley grooves, reducing vibration and preventing unexpected roll-off when engaging the electric PTO clutch on uneven terrain.
Fitment covers a broad lineup of widely owned machines, including Ariens Ikon-X 42, Ikon-XL 42, Ikon-XD 42, and Zoom series, alongside Gravely ZT and ZTX models ranging from 34-inch to 50-inch decks. It also fits older Toro XL series tractors with 44-inch decks. While installation is straightforward for anyone comfortable with routine mower maintenance, it does require releasing spring-loaded idler pulleys and following the deck routing schematic carefully. Homeowners should always confirm their mower model number and deck size prior to purchase, as belt lengths vary widely even within the same mower family.
For property owners seeking a durable, budget-conscious replacement before the peak mowing season kicks off, this aramid-reinforced deck belt provides a sensible and practical option. It pairs strong build materials with exact factory dimensions, making it a reliable spare to store on a garage shelf or install right away for uninterrupted weekend mowing.
Routine deck belt inspection is one of the easiest ways to prevent sudden breakdowns while mowing. Before each mowing season, take a few minutes to inspect the underside of your mower deck. Look for signs of belt glazing, dry rot, fraying along the edges, or missing chunks of rubber that indicate excessive heat or pulley misalignment.
When installing this new deck belt, verify that all idler pulleys and deck spindles turn smoothly by hand with no grinding or wobble. Clean out accumulated grass clippings and debris around the spindle covers to allow cool air circulation, which prolongs the life of the aramid fibers and prevents unnecessary friction.
Installing a deck belt on an Ariens mower requires careful attention to the belt path and tensioning mechanism. The process is not just about looping the rubber band around pulleys; it involves engaging the idler arm to create slack, threading the belt in a specific sequence, and verifying that the blade assembly is secured.
Before touching the deck, ensure the engine is off, the key is removed, and the spark plug wire is disconnected to prevent accidental starting. This safety step is critical because the blade can spin instantly if the ignition is active.
| Component | Function | Key Check |
|---|---|---|
| Idler Arm | Provides tension | Must be pivoted to create slack |
| Blade Pulley | Drives the blade | Center bolt must be tightened |
| Transmission Pulleys | Drive the wheels | Belt must seat in grooves |
| Deck Belt | Power transfer | Correct length and width |
The first step in the installation process is preparing the deck for belt access. You need to create enough slack in the existing belt (if removing an old one) or ensure the idler arm is in the correct position for the new belt. On many Ariens models, the idler arm is spring-loaded.
To install a new belt, you typically need to pivot the idler arm away from the pulleys to relieve tension. This creates the gap needed to thread the belt around the lower and upper pulleys. Without this slack, forcing the belt onto the pulleys can stretch the rubber or damage the belt surface.
Before starting, verify that you have the correct belt for your specific mower model. Belt sizes vary significantly between 42-inch and 46-inch decks, and even between different model years. Using the wrong size will result in improper tension and poor performance. The belt number is usually found on the old belt or in your owner’s manual. If the old belt is worn out, you may need to measure it carefully or consult the manufacturer’s parts list. Here are the key items to check before you begin the installation:
- Disconnect the spark plug wire to ensure the engine cannot start.
- Identify the correct belt size for your specific mower model.
- Locate the idler arm and understand its pivot point.
- Ensure the deck is clean and free of grass clippings.
- Have a socket wrench ready for the blade center bolt.
- Check that the blade is securely attached before tensioning.
Threading the Belt Around the Pulleys
Once the idler arm is pivoted to create slack, you can begin threading the belt. The specific path depends on your mower model, but it generally involves routing the belt around the transmission pulleys and the blade pulley. Start by placing the belt around the lower transmission pulleys.
Then, guide it over the top pulleys and around the blade pulley. The idler pulley should be the last one engaged, as it provides the tension that keeps the belt tight. If you engage the idler too early, you may not have enough slack to complete the loop.
It is crucial to ensure the belt sits in the grooves of the pulleys, not on the edges. A belt that is riding on the edge of a pulley will wear out quickly and may slip under load. As you thread the belt, check that it is not twisted.
A twisted belt will not run correctly and can cause uneven wear. Take your time with this step, as rushing can lead to misrouting. If the belt is difficult to thread, double-check that the idler arm is fully pivoted and that there is enough slack to work with.
Engaging the Idler and Verifying Tension
After the belt is routed around all the pulleys, you need to release the idler arm to engage the tension. This step is critical because the idler spring provides the necessary force to keep the belt tight against the pulleys. If the idler does not engage properly, the belt will slip, and the mower will not cut effectively. When releasing the idler, ensure it clicks into place or moves smoothly without binding. If it feels stiff or stuck, do not force it, as this can damage the idler mechanism.
Once the idler is engaged, check the belt tension by pressing on the longest span of the belt with your thumb. It should have a slight give but not be loose enough to flap or slip. If the belt is too tight, it can put excessive strain on the bearings and idler arm.
If it is too loose, it will slip and overheat. Adjusting the tension may require repositioning the idler arm or checking for wear in the idler spring. If the tension is incorrect, re-route the belt and try again. Proper tension is essential for the longevity of the belt and the mower’s drivetrain.
After verifying the tension, you should perform a final check of the entire deck assembly. Ensure that the blade is still securely tightened and that all bolts are in place. Rotate the blade by hand (with the spark plug disconnected) to ensure it spins freely without hitting any parts of the deck.
If the blade rubs against the deck or other components, stop and investigate the cause. This could indicate a bent blade, a misaligned pulley, or a debris buildup. Addressing these issues before mowing can prevent further damage and ensure a clean cut.
Common Mistakes to Avoid During Installation
Many homeowners make mistakes when replacing mower belts that can lead to safety hazards or equipment damage. One common error is forgetting to disconnect the spark plug wire. This can result in accidental engine starting, which is extremely dangerous when your hands are near the blade and pulleys.
Always treat the mower as if it can start at any time until you have verified the ignition is disabled. Another mistake is using the wrong belt size, which can cause excessive wear or slippage. Always double-check the belt number against your mower’s specifications.
Forcing the belt onto the pulleys is another frequent error. If the belt does not slide on easily, it is likely that the idler arm is not providing enough slack. Forcing the belt can stretch the rubber or damage the belt surface, leading to premature failure.
Instead, adjust the idler arm to create more slack and try again. Rushing the installation process can also lead to misrouting the belt. Take your time to ensure the belt is in the correct grooves and not twisted. A few extra minutes of careful work now can save you from a costly repair later.
Verifying the Installation and Safety Checks
Before you start mowing, perform a final safety check to ensure everything is secure. Reconnect the spark plug wire and start the engine. Listen for any unusual noises, such as squealing or grinding, which can indicate a loose belt or misaligned pulleys. If you hear a squeal, stop the engine immediately and check the belt tension. A squealing belt is often a sign that it is slipping or not seated correctly in the pulley grooves. Addressing this issue promptly can prevent further damage to the belt and pulleys.
Also, check that the blade is spinning freely and that there is no debris caught in the deck. Grass clippings can accumulate under the deck and interfere with the belt’s movement. If you find any debris, turn off the mower and clear it out before continuing.
A clean deck ensures better cutting performance and reduces the risk of belt damage. If everything sounds and looks good, you are ready to mow. However, keep an eye on the belt during the first few minutes of mowing to ensure it is running smoothly.
Regular maintenance of the mower belt and deck is essential for long-term performance and safety.
- Inspect the belt for signs of wear, such as cracking, fraying, or glazing, and replace it if necessary.
- A worn belt can slip or break, causing damage to the mower, so regular checks are vital.
- If you are unsure about any part of the process, consult your owner’s manual or seek professional assistance.
- Proper installation and maintenance will help you get the most out of your mower and avoid costly repairs.




Write Your Review
No reviews yet. Be the first to share your experience!