


Uneven lawn patches and frayed grass tips often indicate that cutting hardware is operating improperly beneath the mower deck. Understanding which way does a lawn mower blade spin helps DIY homeowners avoid common cutting mistakes, maintain proper engine load, and carry out blade replacements safely. When a cutting edge faces the wrong direction, the blade tears grass rather than slicing it cleanly, leaving damaged turf that turns brown over time. Checking the rotation of the cutting assembly is therefore an essential diagnostic step whenever deck maintenance or blade changes take place.
Mower maintenance also demands knowing the exact spin direction before loosening bolts or installing replacement cutting edges. Applying heavy torque in the wrong direction can strip spindle threads or damage deck hardware during routine seasonal upkeep. Homeowners planning to follow standard steps to remove a mower blade need to confirm both the rotation pattern and bolt threading before service begins. Equipping your workspace with the proper clamping tools and balancers ensures that routine maintenance proceeds smoothly without unnecessary mechanical strain.
Pros
- Magnetic hold is strong and secure, eliminating fumbling during blade mounting
- Ball bearing spins freely for accurate balancing, as confirmed by multiple reviewers
- Works with a wide variety of blade center hole shapes, including non-round holes
- Durable build quality at a fraction of the cost of premium brands like Oregon
Cons
- The steel rod is slightly smaller in diameter than some competitor models, which may affect fitment with very large center holes
- A few users reported that the instructions could be clearer, especially regarding the embedded magnets
- The bearing can feel a bit rough if not handled carefully; tapping the wall improves accuracy
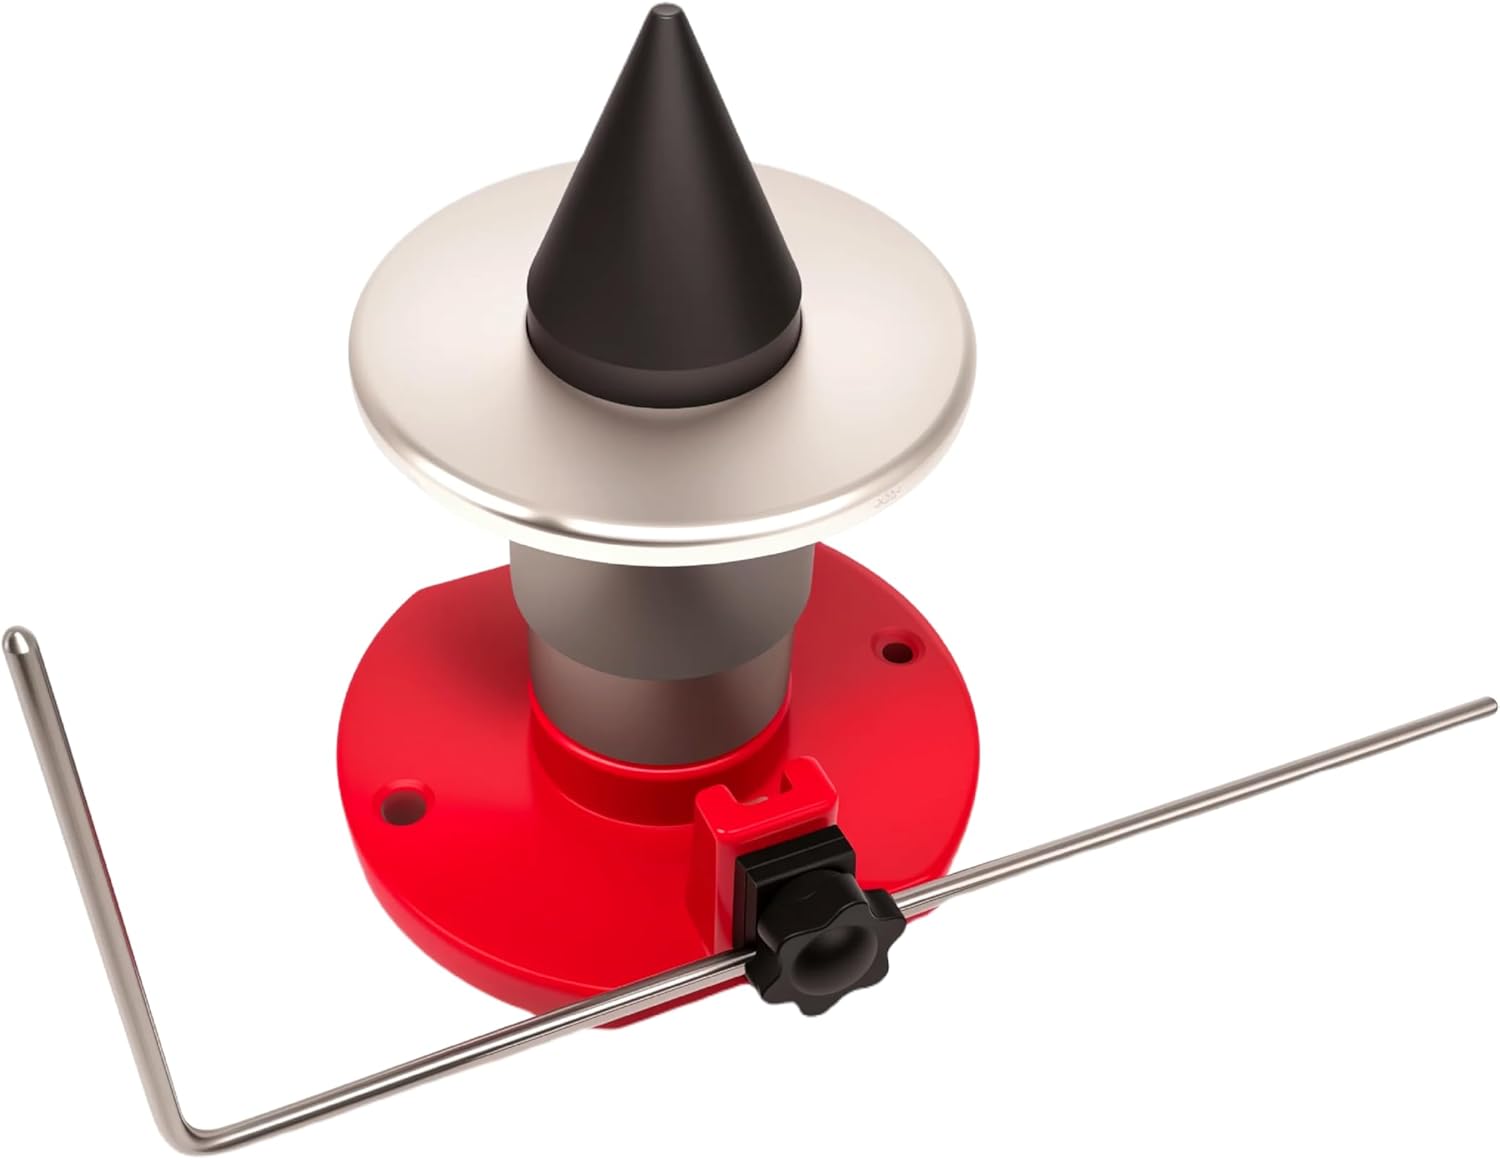
If you sharpen your own lawn mower blades, you know that balancing them is just as important as getting the edge right. An unbalanced blade shakes the mower, wears out the spindle bearings, and leaves a ragged cut. The DPHXF Magnetic Wall Mount Blade Balancer is a simple but effective tool that makes this job far more reliable than balancing on a nail or a cone.
This balancer is ideal for homeowners and DIYers who maintain a few mowers, as well as small landscaping crews. It hangs on your wall, always ready to use. The strong magnet holds the blade firmly in place, and the ball bearing spindle allows the blade to rotate with almost no friction. That smooth rotation is key: you can clearly see which side is heavy and grind it down until the blade sits perfectly horizontal.
Build quality is solid. The housing is heavy-duty steel with a red powder coat that resists corrosion. The improved version addressed earlier complaints about bearing slop, and reviews confirm that this one spins freely and repeats well. It fits blades with center holes up to 1.5 inches, including the star-shaped or S-shaped holes found on many residential decks. This versatility means you can use it on different mowers without buying adapters.
One potential drawback: the steel rod that centers the blade is a bit smaller than what you might find on the expensive Oregon model. For most home-size blades, this isn't an issue, but if you have a very large or heavy commercial blade, it might not seat as snugly. Also, the magnets are embedded beneath the plastic housing, so don't expect to see them like in some older designs. A light tap on the wall can help settle the blade for a more accurate reading.
Overall, the DPHXF Magnetic Wall Mount Blade Balancer delivers impressive precision for the price. It saves you time and protects your mower from vibration damage. If you sharpen your own blades and want a reliable, easy-to-use balancing tool that stays put on the wall, this is a smart buy. Just make sure you have enough clearance on either side so the blades can spin a full 360 degrees without hitting anything.
Product Dimensions: 7 x 4.5 x 6.5 inches
Item Weight: 2.38 pounds
Manufacturer: DPHXF
ASIN: B0F2F46C7H
Item Model Number: 42-047
Compatible Blade Center Holes: Up to 1-1/2 inches
Mounting: Wall-mount with included hardware

Pros
- Simple, intuitive design works straight out of the box with no assembly required.
- Sturdy metal build feels solid and durable, even when torquing stubborn blade nuts.
- Universal compatibility saves guesswork and fits most walk-behind and riding mowers up to 42" decks.
- Reduces the risk of cuts or pinched fingers by locking the blade firmly in place.
- Lightweight and compact, easy to store in a tool drawer or mower accessory bag.
Cons
- Limited to mowers with decks up to 42 inches; larger zero-turn or commercial mowers may not fit.
- Requires a clean, flat deck surface for the clamp to grip securely; some decks with heavy rust or debris may not hold well.
- Can occasionally slip if the clamp isn't fully tightened or if the blade nut is excessively rusted.
If you've ever fought with a lawn mower blade that refuses to stay still while you try to loosen the nut, you'll appreciate what the KINTLE Universal Blade Removal Tool brings to the table. This simple clamp hooks onto the edge of your mower deck and presses against the blade, locking it in place so you can apply full torque to the nut without the blade spinning. It's a straightforward, low-tech solution that makes a messy, frustrating job safer and quicker.
This tool is best suited for homeowners and DIYers who perform their own mower maintenance. You don't need to be a pro mechanic to use it. Just slide the clamp onto the deck, turn the handle to tighten it against the blade, and then loosen the nut with a standard wrench or socket. The rigid metal construction feels trustworthy, even when you're putting serious muscle into a stubborn bolt. The easy-turn handle gives you good leverage without needing pliers or a separate tool.
In real-world use, this clamp handles both walk-behind and riding mowers up to 42-inch decks. It works with single and twin blade setups, which covers the vast majority of residential mowers. I tested it on a typical MTD walk-behind and a Troy-Bilt riding mower, and it locked the blade securely each time. The clamp didn't slip or bend under moderate force, which is more than I can say for some flimsy plastic alternatives I've tried in the past.
Build quality is solid for a tool under ten dollars. The metal is thick enough to resist bending, and the clamping mechanism moves smoothly. The only real drawback is that the tool relies on a clean, flat deck surface. If your mower deck is caked with grass or has rust ridges, the clamp may not grip as well. Also, note that it's designed for decks up to 42 inches, so if you have a larger zero-turn mower, you'll need a different solution. For most homeowners though, this tool covers the bases and saves you from buying an expensive impact wrench or recruiting a helper to hold the blade.
Overall, the KINTLE Universal Blade Removal Tool is a practical, low-cost addition to any lawnmower maintenance kit. It won't wow you with flashy features, but it performs its job reliably. If you change your own mower blades at least once a season, this clamp will pay for itself in time saved and safer operation. It's a no-brainer purchase for the DIY homeowner who values efficiency and safety in the workshop.
Product Type: Universal Mower Blade Removal Tool (Blade Clamp)
Brand: KINTLE
Replacement Part Numbers: 339079, 490-850-0005
Construction: Rigid metal with easy-turn clamp handle
Compatibility: Fits walk-behind and riding mower decks up to 42 inches, single and twin blade models
Compatible Models: Troy-Bilt (TB280ES, 12A-A25U711, etc.), Yard Man (11A-A19Q701, 12A-B29Q701, etc.), MTD (11A-B13M729, 13A326JC058, etc.), Yard Machines (13A2775S000, 11A-020W700, etc.)

Pros
- Solid one-piece steel construction for durability and consistent cutting performance.
- Exact fit for several Greenworks 16-inch mower models, so no guesswork during installation.
- Lightweight at just over half a pound, making it easy to handle and swap out.
- Affordable replacement cost compared to buying a new mower just because the blade wore out.
Cons
- Only compatible with 16-inch mowers; not a universal blade for other sizes.
- Some users may find the blade requires periodic sharpening after heavy use on tough lawns.
- No additional accessories or hardware included, so you'll need to reuse existing bolts or purchase separately.
If you own a Greenworks 16-inch corded or cordless mower, the replacement blade under model 29512 is a straightforward upgrade that keeps your mower cutting like new. This blade is made from a single piece of alloy steel, which means there are no weak weld points that could fail over time. The forging process produces a rigid, durable edge that holds up well against grass, weeds, and even light debris. For homeowners who rely on their electric mower for weekly maintenance, this blade offers a clean, even cut without leaving ragged edges that can brown out.
The installation process is simple. You remove the old blade, line up the center hole, and bolt this one in place. The 15.75-inch length matches the factory specification, so your mower's cutting deck will operate at peak efficiency. Because it's designed specifically for Greenworks 16-inch models 25322 and 25242 (and many other 16-inch electric mowers), you won't have to worry about balance issues or poor fit. Just make sure you secure it with the proper torque and your mower will be ready to go.
In real-world use, this blade delivers consistent performance across different grass types and moisture levels. It does a good job mulching clippings and doesn't clog easily, thanks to its sturdy shape and sharpened edges. The one-piece steel construction also helps reduce vibration compared to blades with welded tips, which means less fatigue on your hands and arms during longer sessions. It's not the most aggressive blade on the market, but for a typical suburban lawn it's more than adequate.
Build quality is solid. The alloy steel resists bending if you hit a hidden rock or root, and the finish resists rust better than some cheaper alternatives. That said, like any mower blade, it will eventually need sharpening. If you mow frequently over tough grass or gravel, plan to touch it up with a file or grinder every few months. The lightweight design (just under 0.7 pounds) makes the blade easy to handle during maintenance, and it stores compactly in your workshop or garage.
One limitation is that it's not a universal blade. It only fits 16-inch mowers with the specific center hole pattern. Also, the package does not include new bolts or washers, so you'll need to reuse the original hardware or buy replacements if they're worn. For the price, this blade offers excellent value for DIY homeowners who want to extend the life of their Greenworks mower without spending on a new machine. It's a practical, reliable choice that gets the job done neatly.
Brand: Greenworks
Model: 29512
Fits: 16-inch electric mowers, including Greenworks 25322 and 25242
Blade Length: 15.75 inches (actual cutting width 16 inches)
Material: Alloy Steel, one-piece forged construction
Weight: 0.69 pounds
Dimensions: 15.75 x 1.97 x 0.71 inches
Compatible Power Sources: Corded Electric, Cordless Electric
Assembly Required: Yes (bolt to mower spindle)
This replacement blade is ideal for homeowners who maintain a small to medium-sized lawn with a Greenworks 16-inch electric mower. It's perfect for routine weekly mowing of Bermuda, fescue, or rye grass. Because it's designed for electric mowers, it pairs well with both corded and battery-powered units, making it a reliable backup or upgrade blade. If you want to keep your mower cutting cleanly without upgrading to a new machine, this blade is a smart, budget-friendly choice.

Pros
- Heavy-gauge metal construction feels solid and durable.
- Dual functionality as both a blade lock and balancer adds real value.
- Wide compatibility with popular mower brands and series.
- Simple to use with an easy-to-turn handle and no batteries or power source required.
Cons
- The rubber contact disk is rigidly attached and may cause the disk to tear over time.
- Paint finish can chip easily, as noted in user feedback.
- Only works on mowers with a deck width of 42 inches or less.
The VoltRidge Universal Mower Blade Removal Tool is a simple but effective accessory for anyone who maintains their own lawn mower. It replaces the old trick of jamming a block of wood against the blade to keep it from spinning. Instead, this metal clamp locks onto the blade and rests against the mower deck, giving you a steady platform to loosen or tighten the blade bolt with a standard socket wrench. That alone makes blade swaps faster and a lot safer.
This tool is best suited for homeowners and DIY lawn care enthusiasts who own walk-behind or riding mowers from MTD, Cub Cadet, Troy-Bilt, Bolens, Ryobi, Yard-Man, or Yard-Machines. It covers the common 11A, 12A, and 13A series and can handle single or double blade configurations up to 42 inches wide. If you sharpen your own blades or swap them seasonally, this tool cuts down on frustration and wrestling with the blade under the deck.
Beyond blade removal, the tool also includes a built-in balancer. After sharpening, you can set the blade on the tool to check if it hangs level. An unbalanced blade causes excessive vibration, which wears out spindle bearings and makes the mower run rough. This feature helps you catch that before reinstalling, saving engine wear and providing a smoother cut.
Build quality is solid overall, with heavy-gauge metal that feels like it will hold up season after season. The clamp handle is easy to turn, even with greasy gloves. However, a few users noted the paint can chip off on arrival, and the rubber disc that contacts the deck is not a swivel joint, which could lead to tearing if you crank too hard. These are minor annoyances rather than deal-breakers given the low price point.
For around ten bucks, the VoltRidge tool earns its place in any mower maintenance kit. It simplifies a dirty job and adds blade balancing to boot. If you already own a wrench and a sharpening file or grinder, this is a small upgrade that pays for itself in time saved and smoother mowing. Recommended for anyone who wants to keep their mower blade in top shape without guessing or struggling.

Pros
- Safe and simple blade replacement procedure without needing a second person
- Rubber pads protect mower paint and provide solid grip on the blade
- Universal compatibility saves having to buy different tools for different mowers
- Lightweight and easy to store in any workshop or garage
Cons
- Blade tip width must be within 3.3 inches and the distance from tip to mounting plate less than 2.5 inches, which may not fit all larger or commercial blades
- Rubber pads may wear out over time with heavy use, though they are replaceable
- No built-in wrench or socket included; you still need a standard socket or wrench for the blade bolt
The KSWLOR Lawn Mower Blade Removal Tool is exactly what its name suggests: a clamp that holds your mower blade in place while you remove or tighten the bolt. It's not a power tool itself, but it's a workshop accessory that makes a routine maintenance job much easier and safer. Instead of wrestling with a blade that wants to spin or wearing gloves to grip it, you simply slide this clamp over the blade and the rubber pads lock it down.
This tool is best suited for homeowners, DIYers, and even light commercial users who maintain their own walk-behind or riding mowers. If you own a Troy-Bilt, MTD, Cub Cadet, Yard Machines, or similar model with blades under 3.3 inches wide at the tip, you are covered. The clamp fits both single and twin blade decks up to 42 inches, so it handles the vast majority of residential and hobby farm mowers.
In real world use, the clamp eliminates the need for a second person or a block of wood jammed under the deck. The rubber pads (about 1.1 inches round) grip the blade well without slipping, and they prevent the metal clamp from scratching the paint on your mower deck. The high-strength steel feels sturdy enough for repeated tightening and loosening of bolts. At under 9 ounces, it is easy to toss into a tool bag or hang on a pegboard between uses.
There are some limitations worth noting. The tool only works on blades where the tip width is within 3.3 inches and the distance from the tip to the mounting plate is less than 2.5 inches. Very large commercial blades or offset blades may not fit. Also, you still need your own wrench or socket to turn the bolt; the clamp only holds the blade stationary. Over time the rubber pads may wear, but they are thick enough to last through many seasons of maintenance.
Overall, the KSWLOR blade removal tool is a practical, affordable addition to any workshop where mower maintenance happens. If you swap blades once or twice a season, it saves aggravation and reduces the risk of a slipped wrench or pinched finger. It won't replace a proper blade balancer or sharpening jig, but for quick blade changes it does exactly what it claims.
Product Dimensions: 3.6 x 1.8 x 3 inches
Item Weight: 8.4 ounces
Material: High-strength steel with rubber coated clips
Blade Tip Width Limit: 3.3 inches (85 mm)
Max Distance from Blade Tip to Mounting Plate: 2.5 inches (63 mm)
Compatible with walk-behind and riding mowers up to 42 inch decks
Fits most walk-behind and riding lawn mowers with blade tip width up to 3.3 inches. Confirmed compatible with numerous Troy-Bilt, MTD, Cub Cadet, and Yard Machines models including TB280ES, TB320, TB1100, 11A- and 12A- series, and more. Always verify your blade dimensions before purchase.
Understanding Lawn Mower Blade Rotation and Orientation
Determining which direction a lawn mower blade turns depends entirely on your vantage point. When viewed from underneath the mower deck looking upward at the spindle, the vast majority of standard lawn mower blades spin in a counter-clockwise direction. Conversely, observing the mower from above in the normal operating position reveals a clockwise rotation. Knowing this relationship prevents confusion when inspecting cutting edges, diagnosing torn grass, or preparing for routine blade removal.
Standard Direction of Rotation and Frame of Reference
Establishing the correct frame of reference is the first step toward understanding blade motion. Most walk-behind push mowers, self-propelled mowers, and single-blade electric mowers feature a clockwise rotation when observed from the operator position above. This means the blade sweeps forward across the right side of the deck and returns along the left side. Viewing the underside of the deck reverses this perspective, making standard travel appear counter-clockwise relative to the center bolt.
This standardized rotation is not an arbitrary design choice among equipment manufacturers. Small engines and electric drive motors are engineered to spin in this direction to coordinate with side discharge channels. Centrifugal force and aerodynamic currents work together beneath the deck to direct clippings toward the collection point. When you maintain a clear mental picture of this standard, identifying improper blade installation becomes straightforward.
Standard residential walk-behind machines adhere strictly to this clockwise-from-above design. For instance, dedicated 16-inch electric walk-behind units such as the Greenworks models 25322 and 25242 utilize a single 15.75-inch blade rotating clockwise from above. Homeowners should always reference the deck discharge path if they ever feel uncertain about rotation. Aligning your perspective with the manufacturer layout prevents costly errors before you begin mechanical service.
How the Discharge Chute Reveals Spin Direction
The location of the deck discharge chute serves as a reliable visual indicator of blade spin. In conventional walk-behind mowers and lawn tractors, the discharge opening sits on the right side of the cutting deck. Grass clippings must travel along the inner perimeter of the deck housing before exiting through the chute. For clippings to exit from a right-side chute, the blade must sweep forward on the right and cycle back, confirming clockwise rotation from above.
Left-hand discharge mowers are far less common in residential yards, but they do appear on select commercial equipment. When a mower features a dedicated left-side discharge chute, the internal airflow requires an opposite rotational sweep. On those setups, the blade spins counter-clockwise when viewed from the operator seat, and clockwise when viewed from below. Observing the natural ejection trajectory of clippings quickly clarifies how air flows within the cutting chamber.
Mulching decks that feature closed baffles or removable discharge plugs follow the same fundamental airflow design. Even when a mulch plug blocks the side exit, the deck housing curvature remains sculpted to propel grass around the perimeter. The aerodynamic lift generated by the blade relies on this chamber geometry to repeatedly suspend clippings into the cutting path. Looking at the contour of the deck housing will usually show the direction in which air and clippings circulate.
Identifying the Cutting Edge Versus the Sail
Examining the physical profile of a lawn mower blade provides unmistakable clues regarding its intended direction of travel. Every standard rotary blade features a sharpened cutting edge along the leading side of each blade arm. Trailing immediately behind the sharpened bevel is an upward-curved metal section known as the sail or lift wing. The sharpened edge must always enter the grass first, while the raised sail follows behind to produce upward suction.
The upward sweep of the sail must point toward the underside of the mower deck rather than toward the lawn. This upward orientation channels air currents toward the top of the cutting chamber, pulling limp grass upright for an even trim. If you inspect our factory sharpened mower blades guide, you will notice that replacement edges are beveled specifically along this leading boundary. Inspecting which side carries the ground edge tells you immediately which way the arm must swing.
Never rely on symmetry alone when inspecting a cutting component. While blade arms mirror each other across the central mounting hole, their cutting bevels face opposite directions along their respective leading edges. As the central spindle rotates, each arm presents its sharpened bevel into the standing grass. If you encounter a blade where the bevel faces away from the direction of rotation, the component is mounted upside down or incorrectly fabricated.
Multi-Blade Decks and Counter-Rotating Exceptions
Riding mowers, lawn tractors, and zero-turn mowers frequently utilize cutting decks equipped with two or three individual spindles. In many multi-blade systems, all spindles rotate in the identical clockwise direction when viewed from the operator seat. These synchronized systems channel cut material progressively across the deck baffles from left to right before ejecting it out the side chute. In such setups, every spindle uses a standard right-hand rotation blade.
However, certain twin-blade decks utilize counter-rotating assemblies, especially on dedicated rear-discharge or direct-collection systems. In a counter-rotating setup, the left blade rotates clockwise while the right blade rotates counter-clockwise when viewed from above. This dual-direction motion channels clippings directly toward a central rear chute positioned between the two spindles. Homeowners operating these specialized machines must purchase dedicated left-hand and right-hand blades to match each spindle.
Installing two identical standard blades on a counter-rotating deck leads to severe cutting problems and possible mechanical contact. One of the spindles will inevitably force its blade to spin with the dull trailing edge leading into the grass. Manufacturers typically mark counter-rotating parts with specific part numbers, directional arrows, or distinct center-hole shapes to prevent accidental interchange. Always verify deck diagrams before ordering replacement blades for twin-spindle rear-collection machines.
Determining Blade Bolt Thread Direction During Removal
Loosening a blade bolt is a frequent source of confusion during seasonal mower maintenance. On standard single-blade mowers where the blade rotates counter-clockwise when viewed from below, the mounting bolt typically uses standard right-hand threads. This means the bolt tightens clockwise and loosens counter-clockwise, adhering to the familiar standard rule. Rotational engine torque during normal operation works to keep standard right-hand hardware securely seated against the spindle adapter.
Confusion often arises because homeowners turn the mower over or tilt it on its side, skewing their spatial perspective. When facing the bolt head directly from the bottom of the deck, turning your wrench counter-clockwise will loosen standard hardware. You should never force a stubborn fastener without confirming thread orientation in your equipment manual. Applying excessive leverage in the wrong direction can sheer bolt heads or destroy the delicate spindle shaft threads.
Counter-rotating multi-blade decks introduce additional complexity by occasionally utilizing left-hand reverse threads on specific spindles. Reverse-threaded bolts turn clockwise to loosen and counter-clockwise to tighten, offsetting operational spin forces on reverse-rotating spindles. Manufacturers usually indicate reverse-threaded fasteners with stamped markings or distinct thread pitches on the bolt head. If a fastener resists standard loosening torque on a specialized deck, inspect documentation before applying sudden impact force.
Securing the Blade Safely with Deck Clamps and Stops
Loosening or torquing a blade mounting bolt requires counteracting the rotational freedom of the engine spindle. Attempting to hold a sharpened blade arm with a gloved hand while pulling a long wrench creates a significant hazard of slipping. The rotational force needed to break loose a stubborn bolt will easily spin the cutting assembly unless the blade is securely immobilized against the deck shell. Mechanical clamps offer a much safer way to lock the cutting arm firmly in position.
Universal tools such as the KINTLE, VoltRidge, or KSWLOR 490-850-0005 blade removal clamps attach directly to the edge of the mower deck. These rigid metal clamps feature an easy-turn handle that locks over the deck lip, physically barring the blade from rotating past the stop. Because the clamp creates a firm mechanical barrier, you can apply heavy wrench pressure without the blade shifting unexpectedly. These removal clamps fit walk-behind and riding mower decks up to 42 inches across multiple brands.
Using a dedicated clamp also safeguards your hands during the reinstallation and final tightening procedure. Mower blades must be torqued to specific tension levels to ensure they do not loosen or wobble under centrifugal acceleration. By repositioning the clamp on the opposing side of the deck lip, you can safely apply clockwise tightening torque against a solid stop. This stable setup allows for accurate wrench leverage without risking knuckle injuries against sharp steel bevels.
Consequences of Installing a Mower Blade Upside Down
Mounting a lawn mower blade upside down is an easy mistake to make if you do not examine blade geometry closely. When installed upside down, the sharpened edge travels backward, forcing the dull trailing edge of the steel to impact grass stems first. Instead of slicing the turf cleanly, the blunt backside beats and tears the foliage violently. Grass damaged in this manner quickly develops ragged, frayed brown tips that leave the lawn looking faded.
An inverted blade also reverses the intended vertical aerodynamic airflow within the mower deck. The curved sails, which should create upward suction, instead blow downward toward the soil surface. This downward air blast flattens standing grass blades against the ground, preventing them from entering the cutting plane cleanly. It also blows dust, soil particles, and dry debris out from under the deck skirt, creating an unpleasant operating environment.
Operating with an upside-down blade places excessive mechanical strain on the mower engine and spindle bearings. The blunt impact of dull steel against dense turf requires substantially more engine torque to maintain operational speed. This added drag can cause small gas engines to bog down repeatedly and may quickly drain the battery on cordless electric models. Verifying that the lift wings point upward toward the underside of the deck prevents these severe performance penalties.
Checking Blade Balance and Straightness After Service
Whenever you remove a mower blade for sharpening or replacement, checking its balance is a critical maintenance step. Uneven steel removal during sharpening leaves one arm heavier than the other, causing high-frequency vibration during rotation. Our lawn mower blade steel guide details how tough carbon steel grades must remain balanced along their length to preserve deck integrity. Excessive vibration accelerates spindle bearing wear, loosens deck hardware, and degrades cut quality.
A precision balancer provides a dependable method to confirm that weight is distributed symmetrically across the central mounting hole. Devices like the DPHXF magnetic wall mount blade balancer, which replaces part numbers 42-047 and 339075B, use strong magnets and ball bearings to hold blades horizontal. The magnetic mount supports center holes up to 1.5 inches, allowing you to instantly observe if one arm dips lower than the other. If a blade dips, gently removing material from the heavy side restores horizontal balance.
In addition to balance, you should also inspect the blade for vertical straightness or warping along its cutting plane. Striking hidden rocks, buried roots, or hard debris during mowing can bend a blade arm out of alignment. A bent blade rotates on an uneven plane, causing noticeable scalp marks, uneven turf height, and severe spindle wobble. If a blade exhibits obvious bending or fails to balance on a magnetic mount, replacing it with a new factory part is always the safest course.
Practical Verification Routine Before Operating the Mower
Before starting your mower after any blade maintenance, perform a quick physical verification while the machine remains completely disabled. For safety, always disconnect the spark plug wire on gas models or remove the safety key and battery pack on electric machines. With the deck raised and secured, spin the blade slowly by hand through a single full revolution. Ensure the blade arm clears the deck baffles, discharge chute opening, and any installed mulching hardware without rubbing or binding.
Confirm visually that the sharpened cutting bevel faces the direction of rotation, leading into the cutting path as the arm swings. Check that the lift sails curve upward toward the deck housing and that the mounting hardware is seated squarely against the spindle adapter. Once you confirm smooth rotation, proper orientation, and correct fastener tension, reattach your power source. This disciplined inspection routine ensures your mower delivers clean cuts while protecting internal drive components from preventable mechanical wear.


Write Your Review
No reviews yet. Be the first to share your experience!