


If your lawn mower fails to start or runs roughly, the ignition coil is a primary suspect. This component generates the high-voltage pulse needed to fire the spark plug, effectively acting as the electrical heart of the engine’s starting process.
Understanding this part helps diagnose issues before they become costly repairs. Many homeowners encounter starting problems during seasonal transitions, where a worn lawn mower coil may struggle to generate sufficient voltage. Identifying the correct replacement requires matching the specific engine model, as coils are not universally interchangeable despite similar appearances. The following details explain the function, common failure modes, and verification steps for this critical ignition component.


Pros
- Affordable fix for common ignition failure on Honda engines
- Simple installation with basic hand tools
- Works across multiple Honda engine families and equipment types
Cons
- Not a genuine Honda part, so long-term durability may vary
- Zero reviews at launch makes it a bit of a gamble until user feedback comes in
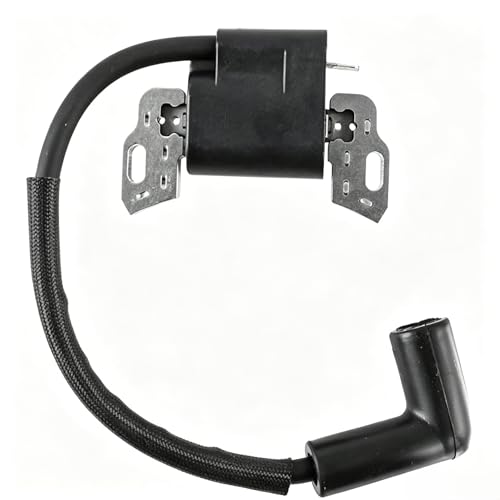
If you own a Honda-powered lawn mower, snowblower, generator, or water pump, you have likely experienced that frustrating moment when the engine refuses to start or runs rough. Often the culprit is a failing ignition coil. The Hipa GCV160 ignition coil is an aftermarket replacement designed to get your equipment back in action without the high cost of a dealer repair. It replaces multiple OEM Honda part numbers, including 30500-ZL8-004 and 30500-Z8B-901, and fits a wide range of engines like the GC160, GCV190, and GC190.
This coil is best suited for DIY homeowners, hobbyists, and light contractors who maintain their own small-engine equipment. It is not a performance upgrade, but rather a direct functional replacement. In real-world use, the coil provides the necessary high-voltage pulse to the spark plug, restoring reliable ignition. Installation is straightforward: remove the old coil, set the proper air gap with a business card or feeler gauge, and bolt the new one in place. Most users can complete the swap in under 30 minutes.
Build quality is decent for the price. The coil is a single metal unit with a rubber-insulated lead wire and a spark plug boot. It feels solid enough for typical homeowner use, though it does not carry the same premium finish as a genuine Honda part. The package includes one coil only, no gapping tool or instructions, so you will want to have a basic tool set handy. The compact size means it stores easily in a toolbox or mower shed.
A realistic drawback is the lack of user reviews at launch. Without field feedback, it is hard to gauge long-term reliability. Some users may prefer to stick with OEM for peace of mind, especially on newer equipment. Additionally, the coil is not compatible with all Honda engines; you must verify your engine model and serial number before purchasing. If you have a GC135 or GSV160, for example, you are in luck, but always double-check.
Overall, the Hipa GCV160 ignition coil is a practical, cost-effective fix for common ignition problems on Honda small engines. It is ideal for anyone comfortable with basic tools and looking to save money on repairs. If you have a non-starting mower or a snowblower that cranks but wont fire, this coil is worth a try. Just confirm your engine specs first, and you will likely be back to cutting grass or clearing snow in no time.

Pros
- Broad compatibility with many Lawn Boy, Toro, and Briggs & Stratton engine models, covering a wide range of mowers and snow blowers.
- Easy to install for anyone comfortable with basic tools; no special skills required for most applications.
- Affordable price compared to OEM parts, making it a budget-friendly option for DIY repairs.
- Solid metal construction with standard form factor, ensuring a secure fit in most applications.
Cons
- Not compatible with Lawn Boy M-series engines, so double-check your engine model before purchasing.
- Some users may find the air gap adjustment tricky; careful measurement is needed for proper spark.
- Limited to gas-powered equipment; no benefit for electric or battery-powered mowers.
If you own a Lawn Boy, Toro, or Briggs & Stratton gas-powered mower or snow blower, the Ruma Ignition Coil (684048, 684049, 99-2911) is a replacement part that can bring your equipment back to life. This coil is designed to restore spark in engines that have lost ignition due to coil failure, a common issue with older or heavily used outdoor power equipment. It is a direct replacement for many OEM part numbers, making it a practical choice for homeowners who prefer to do their own repairs.
This ignition coil is best suited for DIY enthusiasts, budget-conscious homeowners, and anyone with a collection of older Lawn Boy, Toro, or Briggs & Stratton machines. It fits a long list of engine models, including the Dura Force series and many Gold and Silver series engines, as well as Toro snow blowers like the GTS 17gxe. If you are comfortable with basic mechanical tasks, swapping out a faulty coil can save you a trip to the repair shop and keep your equipment running for another season.
In terms of real-world performance, the coil is designed to deliver a reliable spark for starting and running the engine. According to user feedback, it works well when installed correctly, though proper air gap adjustment is critical. The coil's dimensions are standard, so it should fit the mounting holes without modification. It is not a performance upgrade but a functional replacement, so you can expect your mower or snow blower to run as it did when the original coil was working.
Build quality is solid for the price. The coil is made with a metal core and plastic housing, similar to OEM parts. It is not the most heavy-duty component, but it is adequate for typical residential use. The included mounting hardware is basic, and you may need to reuse some original brackets. Rust resistance is not a major concern since the coil is not exposed to moisture in normal operation, but it is wise to keep the area clean and dry.
Installation is straightforward for anyone with a wrench and a screwdriver. You will need to remove the old coil, clean the mounting surface, and set the air gap to the manufacturer's specification (usually around 0.010 to 0.012 inches). Some users find the gap adjustment fiddly, but it is a one-time task. No special tools beyond a feeler gauge are required. Storage is not an issue since the coil stays on the engine. Maintenance is minimal; just keep the area free of debris and check the spark plug connection periodically.
One realistic limitation is that this coil does not fit all Lawn Boy models, specifically the M-series engines. It is also not compatible with electric or battery-powered mowers. Additionally, if your engine has other issues (like a bad carburetor or low compression), replacing the coil alone will not solve the problem. For most homeowners with a simple coil failure, however, this Ruma coil is a cost-effective and reliable fix. It is a good choice for anyone who wants to extend the life of their gas-powered mower or snow blower without spending a lot.
This ignition coil covers a wide range of Lawn Boy, Toro, and Briggs & Stratton engines. It replaces OEM part numbers 684048, 684049, 99-2911, 99-2916, and 92-1152. It fits Lawn Boy engine models in the 680xxx series (680501, 680503, 680521-680568, 681683, 681684, 681905, 681906, 683138, 683281, 683366, 683497, 683789, 683803, 683805, 684075, 684156, 684178, 684187, 684188, 684190, 684305, 684685, 684705, 684711, 684712, and more). It also fits Toro lawn mower models such as 4261, 4262, 4275, 4460, 4600, 4656, 4861, 5070, 5253, 10201, 10211, 10227, 10242, 10243, 10247, 10250, 10252, 10301, 10304, 10312, 10314, 10323, 10324, 10331, 10332, 10342, 10343, 10401, 10415, 10420, 10422, 10424, 10425, 10515, 10518, 10520, 10523, 10525, 10527, 10545, 10546, 10547, 10548, 10590, 10591, 10600, 10601, 10650, 10700, 10725, 10735, 10750, 10760, 10800, 10905, 10915, 11002, 11003, 22240, 22241, 72934, 22260, 22261, 1041C, 4250A, 4505A, 4656A, 10725B, 10735B, 11000, 11000B, 110001 (except M-series). For Briggs & Stratton, it fits engine models 084132, 084133, 084332, 084233, 084333, and more. It also works on Toro snow blowers including GTS 17gxe, CCR2400, CCR2450, CCR2500, CCR3000, CCR3600, CCR3650, 20441, 20442, 20443, 20444, 20708, 20709, 20710, 20711. Always check your engine's model number before purchasing.
Installing the Ruma ignition coil is a straightforward DIY task for most homeowners. Start by disconnecting the spark plug wire to prevent accidental starting. Remove the old coil by unscrewing the mounting bolts (usually two). Clean the mounting surface on the engine to ensure good contact. Position the new coil over the mounting holes but do not tighten fully yet. Insert a feeler gauge (0.010 to 0.012 inches recommended) between the coil armature and the flywheel magnet. Rotate the flywheel to bring the magnet into alignment with the coil. Tighten the bolts while holding the gauge in place. Remove the gauge and double-check the gap by rotating the flywheel slightly. Reconnect the spark plug wire and test the engine. If the engine does not start, check the gap again and ensure all connections are secure. No special tools beyond a feeler gauge and basic wrenches are required. Allow about 15-30 minutes for the job.

Pros
- Affordable price compared to genuine Briggs and Stratton coils
- Comes with installation accessories (spark plug and gap gauge)
- Easy to install for DIYers with basic mechanical knowledge
- Wide compatibility with many popular lawn mower brands and engine models
Cons
- Aftermarket part may not carry CARB certification for engine emissions compliance
- Some users note occasional quality inconsistencies typical of budget replacement parts
- No warranty coverage from the original engine manufacturer
The YAMAKATO ignition coil is an aftermarket replacement part designed primarily for Briggs and Stratton single-cylinder engines commonly found in walk-behind mowers, riding tractors, and zero-turn mowers. It directly replaces OEM part numbers 591459, 492341, and LG492341, making it a versatile option for a wide range of equipment from brands like Toro, MTD, Craftsman, and Cub Cadet.
This coil is best suited for DIY homeowners and small engine hobbyists who are comfortable with basic mechanical tasks. If your mower cranks but doesn't start, the ignition coil is often the culprit. Swapping this unit in can restore spark quickly. The package includes a spark plug and an air gap gauge, which simplifies the installation process and helps you avoid guesswork.
In real-world use, this coil delivers consistent spark output once properly gapped and installed. The build quality is decent for the price; the plastic housing and wire connections feel sturdy enough for typical backyard use. It is not a heavy-duty commercial part, but for seasonal mowing and occasional repairs, it performs reliably.
One limitation to note is that this is an aftermarket component, so emissions certification (CARB) may not apply. If you live in a state with strict emissions regulations, verify compatibility before buying. Additionally, some users have reported minor variations in fit or performance, though this is common with budget replacement parts.
Overall, the YAMAKATO ignition coil is a practical, wallet-friendly fix for a common small engine problem. If you are comfortable turning a wrench and want to get your mower running without spending a lot, this is a solid choice. For heavy-use commercial mowers or those requiring OEM certification, a genuine Briggs part might be a safer bet.
Size: 1 pack
Weight: 0.66 pounds
Product Group: Automotive Parts and Accessories
Compatible OEM Numbers: 591459, 492341, LG492341
Understanding the Lawn Mower Ignition Coil
The ignition coil converts the engine’s low-voltage input into the high voltage required for spark plug ignition. In small engines like those found in push and riding mowers, this part is often integrated with the flywheel magnet, known as an armature or magneto. It produces a pulse of electricity that travels through the spark plug wire to the plug tip, creating the spark that ignites the fuel-air mixture.
| Component | Function | Common Failure Sign |
|---|---|---|
| Primary Winding | Receives low voltage from battery or magneto | Open circuit or short |
| Secondary Winding | Steps up voltage to thousands of volts | Insulation breakdown |
| Spark Plug Wire | Transmits high voltage to plug | Cracks or carbon tracking |
| Mounting Bracket | Holds coil at correct air gap | Corrosion or bending |
Before replacing the coil, verify that the issue is not caused by a faulty spark plug or a blocked air filter. A weak spark can also result from a dirty plug or incorrect gap setting. Checking these simpler items first saves time and money. If the plug is good but the engine still won’t start, the coil is the next logical test point.
- Check the spark plug wire for visible cracks or damage.
- Inspect the spark plug for fouling or excessive wear.
- Verify the air gap between the coil and flywheel magnet.
- Look for corrosion on the coil mounting points and terminals.
- Test for spark by holding the plug near a grounded metal surface.
- Confirm the engine kill switch is in the run position.
How the Coil Generates Spark
The coil operates on the principle of electromagnetic induction. As the flywheel rotates, the magnet passes by the coil’s primary winding, inducing a current. This current flows through the secondary winding, which has many more turns of wire, stepping up the voltage significantly. The resulting high-voltage pulse jumps the gap at the spark plug electrode, igniting the combustion chamber contents.
This process happens rapidly, synchronized with the engine’s timing. If the coil’s internal windings degrade or the insulation breaks down, the voltage output drops below the threshold needed for reliable ignition. This leads to hard starting, misfires, or a complete failure to start. The consistency of the spark is crucial for smooth engine operation and fuel efficiency.
Common Signs of a Failing Coil
Several symptoms indicate a weakening ignition coil. The most common is the engine cranking but not starting, even with fresh fuel and a good spark plug. You might also experience rough idling or stalling under load, such as when cutting thick grass or going up a slight incline. These issues often worsen as the engine warms up, suggesting heat-related electrical resistance.
Visible damage is another clear indicator. Look for burnt spots on the coil housing, melted wire insulation, or significant corrosion on the terminals. A cracked housing can allow moisture to enter, damaging the internal windings. If you see any of these physical signs, replacement is usually the most practical solution rather than attempting repair.
- Engine cranks but fails to start consistently.
- Rough idling or stalling under heavy load.
- Visible burn marks or melted insulation on the coil.
- Corrosion on electrical terminals or mounting hardware.
- Spark is weak, intermittent, or absent entirely.
- Engine performance degrades after warming up.
Verifying Compatibility Before Purchase
Ignition coils are specific to engine models, not just mower brands. A coil for a Briggs & Stratton engine will not fit a Honda engine, even if the mowers look similar. You must identify the exact engine model number printed on the engine’s data plate. This number determines the correct coil part number, mounting style, and wire length. Cross-referencing this number with the replacement part’s specifications is essential.
Many aftermarket coils list a wide range of compatible engine models and OEM part numbers. Check these lists carefully to ensure your specific engine model is included. For example, a coil listed for Honda GCV160 engines may not fit a GCV190, despite the similar names. The physical dimensions and electrical specifications can differ. If in doubt, consult the engine manufacturer’s parts manual or a trusted parts supplier for confirmation.
Some coils are sold as part of a kit that includes the spark plug wire and boot. This can simplify installation and ensure all components are compatible. However, if you only need the coil, buying it separately is often more cost-effective. Always verify that the included hardware matches your mower’s existing setup to avoid fitment issues.
For detailed guidance on other maintenance tasks, our push mower blade replacement guide offers similar step-by-step instructions for common repairs. Understanding basic engine maintenance helps you tackle issues like coil replacement with confidence.
Installation and Safety Precautions
Always disconnect the spark plug wire before working on the engine to prevent accidental starting. This is a critical safety step that prevents injury from moving parts. Allow the engine to cool down if it has been running recently. Wear safety glasses and gloves to protect against sharp edges and hot components. Having the right tools, such as a socket set and screwdrivers, makes the process smoother.
When installing the new coil, ensure the mounting bracket is secure and the air gap is correct. The manufacturer’s specifications usually provide the recommended gap, often measured in thousandths of an inch. An incorrect gap can lead to weak sparks or no spark at all. Connect the spark plug wire firmly to the coil terminal and the plug. Reconnect the battery or magneto power source and test the ignition.
If the engine still doesn’t start after coil replacement, recheck the spark plug and fuel system. Ensure the fuel is fresh and the air filter is clean. Persistent issues may indicate a deeper problem with the engine’s compression or fuel delivery. Following the manufacturer’s safety guidelines and using proper tools ensures a safe and effective repair.
Maintenance Tips for Longevity
Regular inspection of the ignition system can prevent unexpected failures. During seasonal maintenance, check the spark plug wire for cracks and the coil terminals for corrosion. Clean any corrosion with a suitable electrical contact cleaner. Ensure the coil mounting is tight and free from vibration-induced loosening. These simple checks can extend the life of the ignition components.
Keep the engine compartment clean and dry. Dirt and moisture can accumulate on the coil, leading to insulation breakdown. Use a dry cloth to wipe away debris. Avoid using high-pressure water directly on the engine when washing the mower. If water does get inside the coil, allow it to dry completely before attempting to start the engine. Proper storage in a dry location also helps protect electrical components from damage.
Using the correct grade of fuel and maintaining proper oil levels also supports overall engine health, including the ignition system. A well-maintained engine puts less stress on the coil, reducing the likelihood of premature failure. Regular tune-ups, including spark plug replacement, ensure the ignition system operates within its optimal parameters. This proactive approach saves time and money in the long run.



Write Your Review
No reviews yet. Be the first to share your experience!