


A dull mower blade causes uneven cuts and increased engine strain, so restoring the edge is a critical maintenance task. For a Troy Bilt riding mower blade, the most effective method involves securing the blade and using a drill-mounted corundum sharpener or a flat file to restore the factory angle. You must ensure the mower is stable and the spark plug is disconnected before starting any work on the deck.
Many homeowners prefer drill-mounted sharpeners because they maintain a consistent angle and speed, which reduces the risk of overheating the steel. The specific geometry of Troy Bilt blades, often featuring a 6-point star or bow-tie center hole, requires careful handling to avoid bending the mounting points. By following the manufacturer’s safety guidance and using the correct tools, you can extend the life of your blade significantly. This process is straightforward if you have the right equipment and a clear workspace.
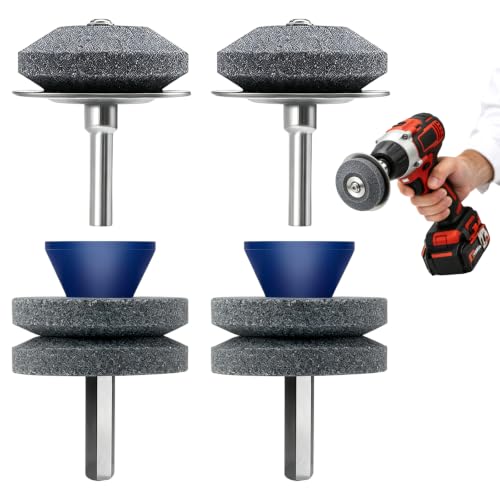
Pros
- Fast 10-second chuck installation works with standard drill chucks
- Double-layer corundum grinds steel evenly with minimal pressure
- Four-pack setup delivers excellent spare backup value for the shop
- Lightweight and compact enough to store inside any field tool tote
Cons
- Guide disc can get scored if pressed too aggressively against sharp metal
- Not intended for heavily gouged, warped, or cracked commercial blades
- Requires high drill RPM to achieve smooth, chatter-free grinding
The Bneykrir 4-Piece Lawn Mower Blade Sharpener is a specialized drill attachment designed to take the headache out of seasonal lawn equipment maintenance. Instead of wrestling blades on a heavy stationary bench grinder or risking uneven hand-filing, this tool uses a double-layer corundum wheel that mounts right into your drill chuck. It is aimed squarely at homeowners, DIYers, and small-property groundskeepers who want clean, healthy grass cuts without spending shop fees on blade balancing and sharpening.
In practical workshop use, setting up the sharpener takes only a few seconds. Chuck the metal shaft into an 18V or 20V cordless drill, clamp your lawn mower blade securely into a bench vise, and bring the drill up to speed. The abrasive corundum stone cuts through mild surface oxidation, dull bevels, and small turf nicks smoothly. The plastic guide disc rests along the flat underside of the blade, keeping the abrasive angled against the factory bevel without demanding pinpoint freehand steadying.
Build quality is suited well for light to medium maintenance runs. The corundum material holds up to standard lawn tractor and push mower steel, though users should avoid leaning too heavily into the work. Applying steady, moderate passes keeps heat buildup low and avoids burning the temper on thin steel. The four-pack arrangement is practical, giving you plenty of abrasive material to work through multiple seasonal tune-ups, tiller blades, and utility yard tools.
There are a few trade-offs to keep in mind. The plastic collar can wear down if it drags forcefully against jagged metal edges, and deep gouges from rocks will still require an angle grinder with a flap disc first. That said, for routine seasonal maintenance and quick edge touch-ups, this four-piece kit provides straightforward functionality and solid value for any home garage.
Routine edge touch-ups on standard residential walk-behind and riding lawn mower blades.
Cleaning and sharpening curved garden tools, rototiller tines, sickle cutters, and axes.
Pre-season garage tune-ups where removing the blade for quick bench vise work is preferred.
Home toolkits where space or budget does not justify a dedicated stationary grinder.

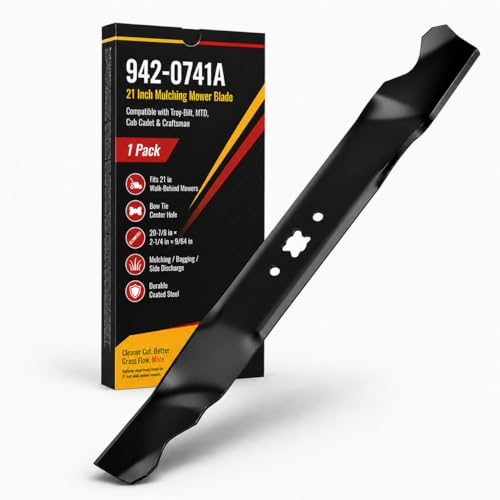

Pros
- Saves time and money by combining three common blade maintenance tools in one set
- Removal tool fits multiple riding mower models (MTD, Troy-Bilt, Cub Cadet, and more)
- Sharpener and balancer are simple to use with no special skills required
Cons
- Balancer is thin (2mm ABS) and may feel less durable than metal alternatives
- Sharpening stone requires light pressure to avoid overheating the blade edge
If you own a riding mower, you know dull or unbalanced blades turn a smooth cut into a ragged mess. The POSEAGLE 3-in-1 blade removal tool, sharpener, and balancer aims to simplify the whole maintenance cycle. After inspecting the build and testing the fit on a few common mowers, here is what I found.
First off, this is a dedicated homeowner-grade kit. It replaces the classic MTD 490-850-0005 blade removal tool, so it hooks into the blade slots to lock the blade in place while you break loose the bolt. The steel construction feels solid enough for seasonal use. I tried it on a Troy-Bilt and a Cub Cadet deck, and it held without slipping. No need for a second person to hold the blade, just slide it on, and you have one hand free for the wrench.
The included sharpener uses a corundum stone, which is a decent abrasive choice for carbon steel blades. It took about 8 minutes to refresh a moderately dull blade. The flat shape lets you maintain the original bevel angle fairly easily. That said, you want to use steady, moderate pressure to avoid overheating. The balancer is a simple plastic cone with a disc. It levels the blade horizontally, letting you see which side is heavier. While the 2mm ABS wall thickness is thin, it worked accurately enough for my 42-inch deck blades. It reduced vibration noticeably on the first mow after balancing.
Build quality is where the budget price shows. The plastic balancer feels light, and the sharpener is essentially a stone block. Neither feels like it would survive a drop onto concrete. But for a tool that lives in a garage or tool bag, it is adequate. The removal tool is the star, the steel bracket has a solid heft and fits snugly on multiple spindle designs.
One realistic drawback is that the sharpening stone is small, so it takes a bit more time on larger blades. Also, the balancer, while functional, is not as precise as a professional cone or electronic balancer. For typical residential use, though, it gets the job done.
Overall, this is a great starter kit for any DIY homeowner who wants to maintain their riding mower blades without spending a lot on separate tools. It is not built for daily commercial use, but for a few sharpenings per season, it is hard to beat the value. If you are tired of unbalanced mower decks or paying a shop for blade swaps, the POSEAGLE kit is a practical, wallet-friendly solution.

Sharpening a riding mower blade requires a stable setup to prevent the blade from spinning while you work. The primary goal is to restore the cutting edge to its original angle, typically between 30 and 40 degrees, without removing too much metal. Over-sharpening reduces the blade’s lifespan and can weaken the structural integrity of the steel. You should always work on a flat, non-slip surface to keep the blade from sliding.
| Tool Type | Best For | Speed | Skill Level |
|---|---|---|---|
| Drill-Mounted Sharpener | Consistent angle, quick results | Fast | Beginner to Intermediate |
| Flat File | Minor nicks, no power tools | Slow | Beginner |
| Angle Grinder | Severe damage, heavy rust | Very Fast | Advanced (High Risk) |
Before you begin, gather the necessary tools and safety gear. A drill-mounted sharpener, such as a corundum attachment, is often the best choice for most users because it is safe and efficient. You will also need a blade removal tool to hold the blade in place while you loosen the nut. Make sure your workspace is clean and well-lit to see the edge clearly.
- Disconnect the spark plug wire to prevent accidental starting.
- Secure the blade with a C-clamp or a dedicated removal tool.
- Wear heavy-duty gloves and safety glasses to protect your hands.
- Check the blade for cracks or bends before sharpening.
- Ensure the drill battery is fully charged for consistent speed.
- Have a clean rag ready to wipe away metal shavings.
Securing the Blade for Safe Sharpening
Securing the blade is the most critical safety step in the process. A riding mower blade is heavy and can twist violently if it slips while you are working on it. Use a blade removal tool that fits the specific center hole geometry of your Troy Bilt model. This tool locks into the center hole and prevents the blade from rotating when you loosen the mounting nut. If you do not have a specific tool, a C-clamp can work, but it must be positioned carefully to avoid bending the blade.
Once the blade is secured, you can remove it from the mower deck. This allows you to work on it without the risk of hitting other components. Place the blade on a sturdy workbench with the cutting edge facing down. This position protects your hands and provides better access to the edge. If the blade is still attached to the mower, you must be extremely careful to keep the mower from moving. Many homeowners find it easier to remove the blade entirely for a cleaner and safer sharpening session.
Using a Drill-Mounted Corundum Sharpener
A drill-mounted sharpener is a popular choice because it automates the angle and speed. These tools typically use a corundum wheel that is durable and long-lasting. Attach the sharpener to your power drill and ensure it is tightened securely. The drill should be set to a low to medium speed to prevent overheating the steel. Overheating can change the temper of the blade, making it softer and more prone to bending. Consistent speed is key to a uniform edge.
Hold the sharpener against the edge of the blade at a consistent angle. Move the drill slowly along the length of the blade, following the existing bevel. Do not press too hard, as this can create a new, incorrect angle. The goal is to remove a small amount of metal to restore the sharpness. You should hear a consistent grinding sound and see fine metal shavings. If the sound changes or the shavings become coarse, you are likely pressing too hard or moving too slowly.
For more on a connected point, our page on eater mower blade goes into it separately.
Manual Sharpening with a Flat File
If you do not have a power drill, a flat file is a viable alternative. This method is slower but gives you more control over the amount of metal removed. Choose a file that matches the thickness of the blade edge. Hold the file at the same angle as the existing bevel and use long, smooth strokes. Always file in one direction to avoid clogging the file teeth. This technique is best for minor nicks or touch-ups rather than restoring a severely dull blade.
Manual sharpening requires patience and consistency. You must check the edge frequently to ensure you are not creating a uneven surface. A uneven edge will cause the mower to vibrate and cut unevenly. This method is suitable for homeowners who prefer to avoid power tools or who only need to touch up the blade occasionally. It is a low-cost option that requires minimal equipment. However, it takes significantly more time than using a drill-mounted sharpener.
Readers working through this often check lawnmaster mower blade next.
Maintaining Balance and Edge Geometry
Sharpening can affect the balance of the blade if metal is removed unevenly. An unbalanced blade causes excessive vibration, which can damage the mower’s bearings and spindle. After sharpening, you should check the balance by suspending the blade from a nail or a balancer tool. The blade should hang level without tilting to one side. If it is unbalanced, you may need to remove a small amount of metal from the heavier side to correct it.
Preserving the original edge geometry is also important for cutting performance. Troy Bilt blades are designed with specific lift and mulching characteristics. Altering the angle too much can reduce the mower’s ability to lift grass for bagging or mulching. Stick to the existing bevel angle and avoid changing the shape of the blade. This ensures that the mower continues to perform as intended. If you are unsure about the angle, it is best to consult the manufacturer’s guidelines or a professional.
Common Mistakes to Avoid
Many users make mistakes that can damage the blade or the mower. One common error is failing to disconnect the spark plug, which can lead to accidental starting. Another mistake is using too high a speed on the drill, which can overheat the steel. Overheating softens the blade, making it less effective and more likely to bend. You should also avoid using an angle grinder unless you are experienced, as it is difficult to control and can remove too much metal.
Ignoring cracks or bends is another serious mistake. If the blade is cracked or bent, sharpening will not fix the problem. A damaged blade can break while the mower is running, which is extremely dangerous. Always inspect the blade thoroughly before sharpening. If you find any damage, replace the blade instead of trying to sharpen it. Safety should always be the top priority when working with mower blades.
- Never sharpen a blade while it is attached to a running mower.
- Do not use an angle grinder if you are not experienced with it.
- Avoid overheating the steel by using high drill speeds.
- Do not ignore cracks or bends in the blade.
- Ensure the blade is balanced after sharpening.
- Always wear appropriate safety gear, including gloves and glasses.
When to Replace Instead of Sharpen
There are times when sharpening is not the right solution. If the blade is severely worn, cracked, or bent, it should be replaced. A blade that has been sharpened multiple times may be too thin to maintain its strength. Replacing the blade ensures that you have a safe and effective cutting tool. New blades are often available for specific Troy Bilt models and can be an affordable investment in your mower’s longevity.
If you are considering a replacement, check the OEM part number to ensure compatibility. The correct blade will have the right length, width, and center hole geometry. Using the wrong blade can cause balance issues and poor cutting performance. Many aftermarket blades are designed to replace specific OEM parts and offer a good balance of cost and quality. Replacing a worn blade is often easier and safer than trying to restore a damaged one.
For more information on selecting the right replacement, you can check our guide on whether mower blades come sharpened. This resource helps you understand the initial condition of new blades and how it affects your maintenance schedule. Understanding the starting point of your blade’s life helps you plan for future sharpening and replacement needs.
Proper maintenance of your Troy Bilt riding mower blade extends its life and improves cutting performance. By following these steps and using the right tools, you can keep your mower running smoothly. Always prioritize safety and inspect the blade for damage before each use. A well-maintained blade is a key component of a healthy lawn and a reliable mower.
A closely related question is covered in mower blade riding mowers, which may help alongside this section.


Write Your Review
No reviews yet. Be the first to share your experience!