


Cutting through dense firewood or clearing heavy windfall quickly reveals the frustration of dull cutting teeth. When a saw produces fine sawdust instead of thick ribbons of wood chips, the operator must push harder, increasing physical fatigue and placing unnecessary strain on the guide bar and motor. Learning how to sharpen a chainsaw blade with electric sharpener tools provides an efficient way to restore razor-sharp cutter edges without spending hours working with a manual file. Maintaining proper cutter geometry keeps your saw tracking straight through seasoned oak logs and fibrous softwoods alike.
Electric sharpening setups range from portable rotary tools powered by 12-volt battery clips to stationary bench grinders that clamp each cutter link securely. Whether you run high-displacement gas equipment or modern battery and corded electric chainsaws, regular sharpening preserves the integrity of your drive links and reduces dangerous reactive kickback forces. Grinding each cutter tooth to a uniform length ensures balanced cutting performance across the entire guide bar. Taking time to master electric sharpening techniques protects your equipment and ensures every cutting session remains productive.


Pros
- Fast sharpening with adjustable speed to handle various chain conditions
- Comes with multiple diamond wheels and angle guide for precision
- Lightweight and easy to store, great for home workshops
- Affordable way to maintain chains without replacing chains frequently
Cons
- Requires manual indexing of each tooth, which can be time-consuming for long chains
- The included instruction manual could be clearer for first-time users
- Not ideal for heavy-duty professional use on large chainsaws day in and day out
The Honoson Electric Chainsaw Sharpener Kit is a practical, budget-friendly solution for anyone who uses chainsaws regularly and wants to keep them cutting efficiently. This 180W power sharpener offers five speed settings ranging from 8,000 to 35,000 RPM, giving you the flexibility to handle everything from minor touch-ups to restoring a badly dulled chain. The kit includes six diamond grinding wheels in three common sizes (4.0mm, 4.8mm, and 5.5mm), along with an angle attachment and two wrenches, so you have everything needed to get started right out of the box.
This tool is best suited for DIYers, homeowners, and light-duty users who maintain their own chainsaws, pole saws, or even other gardening tools like shovels and shears. The variable speed control is a real plus, letting you slow down for precision work on smaller chains or crank up the RPM for faster sharpening on larger chains. With the angle attachment, you can set a consistent angle across all cutters, which is key to getting a clean, even cut every time. The motor has enough power to smooth out nicks and restore a sharp edge in minutes, which beats manual filing hands down.
Build quality is decent for the price point. The unit is lightweight at about 1.5 pounds and compact enough to fit in a workshop drawer or tool bag. The housing is plastic but feels sturdy enough for occasional use. Operation is straightforward: clamp the chain in the jig, select the right wheel, set the angle, and run the motor while moving the wheel across each tooth. You will need to turn off the motor to reposition the chain for each tooth, which adds a bit of time but ensures accuracy.
One realistic drawback is that this sharpener requires you to manually index each tooth, so sharpening a long chain can take a while. The included instructions are basic and might leave you scratching your head on the first go, but a quick online video will sort that out. Also, while it handles home and hobby use well, it may not hold up to the daily abuse a professional logger or arborist would throw at it.
Overall, if you are a DIYer or homeowner who wants to keep your chainsaw chain sharp without the cost and hassle of replacing chains frequently, the Honoson Electric Chainsaw Sharpener Kit is a solid buy. It delivers good performance, comes with useful accessories, and is easy to store. For the price, it is a smart addition to any workshop that sees chainsaw work on weekends or around the property.
Brand: Honoson
Model: Electric Chainsaw Sharpener Kit
Power: 180W
Speed Settings: 5 levels, 8000-35000 RPM
Included Wheels: 6 diamond grinding wheels (sizes 4.0mm, 4.8mm, 5.5mm)
Accessories: Angle attachment, 2 wrenches, instruction manual
Color: Black
Dimensions: 10.04 x 4.13 x 3.35 inches
Weight: 1.54 pounds
This kit comes with everything you need to start sharpening right away:
- 1 x 180W electric chainsaw sharpener tool
- 1 x Angle attachment for consistent grinding angles
- 2 x Wrenches for setup and adjustments
- 6 x Diamond grinding wheels (two each of 4.0mm, 4.8mm, and 5.5mm sizes)
- 1 x Instruction manual


Step-by-Step Technical Guide: Sharpening Chainsaw Chains with Electric Sharpeners
Restoring a dull saw chain with an electric sharpener requires matching the abrasive diameter to the chain pitch and holding consistent grinding angles across every cutter tooth. Powered sharpening dramatically accelerates routine field maintenance, cutting down maintenance time while delivering uniform cutter edges. Success depends on understanding how abrasive stones or titanium diamond bits interact with hardened steel chrome plating without generating excessive friction heat. By establishing a methodical workflow, any woodcutter can achieve precise cutting teeth that track cleanly through dense timber.
Matching Grinding Wheel Diameter to Saw Chain Pitch
Every saw chain features a specific pitch and cutter profile that dictates the diameter of the grinding stone or abrasive wheel. Standard 3/8-inch low profile and 1/4-inch pitch chains found on entry-level homeowner saws require a 5/32-inch (4.0 mm) grinding bit. Mid-sized chains with a .325-inch pitch commonly found on farm and ranch saws require a 3/16-inch (4.8 mm) abrasive wheel to create the proper gullet radius. Heavy-duty standard 3/8-inch and .404-inch professional logging chains require a 7/32-inch (5.5 mm) grinding tool to establish correct cutting geometry.
Using the incorrect diameter ruins the cutter profile and undermines cutting performance. An abrasive bit that is too small undercuts the top plate, creating a hook-shaped edge that dulls rapidly and grabs wood aggressively. Conversely, an oversized wheel creates a blunt forward face with excessive top-plate slope that refuses to self-feed into the wood fiber. Most multi-piece kits, such as the NEO-TEC Electric Chainsaw Sharpener Kit On-Saw or the HARDELL Electric Chainsaw Sharpener Kit 180W Multi-Purpose, include all three standard bit sizes to accommodate diverse chain pitches.
Abrasive material choice also plays a significant role in long-term sharpening consistency. Traditional vitrified stone wheels wear down gradually with use, changing their outer radius and requiring regular dressing with a truing brick. Titanium-plated diamond bits, such as those supplied with the OMCCHK Chainsaw Sharpener Jig Kit Tool with 10 bits or the EzzDoo Electric Chainsaw Sharpener Kit, maintain a constant outer diameter throughout their working life. This dimensional stability ensures that the final cutter on your chain receives the exact same radius as the first cutter.
Safety Controls and Powerhead Preparation
Before bringing any high-speed rotary tool or electric grinder near your chainsaw, personal safety precautions are mandatory. Always put on impact-resistant safety glasses and heavy cut-resistant work gloves to protect your hands against sharp cutter teeth and flying steel sparks. If you are working in an enclosed shop, a dust mask or respirator prevents inhalation of microscopic metallic debris and abrasive grit. Ear protection is also advisable when operating corded grinding motors that spin up to 35,000 RPM.
Isolating the powerhead prevents accidental starting while you manually manipulate the saw chain around the guide bar. For gasoline chainsaws, pull off the rubber spark plug boot and ground the lead away from the cylinder head. For cordless battery models, eject the lithium-ion battery pack from the chassis before touching the cutting loop. Clean excessive bar oil, pitch, and sawdust from the chain links with a stiff bristle brush and solvent so the grinding wheel contacts clean steel rather than greasy buildup.
Bench-Mounted Sharpeners Versus On-Saw Rotary Tools
Electric sharpeners fall into two distinct structural categories: stationary bench-mounted grinders and handheld rotary tools. Stationary units, such as the VEVOR Electric Chainsaw Sharpener featuring a 230W motor and a 5.5-inch grinding wheel, clamp securely to a workbench and require dismounting the chain from the guide bar. These tools utilize an adjustable vise to lock each drive link rigidly while an articulated grinding arm swings down to remove steel. Bench units deliver exceptional repeatable precision, making them ideal for high-volume firewood cutters and repair shops.
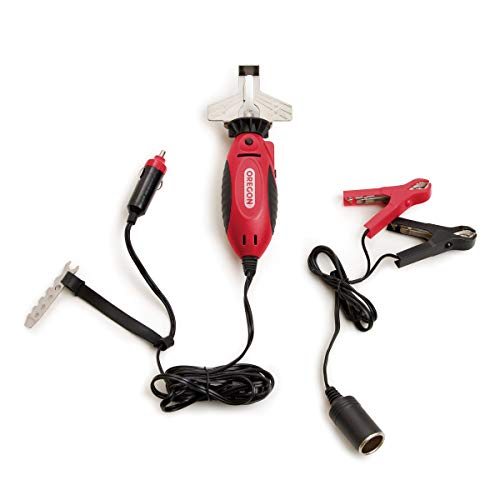
Handheld electric tools offer the distinct advantage of on-saw sharpening without removing the chain or loosening bar nuts. Units like the Honoson Electric Chainsaw Sharpener Kit 180W Power Chain or the Oregon 12V Sure Sharp Electric Chain Sharpener run directly along the mounted bar. These portable tools utilize an attached angle guide plate that rests across the cutter top plate to align the grinding axis. Field-ready models with 12-volt vehicle adapters allow operators to sharpen chains directly from a truck battery on remote woodlots.
Mechanical jig attachments represent an alternative hybrid method by guiding manual or electric burrs along an aluminum frame clamped to the bar. The OMCCHK Chainsaw Sharpener Jig Tool for 4-22″ Saw Chains uses guide sleeves and an indexing pawl to position burrs precisely against each cutting face. Choosing between bench grinders and on-saw rotary sharpeners depends on whether you value stationary shop accuracy or portable field convenience. Many dedicated timber cutters keep a rotary tool in their field box for quick touch-ups and a bench unit at home for major chain restorations.
Securing the Saw Chain and Selecting the Reference Cutter
Sharpening directly on the guide bar requires stable chain tension to prevent cutter teeth from rocking under the grinding stone. Tighten your chainsaw tensioner screw slightly more than normal cutting tension so the drive links cannot lift out of the bar rail groove. Secure the guide bar body in a bench vise equipped with soft jaws, or utilize a stump vise driven into a log if you are working outdoors. Eliminating chain wobble is essential because tooth deflection under the grinder creates inconsistent filing angles.
Inspect the entire chain loop to identify the most heavily worn or damaged cutter tooth. When a saw hits dirt, gravel, or a hidden fence wire, several teeth will suffer severe chipped chrome or rounded corners. This most damaged tooth serves as your master reference cutter. Measure or mark this tooth with a grease pencil or felt marker so you can easily track your starting position around the loop.
Grinding every cutter to match the length of the reference tooth ensures that the chain cuts straight without pulling to one side. If right-hand cutters remain longer than left-hand cutters, the chain will naturally curve toward the side with longer teeth during bucking cuts. Take light, controlled passes on the reference cutter until all visible chrome fracturing is eliminated. Note the depth stop setting on your bench grinder or the stroke count on your rotary tool to duplicate that material removal across all subsequent cutters.
Calibrating Top-Plate Angles and Mechanical Guides
Saw chain cutters require precise geometric alignment across three distinct planes: the top-plate angle, the side-plate cutting angle, and the tilt angle. Standard round-ground saw chains typically call for a 30-degree or 35-degree top-plate filing angle relative to the guide bar. Full-chisel chains designed for clean hardwood bucking often utilize a 25-degree or 30-degree angle to maximize edge durability. Always verify the manufacturer specifications stamped on your chain box or replacement loop before adjusting your sharpener.
Bench-mounted sharpeners feature calibrated turntable scales that rotate the vise assembly to the exact degree required. On bench units, set the vise rotation to your target angle, such as 30 degrees, and lock the clamp knob firmly. Lower the grinding wheel into the gullet of your reference cutter without the motor running to align the wheel contour with the cutting edge. Adjust the mechanical depth stop screw so the wheel enters the gullet without cutting into the tie straps or drive links below.
Handheld rotary sharpeners rely on guide plates engraved with angular reference marks to assist the user. The angle guide included with tools like the cyclamen9 Chainsaw Sharpening Guide with Ruler threads directly onto the rotary housing collar. Align the engraved guideline on the attachment parallel to the centerline of the guide bar while holding the tool level. This simple visual alignment ensures that the spinning diamond bit engages the cutter face at the exact top-plate angle intended by the manufacturer.
Executing Controlled Grinding Strokes and Thermal Management
Overheating cutter teeth is the most common failure point when learning how to use powered sharpening equipment. High-speed grinding generates intense friction that can quickly turn cutter steel blue, indicating that the factory temper has been destroyed. Annealed cutting steel becomes soft, losing its ability to hold an edge and dulling within seconds of contacting wood. To prevent thermal damage, use light, momentary contact lasting no more than one or two seconds per tap.
Variable speed rotary tools should be dialed to moderate RPM settings rather than maximum velocity. While high-speed motors in tools like the 180W Honoson and HARDELL units can spin up to 35,000 RPM, operating between 10,000 and 18,000 RPM provides much better control over heat buildup. Let the diamond coating or abrasive grit do the cutting work without forcing the tool hard into the cutter face. If you observe sparks turning dark or the tooth changing color, reduce your pressure immediately and pause between strokes.
Sharpen all cutters facing one direction before repositioning your equipment for the opposing cutters. On a standard chainsaw loop, cutters alternate between left-hand and right-hand cutting orientations separated by drive links and tie straps. By finishing all left-hand cutters first, you maintain muscle memory and eliminate the need to constantly alter your guide settings. Once the first series is complete, reset the vise angle or reverse your rotary guide orientation to sharpen the opposing right-hand cutters to identical lengths.
Measuring and Lowering Depth Gauges for Smooth Cutting
Sharpening only the cutter teeth solves just half of the cutting equation on any saw chain. Positioned directly in front of each cutter tooth is a curved steel protrusion called the depth gauge, commonly known as a raker. The depth gauge controls how deep the following cutting edge bites into the wood fiber during each revolution. As you grind back the top plate of the cutter, the height difference between the cutting edge and the raker progressively decreases.
If depth gauges are not lowered proportionally as cutters wear, the saw will produce powdery sawdust and refuse to cut even when the teeth feel razor-sharp. Most standard chains require a depth gauge clearance between 0.020 and 0.030 inches, with 0.025 inches serving as the universal standard for general firewood cutting. Place a progressive depth gauge tool over the cutters and file down any protruding raker metal using a standard flat file. Be careful not to file depth gauges too low, as excessive clearance causes violent grabbing, severe vibration, and increased kickback danger.
Post-Sharpening Mechanical Checks and Chain Tensioning
Once sharpening and depth gauge adjustments are complete, perform a thorough inspection of the entire cutting assembly. Check the guide bar rails for mushrooming or burrs along the outer edges using your gloved fingers or a flat file. Bar rails that have splayed outward cause the chain to lean sideways during heavy cuts, producing crooked kerfs regardless of how sharp the cutters are. Dressing the bar rails flat and clean ensures that the drive links sit perfectly upright within the guide track.
Whether you are maintaining modern two-stroke gas chainsaws or servicing vintage John Deere chainsaws, inspect the drive sprocket inside the clutch drum before reinstalling the side cover. Worn spur sprockets or grooved floating rim sprockets cause rapid drive link peening and premature chain stretching. If the drive sprocket shows grooves deeper than 0.020 inches, replace it immediately to prevent damaging your newly sharpened chain loop. Always wipe clear the bar oil inlet hole so lubricating oil reaches the chain chassis unimpeded.
Reset your saw chain to proper operating tension before starting the powerhead. Loosen the bar mounting nuts, pull the guide bar nose upward, and turn the tensioning screw until the bottom drive links fit snugly against the bottom bar rail without sagging. The chain should pull smoothly around the guide bar by gloved hand when the chain brake is released. Snap the chain downward from the bottom rail; it should spring back firmly into the bar groove without binding or showing loose clearance.
Common Electric Sharpening Mistakes and Corrective Actions
The most frequent error among beginners using electric sharpeners is removing excessive steel during routine maintenance. Light touch-ups require only one or two gentle taps against the cutter face to restore a razor edge. Grinding aggressively until showers of sparks fly wears down chain life prematurely, forcing you to replace expensive loops after only a few sharpenings. Unless a tooth has struck a stone or nail, remove only the thinnest sliver of metal necessary to establish a clean chrome corner.
Another prevalent mistake is failing to maintain consistent tooth lengths across opposing sides of the loop. Woodcutters often naturally apply more pressure with their dominant hand, inadvertently grinding right-hand teeth shorter than left-hand teeth. Measure cutter top plates periodically with a pocket ruler or dial caliper to verify uniform dimensions. Keeping all cutter lengths within 0.020 inches of each other guarantees balanced woodchip clearance and prevents the saw from drifting off the cut line.
Taking a systematic approach to electric chainsaw sharpening transforms a tedious workshop chore into a fast, repeatable maintenance routine. Before making your first firewood cut, verify chain lubrication by holding the running guide bar tip near clean wood and revving the engine to observe oil scatter. A properly ground chain will pull effortlessly through seasoned hardwood logs, producing thick wood chips while minimizing engine strain and physical fatigue. Regular inspection of your cutting teeth, depth gauges, and guide bar rails ensures safe, efficient, and reliable cutting performance through every season.





Write Your Review
No reviews yet. Be the first to share your experience!