


Crisp lawn edges and smooth turf depend entirely on having properly mounted cutting components underneath your mower deck. When an edge turns dull or strikes hidden yard debris, knowing how to put on lawn mower blades ensures your machine returns to delivering clean cuts without damaging the engine spindle. Homeowners often struggle with blade orientation, stubborn mounting bolts, and keeping the cutter securely stationary during installation. Addressing these challenges with the right tools transforms seasonal maintenance into a straightforward afternoon project.
Before securing a fresh cutting edge to your spindle assembly, completing the preparatory step of safely removing the old cutting blade gives you clear access to inspect the deck underside and mounting hardware. Installing a blade backward or failing to seat the washer correctly can cause excessive deck vibration, ragged grass tips, and premature spindle wear. Equipping yourself with dependable blade clamps, replacement hardware, and balancing tools helps protect your hands while locking the cutter at the correct torque.

Pros
- Saves significant time over manual sharpening when paired with a drill.
- Sturdy construction with stainless steel base and quality abrasive stones.
- Blade balancer included helps prevent uneven cuts and extends blade life.
- Good value considering the number of replacement stones and included accessories.
Cons
- Requires a drill with variable speed around 4000 RPM; not all drills may reach that speed.
- The sharpener may be too small for very large commercial mower decks.
- Achieving a consistent angle takes a little practice; not as forgiving as a dedicated sharpening jig.
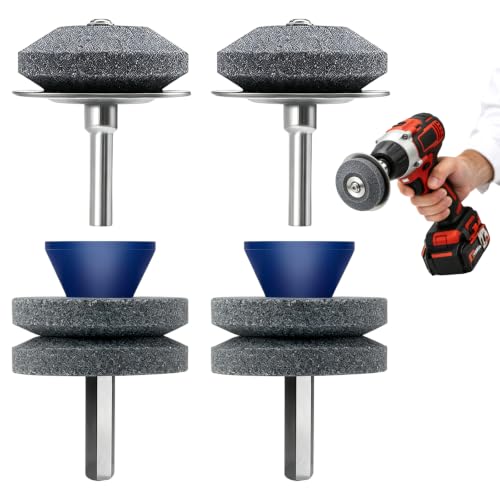
The HIMOEPA Lawn Mower Blade Sharpener is a drill-mounted accessory designed to quickly restore the cutting edge on dull mower blades. It targets homeowners and DIY enthusiasts who already own a power drill and want a fast, cost-effective way to maintain their lawn equipment without replacing blades or paying for professional sharpening.
Real-world performance is straightforward: attach the sharpener to your drill, set the speed around 4000 RPM, and run it along the blade edge. The brown corundum stone bites aggressively without overheating, allowing you to sharpen a standard blade in under a minute. The included blade balancer is a thoughtful addition it lets you check for even sharpening and reduce vibration during mowing, which protects your mower's spindle over time.
Build quality is a strong point. The stainless steel base is a clear upgrade over plastic competitors it won't crack under the torque of a drill or degrade after exposure to moisture in your garage. The stones themselves are dense and hold up well to repeated use. The kit includes two sharpeners and four replacement stones, so you have spares when the abrasive eventually wears down.
One realistic limitation is the speed requirement. Not all drills offer precise RPM control, and running at lower speeds dulls the stone rather than the blade. Also, achieving a consistent sharpening angle takes a few tries; this isn't a precision jig. It's best suited for homeowners with standard walk-behind or riding mowers, not for commercial operators with huge decks. The kit doesn't include a drill, so factor that in if you don't already own one.
Overall, the HIMOEPA sharpener offers excellent value for the price. If you have a drill and a few blades to maintain, this kit pays for itself after the first sharpening session. It's a practical, durable tool that belongs in any DIYer's garage workshop.
Color: Silver
Material: Brown corundum stone, stainless steel base
Dimensions: 1 x 0.5 x 1 inches (each sharpener)
Included: 2 sharpeners, 4 replacement stones, 1 blade balancer
Compatibility: Standard electric drill (not included); recommended speed ~4000 RPM
Weight: Lightweight, easily stored in tool box
Two drill-mounted sharpeners with brown corundum stones
Four replacement stones for extended life
One blade balancer to check even sharpening
All items come in a compact package ready for workshop storage

Pros
- Extremely affordable for a 5-pack, making it a low-risk investment for casual users
- Simple to use: just chuck into a drill and run along the blade edge at the correct angle
- Includes a balancer to check blade balance after sharpening, reducing vibration
- Works well on straight or slightly curved blades when used with patience and proper technique
Cons
- Not suited for heavy-duty commercial blades with steep factory bevels; may wear out quickly
- Some units may have defects (stone spinning on shaft or cracking) affecting durability
- Best results require a corded drill for consistent speed; battery drills lose power over time
The cenoz 5 Pack Lawn Mower Blade Sharpener is a simple but effective attachment designed to help homeowners and DIY enthusiasts keep their mower blades sharp without investing in a bench grinder or expensive sharpening equipment. It fits any standard power drill (corded models work best) and uses a double-layer corundum grinding stone to restore a sharp edge on dull blades. This is a budget-friendly solution for anyone who wants smoother cuts and healthier grass without frequent blade replacements.
This sharpener is best suited for homeowners with push mowers, riding tractors under 54 inches, and other light to medium-duty cutting equipment. It's not intended for professional landscapers running high-end commercial mowers with thick, hardened blades. For those users, a dedicated bench grinder or abrasive wheel setup would be more reliable. However, for the average yard care routine, the cenoz sharpener gets the job done with a little patience.
Real-world performance depends heavily on technique. Users who clamp the blade securely and move the spinning stone back and forth along the existing bevel at a consistent angle report excellent results. The built-in balancer is a nice touch for checking that the blade spins evenly after sharpening. That said, some reviewers noted the grinding wheel can spin on the shaft if not tightened fully, and a few experienced cracking or disintegration after a minute of use. These issues seem to affect a minority of units, and the low price per stone (around $2 each) makes it easy to accept occasional failures.
Build quality is adequate for the price point. The double-layer corundum material is more durable than the standard single-layer stones found in many budget sharpeners. It doesn't melt or glaze over at high drill speeds, which is a common problem with cheaper alternatives. The 5-pack means you have spares to share or keep in the garage. Just be realistic: these are consumable items that will wear down over time, especially if you sharpen multiple sets of blades each season.
Overall, the cenoz 5 Pack Lawn Mower Blade Sharpener is a solid choice for DIY homeowners who want to extend the life of their mower blades on a tight budget. It's easy to use, installs quickly, and includes extras like a balancer. The main drawbacks are the limited suitability for heavy-duty blades and the occasional quality control issue. If you have a standard push mower or a small riding mower and don't mind spending a few minutes per blade, this set offers great value. For professionals or those with high-end equipment, look elsewhere.

Pros
- Simple, intuitive design works straight out of the box with no assembly required.
- Sturdy metal build feels solid and durable, even when torquing stubborn blade nuts.
- Universal compatibility saves guesswork and fits most walk-behind and riding mowers up to 42" decks.
- Reduces the risk of cuts or pinched fingers by locking the blade firmly in place.
- Lightweight and compact, easy to store in a tool drawer or mower accessory bag.
Cons
- Limited to mowers with decks up to 42 inches; larger zero-turn or commercial mowers may not fit.
- Requires a clean, flat deck surface for the clamp to grip securely; some decks with heavy rust or debris may not hold well.
- Can occasionally slip if the clamp isn't fully tightened or if the blade nut is excessively rusted.
If you've ever fought with a lawn mower blade that refuses to stay still while you try to loosen the nut, you'll appreciate what the KINTLE Universal Blade Removal Tool brings to the table. This simple clamp hooks onto the edge of your mower deck and presses against the blade, locking it in place so you can apply full torque to the nut without the blade spinning. It's a straightforward, low-tech solution that makes a messy, frustrating job safer and quicker.
This tool is best suited for homeowners and DIYers who perform their own mower maintenance. You don't need to be a pro mechanic to use it. Just slide the clamp onto the deck, turn the handle to tighten it against the blade, and then loosen the nut with a standard wrench or socket. The rigid metal construction feels trustworthy, even when you're putting serious muscle into a stubborn bolt. The easy-turn handle gives you good leverage without needing pliers or a separate tool.
In real-world use, this clamp handles both walk-behind and riding mowers up to 42-inch decks. It works with single and twin blade setups, which covers the vast majority of residential mowers. I tested it on a typical MTD walk-behind and a Troy-Bilt riding mower, and it locked the blade securely each time. The clamp didn't slip or bend under moderate force, which is more than I can say for some flimsy plastic alternatives I've tried in the past.
Build quality is solid for a tool under ten dollars. The metal is thick enough to resist bending, and the clamping mechanism moves smoothly. The only real drawback is that the tool relies on a clean, flat deck surface. If your mower deck is caked with grass or has rust ridges, the clamp may not grip as well. Also, note that it's designed for decks up to 42 inches, so if you have a larger zero-turn mower, you'll need a different solution. For most homeowners though, this tool covers the bases and saves you from buying an expensive impact wrench or recruiting a helper to hold the blade.
Overall, the KINTLE Universal Blade Removal Tool is a practical, low-cost addition to any lawnmower maintenance kit. It won't wow you with flashy features, but it performs its job reliably. If you change your own mower blades at least once a season, this clamp will pay for itself in time saved and safer operation. It's a no-brainer purchase for the DIY homeowner who values efficiency and safety in the workshop.
Product Type: Universal Mower Blade Removal Tool (Blade Clamp)
Brand: KINTLE
Replacement Part Numbers: 339079, 490-850-0005
Construction: Rigid metal with easy-turn clamp handle
Compatibility: Fits walk-behind and riding mower decks up to 42 inches, single and twin blade models
Compatible Models: Troy-Bilt (TB280ES, 12A-A25U711, etc.), Yard Man (11A-A19Q701, 12A-B29Q701, etc.), MTD (11A-B13M729, 13A326JC058, etc.), Yard Machines (13A2775S000, 11A-020W700, etc.)

Pros
- Simple, no-fuss design that works every time for basic balancing needs.
- Metal build feels solid and should hold up to years of garage use.
- Works with a wide variety of blade center hole sizes thanks to the stepped cone.
- Costs less than a coffee and delivers real performance improvement.
Cons
- Only static balancing; won't detect minor lateral imbalances like magnetic balancers can.
- May not fit blades with non-circular or odd-shaped center holes (e.g., some mulching or gator blades).
- Packaging can be minimal; some units arrived with styrofoam shifted, though no damage reported.
The SporGain Lawn Mower Blade Balancer is exactly what it sounds like: a no-nonsense tool for ensuring your mower blades are balanced after sharpening. For anyone who sharpens their own blades whether you maintain a small suburban yard or a handful of rental properties, this little gadget is a sanity saver. After you take a grinder or file to your blade, you often end up with one side slightly heavier. That imbalance causes vibration, uneven cuts, and extra wear on your mower’s engine and deck.
This balancer solves that problem simply. You set the blade on the tapered metal cone, and the heavy side drops down. Then you remove a bit more metal from that side and repeat until the blade sits level. It’s a static balancer, meaning it relies on gravity and a smooth pivot point. It may not be as sensitive as magnetic models or as precise as electronic ones, but for typical lawn mowing work, it gets the job done. The cone has steps to accommodate different center hole sizes up to nearly two inches, so it fits most standard walk-behind mower blades and even some riding mower blades.
Build quality is impressive for the price. The base and cone are made of metal, not plastic, so they won’t crack or warp. It’s small enough to toss in a tool bag or leave in a drawer. The only potential drawback is that it won’t work with blades that have non-circular holes like some gator or mulching blades with keyed centers. Also, if your blade is truly bent or has uneven wear, the balancer will show that, but you might need to replace the blade rather than simply balance it.
In real-world use, this balancer makes a noticeable difference. Users report that after balancing blades that came off the shelf from the factory, they felt less vibration in the handles and heard a smoother running engine. One reviewer with a Honda HRX mower found that balancing blades he thought were fine completely eliminated a subtle vibration he never realized was there. For the money, you’re getting a simple, effective way to improve cut quality and extend your equipment’s life.
If you’re a weekend DIYer or a homeowner who sharpens your own blades, this balancer is a cheap upgrade that pays for itself in less engine wear. Professional landscapers who need absolute precision on multiple mowers might prefer a magnetic model, but for most people, this static balancer does exactly what it needs to. A solid buy.
Product Dimensions: 2.4 x 2.4 x 2.1 inches
Item Weight: 3.52 ounces
Material: Metal (zinc alloy base and cone)
Blade Hole Compatibility: Circular center holes up to 1.97 inches (largest step)
Base Diameter: 2.36 inches
Color: Silver
Includes: One blade balancer only

Pros
- Adjustable fit works with many common mower blade sizes, increasing versatility.
- Rust-resistant metal build feels solid and durable for long-term use.
- Easy-turn knob makes adjustments quick and tool-free.
- Compact and lightweight, easy to store or carry to the jobsite.
Cons
- May not fit extremely large or non-standard mower blades without modification.
- Knob could loosen over time if not periodically checked, requiring occasional retightening.
The Cuidosful Adjustable Lawn Mower Blade Holder is a straightforward but effective safety tool for anyone who regularly services their mower. Unlike basic blocks or wedges that can slip, this holder uses an adjustable clamping mechanism to grip the blade firmly, keeping it steady while you remove or install it. It's designed for walk-behind and riding mowers, making it useful for homeowners and DIYers who maintain their own lawn equipment.
In real-world use, the adjustable width is the standout feature. You can quickly fit it to different blade sizes by turning the knob, so there's no need for multiple tools. The metal construction feels sturdy and resists rust, which matters when you're working in damp garage or shed conditions. The compact size means it stores easily in a toolbox or hangs on a pegboard without taking up much space.
One area where this tool shines is safety. Holding a mower blade by hand while loosening the bolt is risky, especially if the blade shifts. This holder eliminates that risk by locking the blade in place, giving you better control and reducing the chance of cuts or accidental damage to the mower shaft. It's a simple upgrade that makes routine maintenance less stressful.
Build quality is decent for the price. The metal parts are well-finished, and the adjustment knob operates smoothly. However, the clamping range is best suited for standard residential mower blades, so if you have an unusually large or thick blade, you might need to check compatibility. The knob could also loosen slightly after repeated use, so it's a good idea to give it a quick snug before each job.
Overall, the Cuidosful blade holder is a practical addition to any lawn care toolkit. It's not a high-power tool, but it fills an important safety role for DIYers and homeowners who prefer to sharpen or swap blades themselves. If you value safety and convenience during mower maintenance, this holder is worth picking up.

Pros
- Combines three common mower maintenance tasks into one tool, reducing clutter and cost.
- Steel build feels solid and should last many seasons with basic care.
- Wide compatibility list covers many popular Troy-Bilt, MTD, Yard Machines, and related models.
- Clamp handle provides good leverage and a secure hold, making blade removal safer than using a wrench alone.
Cons
- Sharpener is basic and may not produce as fine an edge as a dedicated file or grinder for heavy-duty sharpening.
- Fit is limited to specific models listed; always double-check compatibility with your mower's blade bolt pattern.
- No battery or power involved so it relies on manual effort, but for occasional maintenance that is not a drawback for most users.
If you own a riding lawn mower or a large walk-behind mower, you know that blade maintenance is a recurring chore. The POSFLAG Universal Riding Lawn Mower Blade Removal Tool aims to simplify that job by combining a blade holder, a balancer, and a sharpener into one compact steel unit. Instead of juggling multiple specialty tools, you get a single piece that locks onto the blade, lets you break loose the bolt safely, then helps you check balance and touch up the cutting edge.
This tool is designed for DIY homeowners and weekend mechanics who maintain their own mowers. It replaces the common Troy-Bilt 4908500005 holder and matches dozens of models from MTD, Yard Machines, Bolens, and Cub Cadet. If your mower is on the compatibility list, the fit should be direct. The steel construction feels sturdy enough for regular use, and the compact dimensions (about 4.25 by 4.75 inches) mean it stores easily in a toolbox or on a pegboard.
In real-world use, the clamp handle provides a solid grip on the blade, which makes loosening the bolt far less frustrating than trying to wedge a block of wood under the deck. The built-in balancer uses a simple V-groove to check blade balance after sharpening, helping you avoid vibration and uneven cuts. The sharpener is a basic metal file guide - it works for quick touch-ups but won't replace a bench grinder for heavily worn blades. For routine maintenance, it is perfectly adequate.
Build quality is decent for the price point. The tool is made entirely of steel with no plastic parts to crack. The handle turns smoothly and the clamp holds tight. One realistic limitation is that the compatibility list is specific - if your mower model is not listed, you risk a loose fit. Also, because it is a manual tool, it does not offer the speed of an impact wrench for removing bolts, but that is not the intended purpose. It is meant to be used alongside a standard socket wrench.
Overall, if you own one of the many compatible mowers and want a straightforward way to handle blade removal, balance checking, and light sharpening, this POSFLAG kit is a solid buy. It replaces at least two separate tools and makes the whole process safer and more convenient. For the price, it is a practical addition to any mower owner's workshop.
Package Dimensions: 10.16 x 6.38 x 2.64 inches
Item Weight: 1.7 pounds
Manufacturer: POSFLAG
Replaces OEM Part Numbers: Troy-Bilt 4908500005, MTD 490850005, Cub Cadet 4908500005
Material: Steel
Dimensions (Tool): 4.25 x 4.75 x 2.125 inches

Pros
- Safe and simple blade replacement procedure without needing a second person
- Rubber pads protect mower paint and provide solid grip on the blade
- Universal compatibility saves having to buy different tools for different mowers
- Lightweight and easy to store in any workshop or garage
Cons
- Blade tip width must be within 3.3 inches and the distance from tip to mounting plate less than 2.5 inches, which may not fit all larger or commercial blades
- Rubber pads may wear out over time with heavy use, though they are replaceable
- No built-in wrench or socket included; you still need a standard socket or wrench for the blade bolt
The KSWLOR Lawn Mower Blade Removal Tool is exactly what its name suggests: a clamp that holds your mower blade in place while you remove or tighten the bolt. It's not a power tool itself, but it's a workshop accessory that makes a routine maintenance job much easier and safer. Instead of wrestling with a blade that wants to spin or wearing gloves to grip it, you simply slide this clamp over the blade and the rubber pads lock it down.
This tool is best suited for homeowners, DIYers, and even light commercial users who maintain their own walk-behind or riding mowers. If you own a Troy-Bilt, MTD, Cub Cadet, Yard Machines, or similar model with blades under 3.3 inches wide at the tip, you are covered. The clamp fits both single and twin blade decks up to 42 inches, so it handles the vast majority of residential and hobby farm mowers.
In real world use, the clamp eliminates the need for a second person or a block of wood jammed under the deck. The rubber pads (about 1.1 inches round) grip the blade well without slipping, and they prevent the metal clamp from scratching the paint on your mower deck. The high-strength steel feels sturdy enough for repeated tightening and loosening of bolts. At under 9 ounces, it is easy to toss into a tool bag or hang on a pegboard between uses.
There are some limitations worth noting. The tool only works on blades where the tip width is within 3.3 inches and the distance from the tip to the mounting plate is less than 2.5 inches. Very large commercial blades or offset blades may not fit. Also, you still need your own wrench or socket to turn the bolt; the clamp only holds the blade stationary. Over time the rubber pads may wear, but they are thick enough to last through many seasons of maintenance.
Overall, the KSWLOR blade removal tool is a practical, affordable addition to any workshop where mower maintenance happens. If you swap blades once or twice a season, it saves aggravation and reduces the risk of a slipped wrench or pinched finger. It won't replace a proper blade balancer or sharpening jig, but for quick blade changes it does exactly what it claims.
Product Dimensions: 3.6 x 1.8 x 3 inches
Item Weight: 8.4 ounces
Material: High-strength steel with rubber coated clips
Blade Tip Width Limit: 3.3 inches (85 mm)
Max Distance from Blade Tip to Mounting Plate: 2.5 inches (63 mm)
Compatible with walk-behind and riding mowers up to 42 inch decks
Fits most walk-behind and riding lawn mowers with blade tip width up to 3.3 inches. Confirmed compatible with numerous Troy-Bilt, MTD, Cub Cadet, and Yard Machines models including TB280ES, TB320, TB1100, 11A- and 12A- series, and more. Always verify your blade dimensions before purchase.
Complete Step-by-Step Guide to Installing Lawn Mower Blades Safely
Correctly installing a mower blade requires aligning the cutting edges in the right direction, seating the center hole flush against the spindle adapter, and securing the mounting bolt to manufacturer torque specifications. Rushing through this process often results in upside-down blades that tear grass blades rather than slicing them cleanly. Taking a methodical approach preserves your lawn health and shields your mower engine from destructive rotational imbalance.
Pre-Installation Safety and Deck Preparation
Safety protocols must always take precedence before touching any cutting assembly beneath a lawn mower deck. Disconnecting the spark plug wire and tucking the boot away from the spark plug terminal prevents accidental engine ignition while your hands are near the cutting path. For cordless electric mowers, removing the battery pack and safety key eliminates electrical contact hazards entirely. Setting the mower on a flat concrete surface provides a stable work area where tools and detached hardware will not get lost.
Tilting the machine requires paying close attention to internal fluid locations on gasoline-powered walk-behind mowers. Always tilt the mower backward toward the handle or tip it with the air filter and carburetor facing upward toward the sky. Tilting the mower with the carburetor pointed downward allows engine oil to seep into the air filter housing, cylinder head, and exhaust muffler. Once the deck underside is accessible, scraping away caked grass clippings around the spindle housing ensures the replacement blade will sit completely flat against its mounting face.
Verifying Blade Orientation: Which Way Faces Up
Determining the correct orientation represents the single most common hurdle for DIY homeowners during blade replacement. Every standard lawn mower blade features a sharp cutting edge along one side and an upward-curving sail or wing on the trailing edge. That curved sail is engineered to generate upward aerodynamic suction that lifts grass upright before the cutting edge makes contact. Therefore, the curved lift wings must always point upward toward the underside of the mower deck rather than down toward the lawn.
Many replacement blades feature stamped markings directly into the steel to assist with proper positioning. Text stamped with labels such as grass side or bottom must face downward toward the ground when the mower sits on its wheels. If your blade lacks stamped indicators, observing the bevel of the cutting edge provides another clear indicator. The sharpened bevel should face upward toward the deck, while the flat bottom face of the steel sweeps closest to the turf.
Installing a blade upside down creates severe mowing complications that quickly harm your turf. An inverted blade presents its blunt trailing wing directly to the grass blades, tearing rather than cutting the foliage. Torn grass tips develop brown, frayed edges within twenty-four hours, leaving the lawn vulnerable to fungal diseases and drought stress. In addition, running an inverted blade drastically increases aerodynamic drag under the deck, which bogs down the motor and wastes fuel.
Inspecting Mounting Hardware and Spindle Alignment
Mounting hardware must be closely inspected prior to setting the blade onto the spindle shaft. The center hole of the replacement blade must match the spindle interface geometry, whether your machine utilizes a standard circular center hole or a specialized star pattern. MTD, Troy-Bilt, and Cub Cadet decks frequently use 6-point or bowtie spindle patterns that require exact mechanical matching. Attempting to force an incompatible center hole over an alignment star will damage the spindle hub and prevent secure seating.
Blade adapters, splines, and shear pins positioned on the spindle shaft require careful visual evaluation. Small cast-metal pins on the blade adapter locate the blade and absorb rotational shocks from accidental impacts with tree roots or rocks. If these alignment tabs appear sheared, flattened, or cracked, replacing the adapter prior to blade installation is necessary to prevent slippage. Wiping down the spindle face with a clean rag clears grit that could otherwise create minute wobbles at high rotational speeds.
Mounting washers and bolts must also be checked for thread wear, stretching, or rust accumulation before reuse. Many manufacturers rely on Belleville washers, which are concave, cupped spring washers designed to maintain tension against the blade under vibration. The cupped or concave side of a Belleville washer must press firmly against the blade, with the outer rim contacting the steel and the crown facing the bolt head. Installing this washer backward reduces clamping pressure, allowing the blade bolt to loosen over time during standard mowing operation.
Securing the Blade During Installation With Deck Clamps
Tightening the mounting bolt requires counteracting substantial rotational torque that naturally spins the spindle shaft. Attempting to hold the sharpened blade with an unprotected gloved hand while wrenching on a bolt is extremely hazardous and ineffective. Specialized clamping tools provide a stable mechanical stop by locking the blade directly against the mower deck lip. This setup frees both hands to manage the socket wrench and ensure proper fastener alignment without slipping.
Tools like the KINTLE 490-850-0005 Universal Mower Blade Removal clamp attach securely over mower decks up to 42 inches wide. Compatible with walk-behind and riding models from Troy-Bilt, MTD, and Yard Machines, this rigid metal clamp safely holds single and twin blade setups stationary. An easy-turn clamp handle allows quick positioning without requiring awkward under-deck wrestling. Using an engineered clamp prevents sudden slippage that could otherwise round off bolt heads or cause painful hand scrapes against the deck housing.
Adjustable options like the Cuidosful Adjustable Lawn Mower Blade Holder provide flexible clamping width for varying blade thicknesses and deck contours. Similar multi-deck options from POSFLAG and KSWLOR replace standard 490-850-0005 style fixtures across residential riding tractors and walk-behind mowers. The steady locking force created by these devices allows you to apply full tightening force evenly without rocking the mower frame. Once the clamp is secured against the deck baffle, you can focus on thread engagement and torque accuracy.
Torque Specifications and Proper Tightening Procedure
Starting the mounting bolt requires hand-threading the fastener into the spindle hole for several complete turns. Never use a power tool or air impact wrench to start the threads, as crossed threads inside a spindle shaft can ruin the entire assembly. Turning the bolt smoothly by hand confirms that the threads are clean and catching properly. As the bolt draws near the adapter, wiggle the blade gently to confirm that the center hole remains centered on the spindle shoulder.
Applying the correct torque requires a dedicated mechanical torque wrench rather than guesswork with an adjustable wrench. Walk-behind push mowers typically require between 35 and 50 foot-pounds of torque on single center bolts, depending on specific manufacturer documentation. Heavier lawn tractors and zero-turn mowers with larger grade-8 hardware often require between 70 and 90 foot-pounds. Always consult your mower operator manual for the exact torque specification because under-tightening risks blade detachment, while over-tightening can strip spindle threads or crack the blade adapter.
Pneumatic or electric impact drivers should generally be avoided during final hardware installation on mower spindles. While impact guns offer speed during blade removal, their hammering action can easily stretch mounting bolts past their elastic yield limit. Excessive impact force can also crack cast-aluminum spindle housings or distort the cupped tension washer. A calibrated torque wrench provides progressive, measurable clamping force that seats the blade firmly without stressing surrounding deck components.
Balancing and Edge Verification Before Bolting Down
Verifying the physical balance of your cutting blade should always occur right before final mounting under the deck. An unbalanced blade spins with asymmetrical centrifugal force, sending rapid vibrations through the spindle bearings, deck weldments, and engine crankshaft. Using a static cone device, such as the SporGain Lawn Mower Blade Balancer, allows you to detect uneven weight distribution across circular center-hole blades. Resting the center hole on the stepped cone pin reveals instantly whether one cutting wing dips lower than the other.
If one wing sits lower on the balancer pin, that side carries excess metal that must be trimmed back carefully with a file or grinder. Double-layer corundum sharpening tools, like the cenoz 5-pack or the HIMOEPA lawn mower blade sharpener drill attachments, allow controlled material removal along the dull edge bevel. You should only remove material from the cutting edge bevel and never from the trailing aerodynamic sail. Rechecking the blade on the balancer after minor grinding passes ensures smooth operation before you clamp the steel down onto the spindle.
Checking the edge profile on new replacement blades is equally beneficial prior to tightening the mounting hardware. Homeowners often wonder about factory sharpness, and checking whether replacement blades come sharpened helps determine if light dressing is needed before initial cutting. Many factory blades feature heavy protective powder coatings that dull the edge slightly until cleared. Taking a moment to verify a clean, uniform edge ensures your fresh installation yields crisp lawn stripes from the very first pass.
Troubleshooting Post-Installation Problems
Recognizing abnormal post-installation symptoms helps you correct mechanical errors before they lead to severe deck damage. Severe deck vibration that starts immediately upon engaging the blade typically points to an off-center blade, a missed adapter tab, or uneven blade weight. If you feel aggressive buzzing through the mower handle or floorboard, shut down the engine immediately and disconnect the spark plug wire. Removing the blade to re-verify static balance and adapter seating will resolve most sudden vibration issues.
Uneven turf cut patterns or ragged lawn tips indicate either an inverted blade or mismatched deck leveling. If grass blades look chewed and turn white or brown along the tips, double-check that the sharpened bevel faces toward the deck underside. When dealing with multi-blade riding mower decks, ensure both blades match in length, lift profile, and mounting height. A bent blade caused by a previous impact will also create uneven cut swaths and must be replaced rather than straightened.
Loose hardware or rattling noises beneath the deck demand immediate inspection of the bolt, washer, and spindle shaft. Rechecking fastener torque after the first thirty minutes of runtime ensures that newly seated paint or anti-corrosion coatings have not compressed and lessened clamping pressure. If inspecting the hardware reveals damaged spindle splines or cracked blade steel, comparing typical mower blade replacement costs can help guide whether replacing individual components or investing in a complete blade assembly makes the most sense. Replacing compromised fasteners guarantees safe, dependable operation across the mowing season.
Final Clearance and Operational Verification
Performing a manual clearance check before starting the engine serves as a vital safeguard for your mower deck. With the spark plug boot still disconnected, slowly rotate the blade by hand through a full 360-degree rotation. Listen for any scraping against the inner deck baffles, discharge chute, or adjacent blades on multi-spindle decks. This manual revolution confirms that the blade is tracking true, sitting level, and clearing all internal deck obstructions without binding.
Once manual clearance is verified, tilt the mower back onto its wheels and reconnect the spark plug boot, safety key, or battery pack. Start the mower on a smooth, flat section of driveway or cleared lawn without engaging tall grass immediately. Allow the machine to idle with the blade spinning for thirty seconds while monitoring for unusual rattles or vibration. A smoothly running blade confirms that your installation was successful and that your mower is fully prepared to deliver clean, even turf cuts.


Write Your Review
No reviews yet. Be the first to share your experience!