


Most John Deere riding lawn mower issues stem from fuel delivery, electrical connections, or worn mechanical components rather than complex engine failures. Identifying the specific symptom, such as a no-start condition, rough idling, or loss of drive, allows for targeted troubleshooting using the correct replacement parts and safety protocols.
Homeowners often face these repairs during seasonal transitions when mowers have been stored for months. Understanding the difference between a faulty fuel shut-off solenoid and a dead battery, or recognizing when a tire assembly needs replacement, saves time and prevents unnecessary professional service calls. This article details the diagnostic steps and component checks required to restore functionality to common John Deere models.

Pros
- Plug-and-play installation with all hardware included; no tire shop needed
- Sturdy 4-ply construction handles typical yard loads and provides good puncture resistance
- Accurate fit on many John Deere models (check your sidewall) with reliable Turf Saver tread pattern
- Cost effective compared to OEM replacements or having a tire mounted separately
Cons
- Uses bushings rather than bearings; some users may need to swap out bushings for their own bearings
- Occasional reports of dry rot after 3-4 years, so not a forever part
- Narrower than some OEM tires on certain models; verify width matches your mower
If you own a John Deere riding mower and one of your front tires has gone flat or worn out, the Marastar 15x6.00-6 front tire and wheel assembly offers a straightforward fix. This is a complete assembly: a 4-ply rated tube-type Turf Saver tire already mounted on a yellow powder-coated steel wheel with a 3-inch offset hub and oil-impregnated bushings. You aren't wrestling with tire irons or hunting for a tube; you just bolt it on and grease the fittings.
This assembly is built for homeowners and DIY users who want to avoid a trip to the dealership or tire shop. It pairs best with John Deere 100 and 300 series lawn tractors, though it may fit other models using 15x6.00-6 tires (always check your sidewall). Users consistently praise how easily it installs; most have the old wheel off and the new one on in under 15 minutes. The included spacer, washers, and e-clip make it a true direct-fit solution, even if your original setup uses a different style retainer.
From a real-world performance standpoint, the Turf Saver tread pattern offers a good balance of traction and turf protection. The pneumatic air fill gives a forgiving ride that won't tear up your lawn when making tight turns. The 4-ply rating brings enough strength for typical mowing duties and occasional bumpy terrain, though it's not designed for highway use or heavy loading. Some users find the wheel narrower than the OEM tire; this may cause a slightly different look but doesn't affect function.
Build quality is solid for the price point. The powder coat resists rust, and the steel wheel feels stout. Keep in mind that the bushings are oil-impregnated and not full ball bearings. If your mower originally had bearings, you can knock out these bushings and press in your own bearings, which several reviewers have done. A few long term reviews note dry rot after three or four years, but that's typical for many aftermarket tires in this price range. For most owners, this assembly will outlast the mower's front tire wear period.
Overall, the Marastar assembly is a practical buy for anyone needing a quick, cost effective front tire replacement on a compatible John Deere mower. It saves time and money over OEM parts and eliminates the hassle of tire mounting. If you value convenience and a good fit, this is a reliable choice. Just double check your existing tire dimensions and be aware that you are getting bushings, not bearings. For the price and ease of installation, it's a solid value for the average lawn enthusiast.
Tire Size: 15x6.00-6
Tire Type: Pneumatic, tube-type, 4-ply rating
Tread: Turf Saver
Wheel Material: Powder-coated yellow steel
Hub Offset: 3 inches
Bore: 3/4 inch with oil-impregnated sintered iron bushings
Load Capacity: 400 lbs (not for highway speeds)
Weight: 9 lbs
Includes: Hub spacer, two washers, e-clip, grease fitting
This tire and wheel assembly is designed for the front axle of John Deere riding mowers in the 100 and 300 series, such as the D100, D110, D125, E100, E120, E140, E150, X110, X120, X140, X145, X155, X165, X175, X300, X304, X310, X320, X324, X340, X350, X360, X370, X380, X384, X394, etc. (always verify your sidewall markings). It works well for residential lawn care, mowing large yards, and light yard maintenance tasks. The Turf Saver tread protects grass while providing enough bite on gentle slopes.
Pros
- Easy to install with basic hand tools and a fuel line clamp.
- Wide compatibility with multiple engine models and mower brands.
- Reliable fuel shutoff prevents gas leaks and carburetor flooding.
Cons
- Professional installation recommended if you are not comfortable working with fuel lines.
- Only fits specific engine models; verify your part number before buying.
- May not include installation instructions beyond basic steps, so check online videos.
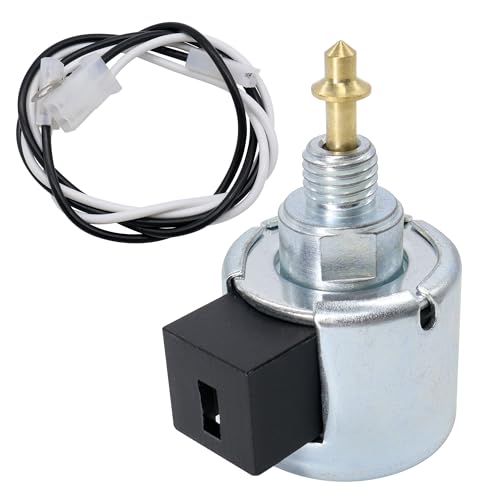
If your riding mower is leaking fuel after you shut it down, or the carburetor keeps flooding, a bad fuel shut-off solenoid is often the culprit. The OXCANO 846639 replacement solenoid is designed to fix that exact problem on many popular lawn and garden tractors. This small but critical part sits on the carburetor and cuts off fuel flow when you turn the ignition off, preventing gas from draining into the engine or onto the ground.
This solenoid is best suited for DIY homeowners who maintain their own John Deere, Craftsman, or Husqvarna mowers, as well as small engine mechanics looking for an affordable stock-up part. It directly replaces several OEM numbers (846639, 694393, 692734, and others) and fits a long list of Briggs & Stratton engines, including the 21R702 and 31R907 series. In real-world use, it does exactly what it should: when you turn the key off, the solenoid retracts and stops fuel flow. No more gas smell in the shed or wasted fuel during repairs.
Installation is straightforward if you have basic mechanical skills. You just clamp the fuel line to prevent draining, unscrew the old solenoid, and screw in the new one with a wrench. OXCANO includes a note that professional installation is recommended, which is fair for anyone uneasy about fuel systems. The build quality feels solid for the price, with a metal body and a cleanly threaded tip that seals well against the carburetor. There is no sign of cheap plastic or loose fitment.
One realistic limitation is that you must verify your engine's part number before buying. While the compatibility list is broad, not every Briggs engine uses this solenoid. Also, the package does not include a fuel line clamp or detailed instructions, so you may need to look up a YouTube video for guidance. For the typical DIYer, that is a minor hurdle. The solenoid itself performs reliably and costs a fraction of what a dealer would charge for the same part.
Overall, the OXCANO 846639 fuel shut-off solenoid is a smart, budget-friendly fix for a common mower issue. It saves you from fuel leaks, carburetor problems, and unnecessary trips to the shop. If your mower matches the compatibility list, this part will get you back to cutting grass without draining your wallet.

Pros
- Broad compatibility across multiple mower brands reduces guesswork when ordering
- Solid 4.4 star average rating from users confirms reliable performance
- Compact 3-post design simplifies wiring for DIY installation
Cons
- Some users may need to verify thread size and post orientation for their specific mower model
- Not a universal fit; always double-check your mower's part number before buying
- Plastic housing may not be as rugged as some OEM metal-bodied solenoids
The Butom 12V Lawn Mower Starter Solenoid is a straightforward replacement part designed for zero-turn mowers from major brands like BadBoy, MTD, Snapper, Ariens, and Troy Bilt. If your mower clicks but won't crank, or the starter doesn't engage, this solenoid is likely the culprit. It's a direct swap for OEM numbers 108-5349-00, 925-1426A, 725-1426, and many others listed in the specs.
This solenoid is best suited for DIY homeowners and small engine mechanics who maintain their own mowers. You don't need to be a pro to install it; just disconnect the battery, remove the old solenoid, and bolt this one in. The 3-pole design matches the original wiring layout, so you won't have to guess which wire goes where. The upper stud is 5/16 inch, the lower is 1/4 inch, matching most cable terminals found on zero-turn mowers.
In real-world use, this solenoid reliably closes the circuit when you turn the key, delivering full battery voltage to the starter motor. It handles the high current draw without getting hot or sticking in the engaged position. Build quality is adequate for residential use; the plastic housing is durable enough for occasional moisture and vibration, though it's not as tough as a metal-bodied unit. For the price, it's a solid value that gets you back to mowing without a trip to the dealer.
One realistic limitation is that compatibility isn't 100% universal. You must verify your mower's part number before ordering. Some users have noted that the post orientation may differ slightly from the original, requiring minor bending of wires. Also, while the solenoid works for most residential zero-turn mowers, commercial operators might prefer a heavier-duty option. But for the typical homeowner with a BadBoy ZT or MTD CZT, this is a reliable fix.
Overall, the Butom 12V Starter Solenoid is a practical, budget-friendly replacement that does the job. If you're comfortable with basic wrenching and want to save money on a common mower issue, this part is worth buying. Just confirm your model number first, and you'll likely have your mower running again in under 30 minutes.
For more on a connected point, our page on best riding mulching lawn mower goes into it separately.
Diagnosing and Repairing John Deere Riding Mower Issues
Effective repair begins with isolating the system responsible for the failure. Whether the mower refuses to start, stalls under load, or loses propulsion, the root cause usually lies in one of three areas: the fuel system, the electrical ignition circuit, or the mechanical drivetrain. A systematic approach prevents swapping parts without confirming the fault. Always disconnect the battery before working on electrical components to avoid short circuits or accidental starting.
| Component | Common Symptom | Key Check |
|---|---|---|
| Fuel Solenoid | No start, fuel drain | Continuity, part number match |
| Starter Solenoid | Clicking, no crank | Voltage, terminal tightness |
| Front Tire Assembly | Wobble, uneven wear | Tread depth, hub offset |
Before opening any compartment, verify the specific model number on the mower’s data plate. John Deere uses different engine platforms across their riding mower lines, meaning a part that fits one series may not fit another. The following checklist helps you gather the necessary information before purchasing replacements or beginning disassembly.
- Locate the model and serial number on the chassis or engine plate.
- Check the fuel filter for debris or clogging before inspecting the solenoid.
- Inspect battery terminals for corrosion and ensure they are tight.
- Verify the spark plug gap and condition before testing ignition.
- Examine the drive belt for cracks, fraying, or glazing.
- Confirm the tire size matches the sidewall markings exactly.
Fuel System and Solenoid Troubleshooting
A frequent cause of a John Deere mower failing to start is a failed fuel shut-off solenoid. This component controls the flow of fuel to the carburetor. When the ignition switch is off, the solenoid should close the fuel line to prevent the tank from draining. If the solenoid sticks open, fuel bypasses the carburetor and drains into the float bowls, causing a flooded engine that will not start. Conversely, if it sticks closed, no fuel reaches the engine, resulting in a no-start condition.
To test the solenoid, you need a multimeter. With the ignition off, the solenoid should show no continuity across the terminals. When the key is turned to the “on” position, continuity should appear. If the reading does not change, the solenoid is likely faulty. Replacement solenoids are inexpensive and relatively easy to install.
However, you must match the part number to your specific engine model to ensure compatibility. The OXCANO 846639 kit is listed as compatible with several John Deere E100 series models and specific Briggs & Stratton engines. Always cross-reference the old part number with the new one before purchase.
During installation, clamp the fuel line to prevent gas from draining out of the tank. This step is crucial to avoid spills and wasted fuel. Unscrew the old solenoid and thread in the new one. Ensure the wiring connector is seated firmly and the ground connection is clean and tight. A poor ground can cause the solenoid to behave erratically, leading to intermittent starting issues that are difficult to diagnose. If the mower still does not start after replacing the solenoid, check the fuel filter and carburetor for blockages.
Electrical and Starter Solenoid Checks
If the engine cranks slowly or makes a clicking sound when you turn the key, the issue often involves the starter solenoid or the battery. The starter solenoid acts as a high-current switch that connects the battery to the starter motor. Over time, the internal contacts can wear out, causing high resistance. This resistance reduces the voltage reaching the starter motor, preventing it from turning the engine over with sufficient force. Corroded battery terminals also increase resistance and should be cleaned and tightened regularly.
Testing the starter solenoid involves checking for voltage at the small control terminal when the key is turned. If voltage is present but the solenoid does not engage, the unit is likely defective. Replacement solenoids, such as the Butom 12V model, are designed for specific part numbers and configurations.
The 3-pole configuration mentioned in product specifications refers to the number of connections, which must match your mower’s wiring harness. Installing a solenoid with the wrong number of posts or incorrect thread sizes can damage the wiring or prevent proper mounting. Always verify the stud thread sizes and post count before ordering.
It is also important to check the battery health. A weak battery may provide enough voltage to turn on lights and accessories but not enough current to crank the engine. If the battery is old or has been left uncharged for an extended period, it may need replacement.
Ensure the battery is fully charged and the terminals are free of white or blue corrosion. A clean, tight connection is essential for reliable starting. If the battery and solenoid are both good, the starter motor itself may be failing, which is a more complex repair often requiring professional attention.
Drivetrain and Mechanical Component Maintenance
Loss of drive or uneven mowing is often caused by worn drive belts, damaged tires, or misaligned components.
- The drive belt transfers power from the engine to the transmission or direct drive system.
- Over time, belts stretch, crack, or glaze, reducing their ability to grip the pulleys effectively.
- A glazed belt may slip under load, causing the mower to lose speed or stop moving while the engine continues to run.
- Inspect the belt for any signs of wear and replace it if necessary to maintain proper function.
- The tensioner spring should also be checked to ensure it provides adequate tension for the belt.
Tire condition significantly affects mowing performance and safety. Worn or flat tires can cause the mower to pull to one side, making it difficult to steer and control. The Marastar 15×6.00-6 pneumatic tire assembly is a common replacement for John Deere front tires.
This assembly includes the tire, wheel, and hub, providing a complete solution for worn or damaged wheels. The 3-inch offset hub and 3/4-inch bushings are specific to certain John Deere models. Verify the offset and bushing size against your existing assembly to ensure a proper fit. Incorrect hub offset can alter the steering geometry and cause premature tire wear.
When replacing tires, check the load capacity and speed rating. The listed 400 lbs. load capacity is suitable for most residential riding mowers but should be verified against your specific model’s weight and usage conditions. Pneumatic tires provide better shock absorption and traction than solid tires, especially on uneven terrain.
Ensure the new tires are inflated to the manufacturer’s recommended pressure. Under-inflated tires can overheat and fail, while over-inflated tires provide poor traction and a harsh ride. Regular tire inspections are part of routine maintenance and help prevent unexpected failures during mowing sessions.
Part Compatibility and Verification
One of the most common mistakes in mower repair is purchasing parts that are not fully compatible with the specific model. John Deere produces many variations of their riding mowers, and even small differences in engine type, transmission, or chassis can affect part fitment.
Always use the model and serial number to search for the correct parts. The part number on the old component is the most reliable identifier. If the old part is damaged beyond reading, use the model number to look up the parts diagram for your specific mower.
For fuel and starter solenoids, the voltage and physical dimensions must match. A 12V solenoid will not work on a 6V system, and a solenoid with the wrong thread size will not mount correctly. The product descriptions for replacement parts often list compatible engine models and part numbers.
Cross-reference these lists with your mower’s specifications. If you are unsure, consult the owner’s manual or contact the manufacturer for confirmation. Installing the wrong part can lead to further damage or safety hazards. Take the time to verify compatibility before making a purchase.
For tire assemblies, the diameter, width, and rim size must match the original specifications. The 15×6.00-6 size is a standard for many John Deere front wheels, but not all. Check the sidewall of your existing tire for the exact size. The offset and bushing size are also critical for proper steering and alignment.
A mismatch in these dimensions can cause the mower to track incorrectly or put stress on the steering components. When in doubt, measure the old assembly and compare it to the new one before installation. Proper fitment ensures safe and reliable operation of your mower.
Safety Protocols and Final Verification
Safety is paramount when working on any powered equipment. Always disconnect the battery before performing any electrical work or maintenance that could accidentally start the engine. Wear safety glasses and gloves to protect against debris and sharp edges. Ensure the mower is on a level surface and the parking brake is engaged before starting work. Never work under the mower without proper support stands. The deck and blades can cause serious injury if they move unexpectedly. Follow the manufacturer’s safety guidelines for all repairs.
After completing the repair, perform a final check before using the mower. Reconnect the battery and ensure all connections are tight. Check the fuel level and ensure there are no leaks. Start the engine and let it idle for a few minutes. Listen for any unusual noises and check for smooth operation.
Test the drive system by engaging the drive control and moving the mower forward and backward. Ensure the steering is responsive and the mower tracks straight. If everything operates correctly, the repair is complete. If issues persist, re-evaluate the diagnosis and check for other potential causes.
Regular maintenance prevents many common mower issues. Keep the air filter clean, the spark plug in good condition, and the fuel system free of stale gas. Store the mower in a dry, secure location to protect it from the elements. By addressing small issues promptly and using the correct parts, you can extend the life of your John Deere riding mower and ensure reliable performance for years to come.
For more detailed information on blade maintenance, see our guide on removing mower blades. This resource provides step-by-step instructions for safe blade removal and installation.
If this topic is part of a bigger decision, riding lawn mower replacement keys is a useful related read.



Write Your Review
No reviews yet. Be the first to share your experience!