


A weak or fouled spark plug is a frequent reason a Toro mower fails to start or runs roughly, and replacing it is a straightforward maintenance task for most homeowners. The process involves locating the plug, disconnecting the spark plug wire, removing the old plug with the correct socket, and installing a new one with the proper gap. Understanding the specific requirements for your model ensures the job is done safely and effectively.
Before beginning, it is crucial to identify the correct replacement part, as Toro mowers use various plug types depending on the engine and model year. Many owners find that consulting the owner’s manual or the label on the engine block is the most reliable way to verify compatibility. This guide walks through the practical steps and considerations for changing the spark plug on a Toro lawn mower, helping you maintain reliable performance and avoid common installation errors.


Pros
- Exact OEM fit for Toro engines.
- Pre-gapped for hassle-free installation.
- Durable NGK construction resists fouling.
- Improves starting reliability in cold or damp conditions.
Cons
- Specific to certain engine models; verify compatibility before buying.
- Single plug - may need multiple for multi-cylinder engines.
- Not a performance upgrade; it's a standard replacement part.
This genuine OEM Toro NGK BPR6HS spark plug is a direct replacement for small engines powering lawn mowers, generators, snow blowers, and other outdoor power equipment. It is best suited for DIY homeowners and mechanics who want a factory-spec part without hunting for cross-references. If you maintain a Toro engine, this plug is the exact match you need for consistent ignition.
In real-world use, this spark plug delivers reliable starts and smooth idle performance. It helps prevent misfires and hard starting, which is critical when you are in the middle of a big mowing job or relying on a generator during a power outage. The pre-gapped design means you can install it straight out of the box, saving time and eliminating the need for a gap tool.
Build quality is excellent. NGK is a leading manufacturer of spark plugs, and this plug features a copper core electrode with a nickel alloy tip for long service life. It resists fouling from oil or carbon buildup, so you get consistent performance over many hours of use. The threaded shell is robust and fits snugly into the cylinder head without cross-threading.
One realistic drawback is that this plug is designed specifically for certain Toro engines with a 14mm thread and 0.75 inch reach. It will not work on all small engines, so always check your equipment's manual. Also, it is a single plug, so if you have a multi-cylinder engine you will need to buy multiple units.
Overall, this is a solid choice for anyone maintaining Toro equipment. It is affordable, reliable, and easy to install. For DIYers and mechanics who value hassle-free maintenance, this genuine OEM part is a smart buy. It keeps your engine running smoothly without any compatibility worries.

Pros
- Exact OEM fit for many popular Kohler engines
- Great value with two plugs at a low price
- Reliable starting and smooth idle after installation
- Easy to install with standard spark plug tools
- Trusted brand with strong customer satisfaction
Cons
- May require gap adjustment before installation (not pre-gapped for all applications)
- Limited to compatible Kohler models; not universal
- Copper core is basic; premium iridium plugs last longer in some engines
The Briggs & Stratton 491055S 2-pack is a set of genuine OEM replacement spark plugs designed for a wide range of Kohler small engines. These are the exact plugs specified by the manufacturer, so you get a perfect fit and reliable spark right out of the box, provided you set the gap according to your equipment's manual.
This plug set is ideal for homeowners and DIYers maintaining lawn mowers, riding tractors, snowblowers, and generators powered by Kohler Command, Courage, or Pro series engines. If you've dealt with hard starting, misfires, or poor fuel economy, swapping in a fresh spark plug is one of the simplest and most effective fixes. Users consistently report smooth restarts and restored performance after installation.
Build quality is typical of OEM parts: a sturdy copper core, durable metal shell, and precise threading. While copper plugs don't last as long as iridium or platinum options, they do the job reliably for normal seasonal use. The two-pack is a smart buy, letting you replace the plug in one machine and keep a spare for another.
One realistic drawback is that the plugs arrive without a pre-set gap. You'll need a gap gauge to set them to your engine's specification; otherwise, performance can suffer. Also, these plugs are not universal they only fit specific Kohler models, so double-check your engine's part number before ordering.
Overall, the Briggs & Stratton 491055S 2-pack is a straightforward, no-nonsense solution for restoring spark and reliability in compatible Kohler engines. At this price, it's a low-risk investment that pays off with hassle-free starts all season. Perfect for anyone comfortable doing basic engine maintenance.
Brand: Briggs & Stratton
Part Number: 491055S (2-pack)
Core Material: Copper
Thread Size: 491055 (standard)
Top Material: Metal
Vehicle Service Type: Lawn Mower, Snowblower, Generator (Kohler engines)
Item Weight: 2.89 ounces per pack
Product Dimensions: 4 x 1 x 1 inches


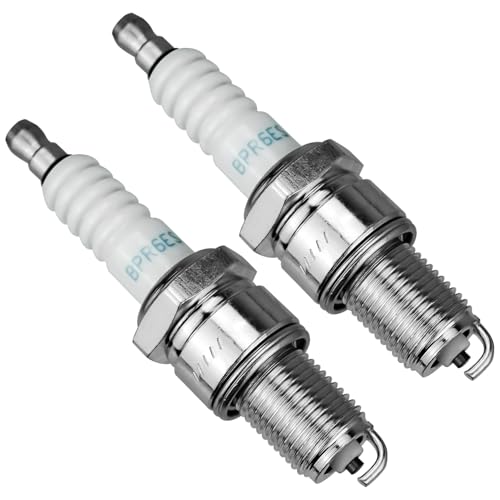

Replacing the spark plug is a core maintenance task that keeps your engine running smoothly. The procedure is similar across most walk-behind and riding Toro models, but specific access points and plug types vary. The goal is to replace the old component with a new one that matches the manufacturer’s specifications, ensuring reliable ignition and fuel efficiency. Safety is the first priority, so always work on a cool engine and in a well-ventilated area.
| Component | Typical Specification | Note |
|---|---|---|
| Socket Size | 5/8 inch or 13/16 inch | Check manual for exact fit |
| Plug Type | NGK BPR6HS or BPR6ES | Varies by model |
| Thread Direction | Standard Right-Hand | Always verify before turning |
| Gap Setting | 0.025 to 0.030 inches | Adjust with a feeler gauge |
Before you start, gather the necessary tools to keep the process efficient. Having everything within reach prevents interruptions and reduces the risk of dropping parts into the engine compartment. A dedicated spark plug socket is the most important tool, as it is designed to grip the plug without damaging the ceramic insulator. You will also need a feeler gauge to check the gap and a clean rag to wipe away debris.
- Spark plug socket and ratchet or breaker bar
- Feeler gauge set for gap adjustment
- Spark plug wire puller or pliers
- Shop vacuum or compressed air for cleaning
- New spark plug matching the model number
- Penetrating oil for stuck plugs
Locating the Spark Plug and Safety Precautions
The spark plug is usually located on the side of the engine, near the top. On some models, it may be partially obscured by the air filter housing or other components. If you are working on a riding mower, ensure the seat switch is disengaged or the key is removed to prevent accidental starting. For electric start models, disconnect the battery negative terminal to eliminate any risk of electrical shorts. This step is critical for personal safety and protects the mower’s electrical system.
Access to the plug can be tight in some engine bays, so plan your approach before moving any parts. You may need to remove the air filter to reach the plug wire, which is a common step on many Toro walk-behind models. If you are also planning to service the blade, our guide on removing blades from a riding lawn mower covers similar safety protocols for handling the deck area. Always let the engine cool completely to avoid burns from hot metal components.
Removing the Old Spark Plug
Disconnect the spark plug wire by gripping the boot and pulling straight off the terminal. Do not pull on the wire itself, as this can damage the insulation or the connection point. Once the wire is removed, use a shop vacuum or compressed air to blow away any dirt or grass clippings around the plug well. This prevents debris from falling into the cylinder when you remove the old plug, which could cause engine damage.
Attach the correct size socket to the plug and fit it over the old spark plug. Turn the socket counter-clockwise to loosen the plug. If the plug is stuck, apply a small amount of penetrating oil around the threads and wait a few minutes before trying again. Never use a wrench on the ceramic part, as this will crack the insulator and render the plug useless. Once loose, unscrew the plug by hand to avoid cross-threading the socket.
Inspect the removed plug for signs of engine issues. A dark, oily deposit may indicate oil burning, while a white, blistered ceramic can signal overheating. These visual cues help diagnose underlying problems that a new plug alone may not fix. If the threads are damaged, you may need to use a thread chaser to clean the hole before installing the new plug. Always replace the plug if it shows significant wear or fouling, as this is a standard maintenance interval.
Installing the New Spark Plug
Check the gap on the new spark plug using a feeler gauge. The gap should match the specification listed in your owner’s manual, typically between 0.025 and 0.030 inches for most Toro models. Adjust the gap gently by bending the ground electrode, being careful not to damage the insulator. A proper gap ensures a strong spark and efficient combustion, which is vital for starting and performance.
Hand-thread the new plug into the engine block to ensure it is not cross-threaded. Once it starts, use the socket to tighten the plug to the manufacturer’s torque specification. Over-tightening can crack the ceramic or strip the threads in the engine block, while under-tightening can lead to a weak seal and misfires. Most plugs should be snug but not forced. If the plug feels like it is binding, back it out and check for debris in the threads.
Reconnect the spark plug wire by pushing the boot firmly onto the terminal until it clicks or locks into place. Ensure the connection is secure to prevent arcing or poor ignition. If you removed the air filter, reinstall it now, making sure the gasket is seated properly to prevent unfiltered air from entering the engine. Double-check that all components are in their original positions before attempting to start the mower.
Choosing the Right Plug and Common Mistakes
Selecting the correct spark plug is essential for optimal engine performance. Toro mowers often use NGK or Champion brands, with part numbers like BPR6HS or BPR6ES being common. Always verify the part number on the engine label or in the manual, as using the wrong heat range can cause engine damage. A plug that is too hot can lead to pre-ignition, while one that is too cold may foul easily under light loads.
Many homeowners make the mistake of not checking the gap before installation. The gap can shift during shipping or storage, so a quick check with a feeler gauge is a simple step that prevents performance issues. Another common error is failing to clean the plug well before removing the old plug, which can lead to debris entering the cylinder. These small oversights can turn a simple maintenance task into a more complex repair.
- Verify the plug part number against the engine label
- Check and adjust the electrode gap with a feeler gauge
- Hand-thread the new plug to avoid cross-threading
- Clean the plug well to prevent debris entry
- Ensure the spark plug wire is securely connected
- Avoid over-tightening the plug to protect engine threads
Verification and Final Checks
After installation, start the engine and let it run for a few minutes. Listen for any unusual noises or rough idling, which could indicate a poor connection or incorrect gap. Check for any leaks around the plug well and ensure the air filter is secure. If the engine runs smoothly, the replacement was successful. Monitor the mower’s performance over the next few mowing sessions to ensure consistent operation.
Proper maintenance extends the life of your mower and ensures reliable performance. Regularly inspecting and replacing the spark plug according to the manufacturer’s schedule is a key part of this routine. If you continue to experience starting issues after changing the plug, the problem may lie elsewhere, such as in the fuel system or ignition coil. For related maintenance tasks, understanding which way a lawn mower blade bolt turns helps with safe deck servicing. Keep your tools organized and your manual handy for future reference.



Write Your Review
No reviews yet. Be the first to share your experience!