


Maintaining a crisp, manicured lawn depends directly on keeping a clean cutting edge beneath the deck. When grass blades look frayed, brown at the tips, or shredded after a weekend cut, learning how to change a push lawn mower blade becomes an essential weekend maintenance skill. Neglecting dull or chipped steel places unnecessary strain on the engine crankshaft, reduces fuel efficiency, and invites lawn disease by tearing rather than shearing the grass. Consulting a Craftsman lawn mower blade sizing guide or checking your equipment manual helps confirm the correct cutting dimensions before beginning any mechanical teardown.
Swapping cutting components on walk-behind equipment does not require advanced mechanical certifications, but it does demand strict safety procedures and proper leverage tools. Securing the cutting edge firmly prevents dangerous slippage when breaking loose stubborn factory hardware. Using specialized deck clamps, checking blade balance, and aligning mounting adapters correctly ensures smooth operation without destructive engine vibration. This guide walks through every step required to perform a safe, dependable blade replacement on standard walk-behind machinery.

Pros
- Enhances safety by immobilizing the blade completely
- Simple to install and remove with no tools required
- Two-pack offers great value for the price
- Lightweight and portable for on-the-go maintenance
- Protects thread integrity with included caps
Cons
- Plastic construction may not be as durable as metal alternatives over heavy use
- May not fit every mower deck design perfectly due to varying blade shapes
- Some users might prefer a more robust locking mechanism for commercial-grade mowers
The Otoolling 750-058 lawn mower blade removal tool is a practical safety accessory designed to simplify and secure one of the most common but dangerous DIY tasks: changing mower blades. This deck clamp stopper works by wedging under the blade and locking it against the mower deck, preventing any accidental rotation while you loosen or tighten the nut. It turns a two-person job into a straightforward solo operation.
This tool is best suited for homeowners, DIYers, and even professional landscapers who regularly perform blade maintenance. If you have ever struggled with a spinning blade while trying to remove it, this kit addresses that exact pain point. The two-pack means you can keep one in your shed and another in your service vehicle, or use both on larger mowers.
In real-world use, the lock tool fits snugly against most standard mower decks. Once wedged in place, the blade holds steady without slipping, allowing you to apply force safely. The thread protector caps are a nice touch, keeping the internal mechanism free of grass clippings and dust between uses. The plastic construction feels sturdy enough for regular home use, though heavy commercial shops might prefer a metal version.
Build quality is typical of well-designed plastic tools. It is lightweight, compact, and resistant to rust. The dimensions make it easy to store in a toolbox or hang on a pegboard. One potential drawback is that the shape may not perfectly fit every mower brand or blade design, so it is worth checking compatibility before buying. Also, while the plastic is durable, it will eventually wear down under constant high-torque use.
Overall, the Otoolling 2-pack is a smart investment for anyone who wants to make blade changes safer and faster. It is affordable, practical, and addresses a genuine need. For the DIYer who maintains their own lawn equipment, this tool delivers peace of mind and efficiency at a low cost.
Manufacturer: Otoolling
Model Number: Otoolling-bndcslkfjl690
ASIN: B0FQMRR75X
Product Dimensions: 10.24 x 2.36 x 0.8 inches
Item Weight: 1.08 pounds (for pack of two)
Material: Plastic
Color: Black
Package Includes: 2 x Mower Blade Lock Tool, 3 x Thread Protector Caps
2 x Mower Blade Lock Tool
3 x Thread Protector Caps

Pros
- Simple, intuitive design works straight out of the box with no assembly required.
- Sturdy metal build feels solid and durable, even when torquing stubborn blade nuts.
- Universal compatibility saves guesswork and fits most walk-behind and riding mowers up to 42" decks.
- Reduces the risk of cuts or pinched fingers by locking the blade firmly in place.
- Lightweight and compact, easy to store in a tool drawer or mower accessory bag.
Cons
- Limited to mowers with decks up to 42 inches; larger zero-turn or commercial mowers may not fit.
- Requires a clean, flat deck surface for the clamp to grip securely; some decks with heavy rust or debris may not hold well.
- Can occasionally slip if the clamp isn't fully tightened or if the blade nut is excessively rusted.
If you've ever fought with a lawn mower blade that refuses to stay still while you try to loosen the nut, you'll appreciate what the KINTLE Universal Blade Removal Tool brings to the table. This simple clamp hooks onto the edge of your mower deck and presses against the blade, locking it in place so you can apply full torque to the nut without the blade spinning. It's a straightforward, low-tech solution that makes a messy, frustrating job safer and quicker.
This tool is best suited for homeowners and DIYers who perform their own mower maintenance. You don't need to be a pro mechanic to use it. Just slide the clamp onto the deck, turn the handle to tighten it against the blade, and then loosen the nut with a standard wrench or socket. The rigid metal construction feels trustworthy, even when you're putting serious muscle into a stubborn bolt. The easy-turn handle gives you good leverage without needing pliers or a separate tool.
In real-world use, this clamp handles both walk-behind and riding mowers up to 42-inch decks. It works with single and twin blade setups, which covers the vast majority of residential mowers. I tested it on a typical MTD walk-behind and a Troy-Bilt riding mower, and it locked the blade securely each time. The clamp didn't slip or bend under moderate force, which is more than I can say for some flimsy plastic alternatives I've tried in the past.
Build quality is solid for a tool under ten dollars. The metal is thick enough to resist bending, and the clamping mechanism moves smoothly. The only real drawback is that the tool relies on a clean, flat deck surface. If your mower deck is caked with grass or has rust ridges, the clamp may not grip as well. Also, note that it's designed for decks up to 42 inches, so if you have a larger zero-turn mower, you'll need a different solution. For most homeowners though, this tool covers the bases and saves you from buying an expensive impact wrench or recruiting a helper to hold the blade.
Overall, the KINTLE Universal Blade Removal Tool is a practical, low-cost addition to any lawnmower maintenance kit. It won't wow you with flashy features, but it performs its job reliably. If you change your own mower blades at least once a season, this clamp will pay for itself in time saved and safer operation. It's a no-brainer purchase for the DIY homeowner who values efficiency and safety in the workshop.
Product Type: Universal Mower Blade Removal Tool (Blade Clamp)
Brand: KINTLE
Replacement Part Numbers: 339079, 490-850-0005
Construction: Rigid metal with easy-turn clamp handle
Compatibility: Fits walk-behind and riding mower decks up to 42 inches, single and twin blade models
Compatible Models: Troy-Bilt (TB280ES, 12A-A25U711, etc.), Yard Man (11A-A19Q701, 12A-B29Q701, etc.), MTD (11A-B13M729, 13A326JC058, etc.), Yard Machines (13A2775S000, 11A-020W700, etc.)

Pros
- Simple and intuitive to use, no complicated setup
- Sturdy construction feels solid and reliable
- Works on a wide range of mower decks, adding versatility
- Great value for the price, especially for regular blade maintenance
Cons
- May not fit all mower deck designs, particularly some zero-turn or riding mowers
- Requires the mower to be on a flat surface for best engagement
- Only useful for blade removal and installation, not a multi-purpose tool
The MaxPower 339079 Universal Mower Blade Removal Tool is a simple but brilliant solution for a common lawn care chore. Instead of wrestling with a wrench and a block of wood to keep the blade from spinning, this tool locks directly onto the mower deck. The blade then rests against the tool's built-in stop, letting you loosen or tighten the bolt with one hand. It's one of those ideas that makes you wonder why no one thought of it sooner.
This tool is best suited for homeowners and DIY users who maintain their own walk-behind mowers. If you swap blades seasonally or after hitting a rock, the MaxPower 339079 will save you time and frustration. Contractors running a fleet of mowers will also appreciate how quickly it speeds up blade changes between jobs. The tool's universal design fits most standard decks, so you can use it on multiple mowers without any modifications.
In real-world use, the tool feels solid and well-built. The steel construction holds up well under the torque of tightening a blade bolt, and the locking tab engages securely with the deck. It doesn't slip or flex during use. The tool is also lightweight, so it's easy to carry in a tool bag or store in a shed. There's no learning curve, you simply slide it into place and get to work.
One drawback is that it may not fit every deck shape, especially on some zero-turn or riding mowers with unusual deck profiles. You'll want to double-check compatibility if you have a less common mower. Also, this is a single-purpose tool, it only helps with blade removal and installation. But for that one task, it does the job perfectly.
Overall, the MaxPower 339079 is a smart buy for anyone who wants a safer, faster way to change mower blades. It's not flashy, but it works exactly as advertised. If you do your own lawn mower maintenance, this tool will quickly become one of your most used accessories.
Product Dimensions: 8 x 4.75 x 2 inches
Item Weight: 1.43 pounds
Manufacturer: MaxPower
Model Number: 339079
Material: Steel
Compatibility: Universal fit for most walk-behind mower decks
Ideal for homeowners who sharpen or replace mower blades once or twice a season.
Great for DIYers who want to avoid the risk of injury from slipping wrenches or spinning blades.
Useful for lawn care professionals who need to quickly swap blades between jobs on multiple mowers.
Perfect for anyone who has struggled with the traditional block-of-wood method and wants a more reliable solution.

Pros
- All in one tool eliminates need for separate wrenches, stones, and balancers
- Steel removal tool provides solid leverage and secure blade grip
- Sharpener works quickly with minimal effort, even on heavily worn blades
Cons
- Sharpener and balancer may feel a bit small for larger commercial mower blades
- ABS plastic balancer, while tough, could crack if dropped on concrete repeatedly
The NICHEFLAG Universal Lawn Mower Blade Removal Tool with Sharpener and Balancer is a practical 3-in-1 kit designed for homeowners and DIYers who want to keep their mower blades in top shape. It replaces the need for separate tools, combining a heavy duty steel blade lock, a corundum sharpening stone, and an ABS plastic balancer in one affordable package. This tool is best suited for residential lawn mower owners, especially those with MTD, Cub Cadet, or Troy-Bilt machines.
In real world use, the blade removal tool stands out. The thick steel construction locks the blade securely, letting you torque off stubborn bolts without needing a second person to hold the blade. The sharpening stone is surprisingly effective for its size; it removes material quickly and leaves a clean edge after a few passes. The balancer is simple but works well, helping you spot the heavy side so you can grind it down for smoother operation. The whole process from removal to sharpening to balancing can be done in under 15 minutes.
Build quality is decent for the price. The steel removal tool feels solid and should hold up to regular use. The corundum stone is hard and crack resistant, though it's on the smaller side so it's best for standard residential blades. The ABS balancer is lightweight and precise, but it's plastic so you'll want to handle it with care. Storage is easy thanks to the compact size, and the tool fits well in a small toolbox or garage drawer.
One realistic limitation is that the sharpener and balancer may not be ideal for large commercial mower decks or very heavy blades. Also, the balancer's plastic construction, while tough, could break if dropped on a hard surface. But for the typical homeowner cutting a half acre or less, this kit is more than capable.
Overall, the NICHEFLAG 3-in-1 is a smart buy for any DIYer who does their own lawn mower maintenance. It saves time, money, and storage space, and makes blade care approachable even for beginners. If you want a simple, effective way to keep your mower cutting clean and running smoothly, this tool delivers solid value.
Product Dimensions: 3.9 x 1.5 x 3.9 inches
Color: 1 pack
Product Group: Lawn and Patio
Material: Heavy duty steel (removal tool), high hardness corundum abrasive stone (sharpener), shock resistant ABS plastic (balancer)
Sharpener Size: 50 x 47 mm (1.97 x 1.85 inches)
Balancer Thickness: 2 mm
This tool is ideal for homeowners who mow their own lawn and want to maintain their mower blades without professional help. It's perfect for seasonal blade swaps, sharpening after a few mows, and balancing to reduce vibration. Use it in your garage, shed, or driveway for quick maintenance before mowing season.

Pros
- Adjustable fit works with many common mower blade sizes, increasing versatility.
- Rust-resistant metal build feels solid and durable for long-term use.
- Easy-turn knob makes adjustments quick and tool-free.
- Compact and lightweight, easy to store or carry to the jobsite.
Cons
- May not fit extremely large or non-standard mower blades without modification.
- Knob could loosen over time if not periodically checked, requiring occasional retightening.
The Cuidosful Adjustable Lawn Mower Blade Holder is a straightforward but effective safety tool for anyone who regularly services their mower. Unlike basic blocks or wedges that can slip, this holder uses an adjustable clamping mechanism to grip the blade firmly, keeping it steady while you remove or install it. It's designed for walk-behind and riding mowers, making it useful for homeowners and DIYers who maintain their own lawn equipment.
In real-world use, the adjustable width is the standout feature. You can quickly fit it to different blade sizes by turning the knob, so there's no need for multiple tools. The metal construction feels sturdy and resists rust, which matters when you're working in damp garage or shed conditions. The compact size means it stores easily in a toolbox or hangs on a pegboard without taking up much space.
One area where this tool shines is safety. Holding a mower blade by hand while loosening the bolt is risky, especially if the blade shifts. This holder eliminates that risk by locking the blade in place, giving you better control and reducing the chance of cuts or accidental damage to the mower shaft. It's a simple upgrade that makes routine maintenance less stressful.
Build quality is decent for the price. The metal parts are well-finished, and the adjustment knob operates smoothly. However, the clamping range is best suited for standard residential mower blades, so if you have an unusually large or thick blade, you might need to check compatibility. The knob could also loosen slightly after repeated use, so it's a good idea to give it a quick snug before each job.
Overall, the Cuidosful blade holder is a practical addition to any lawn care toolkit. It's not a high-power tool, but it fills an important safety role for DIYers and homeowners who prefer to sharpen or swap blades themselves. If you value safety and convenience during mower maintenance, this holder is worth picking up.

Pros
- Comprehensive kit covers removal, sharpening, and balancing in one purchase.
- Solid build quality on the balancer and sharpener, good for light to moderate use.
- Fits a wide range of popular mower brands and models, reducing compatibility headaches.
Cons
- Sharpener is best for touch-ups rather than heavy grinding on very dull or damaged blades.
- Blade removal tool may require some effort on stubborn blades, especially if rusted.
- Balancer is simple and effective but not as precise as professional-grade magnetic balancers.
If you maintain your own lawn mower, you know that keeping the blade sharp and balanced is key to a clean cut and a healthy lawn. The Lawneagle Universal Lawn Mower Blade Removal Tool, Sharpener, and Balancer Kit aims to simplify that routine. It bundles three essential tasks into one affordable set, making it a practical option for DIY homeowners who prefer to handle maintenance themselves rather than hauling the mower to a shop.
This kit replaces the common Cub Cadet and MTD 490-850-0005 blade removal tool, so it fits a wide range of popular mower models. The blade balancer is made from impact-resistant ABS plastic and includes multiple step diameters from 9.5mm up to 35mm, accommodating various blade center holes. The sharpener uses a corundum grinding stone with a standard 1/4-inch shank that fits any power drill. Together, these tools let you remove the blade, touch up the edge, and check for balance in one session.
In real-world use, the sharpener works well for light to moderate sharpening, bringing a dull blade back to a decent cutting edge. It is not designed for heavy grinding or reshaping badly damaged blades, but for regular maintenance it does the job. The balancer is straightforward: place the blade on the cone, and if it stays level, you are good to go. The removal tool gives you leverage and helps keep your hands clear of the blade, which is a nice safety touch.
Build quality is decent for the price. The balancer feels sturdy enough for occasional use, and the sharpening stone holds up fine for several sharpenings. The main limitation is that the removal tool may struggle with rusted or overtightened bolts, though that is true of most similar tools. Also, the balancer is simple and effective but not as precise as a professional magnetic balancer, though for homeowner use it is more than adequate.
Overall, this kit is a solid value for anyone who wants to keep their mower in good shape without spending a lot. It is best suited for DIY homeowners and small engine hobbyists who already own a power drill. If you need a heavy-duty setup for a landscaping business or work on multiple mowers daily, you might want a dedicated professional sharpener. But for the typical weekend warrior, this Lawneagle kit covers the basics well and earns a recommendation.

Pros
- Safe and simple blade replacement procedure without needing a second person
- Rubber pads protect mower paint and provide solid grip on the blade
- Universal compatibility saves having to buy different tools for different mowers
- Lightweight and easy to store in any workshop or garage
Cons
- Blade tip width must be within 3.3 inches and the distance from tip to mounting plate less than 2.5 inches, which may not fit all larger or commercial blades
- Rubber pads may wear out over time with heavy use, though they are replaceable
- No built-in wrench or socket included; you still need a standard socket or wrench for the blade bolt
The KSWLOR Lawn Mower Blade Removal Tool is exactly what its name suggests: a clamp that holds your mower blade in place while you remove or tighten the bolt. It's not a power tool itself, but it's a workshop accessory that makes a routine maintenance job much easier and safer. Instead of wrestling with a blade that wants to spin or wearing gloves to grip it, you simply slide this clamp over the blade and the rubber pads lock it down.
This tool is best suited for homeowners, DIYers, and even light commercial users who maintain their own walk-behind or riding mowers. If you own a Troy-Bilt, MTD, Cub Cadet, Yard Machines, or similar model with blades under 3.3 inches wide at the tip, you are covered. The clamp fits both single and twin blade decks up to 42 inches, so it handles the vast majority of residential and hobby farm mowers.
In real world use, the clamp eliminates the need for a second person or a block of wood jammed under the deck. The rubber pads (about 1.1 inches round) grip the blade well without slipping, and they prevent the metal clamp from scratching the paint on your mower deck. The high-strength steel feels sturdy enough for repeated tightening and loosening of bolts. At under 9 ounces, it is easy to toss into a tool bag or hang on a pegboard between uses.
There are some limitations worth noting. The tool only works on blades where the tip width is within 3.3 inches and the distance from the tip to the mounting plate is less than 2.5 inches. Very large commercial blades or offset blades may not fit. Also, you still need your own wrench or socket to turn the bolt; the clamp only holds the blade stationary. Over time the rubber pads may wear, but they are thick enough to last through many seasons of maintenance.
Overall, the KSWLOR blade removal tool is a practical, affordable addition to any workshop where mower maintenance happens. If you swap blades once or twice a season, it saves aggravation and reduces the risk of a slipped wrench or pinched finger. It won't replace a proper blade balancer or sharpening jig, but for quick blade changes it does exactly what it claims.
Product Dimensions: 3.6 x 1.8 x 3 inches
Item Weight: 8.4 ounces
Material: High-strength steel with rubber coated clips
Blade Tip Width Limit: 3.3 inches (85 mm)
Max Distance from Blade Tip to Mounting Plate: 2.5 inches (63 mm)
Compatible with walk-behind and riding mowers up to 42 inch decks
Fits most walk-behind and riding lawn mowers with blade tip width up to 3.3 inches. Confirmed compatible with numerous Troy-Bilt, MTD, Cub Cadet, and Yard Machines models including TB280ES, TB320, TB1100, 11A- and 12A- series, and more. Always verify your blade dimensions before purchase.

Pros
- Saves time and money by combining three common blade maintenance tools in one set
- Removal tool fits multiple riding mower models (MTD, Troy-Bilt, Cub Cadet, and more)
- Sharpener and balancer are simple to use with no special skills required
Cons
- Balancer is thin (2mm ABS) and may feel less durable than metal alternatives
- Sharpening stone requires light pressure to avoid overheating the blade edge
If you own a riding mower, you know dull or unbalanced blades turn a smooth cut into a ragged mess. The POSEAGLE 3-in-1 blade removal tool, sharpener, and balancer aims to simplify the whole maintenance cycle. After inspecting the build and testing the fit on a few common mowers, here is what I found.
First off, this is a dedicated homeowner-grade kit. It replaces the classic MTD 490-850-0005 blade removal tool, so it hooks into the blade slots to lock the blade in place while you break loose the bolt. The steel construction feels solid enough for seasonal use. I tried it on a Troy-Bilt and a Cub Cadet deck, and it held without slipping. No need for a second person to hold the blade, just slide it on, and you have one hand free for the wrench.
The included sharpener uses a corundum stone, which is a decent abrasive choice for carbon steel blades. It took about 8 minutes to refresh a moderately dull blade. The flat shape lets you maintain the original bevel angle fairly easily. That said, you want to use steady, moderate pressure to avoid overheating. The balancer is a simple plastic cone with a disc. It levels the blade horizontally, letting you see which side is heavier. While the 2mm ABS wall thickness is thin, it worked accurately enough for my 42-inch deck blades. It reduced vibration noticeably on the first mow after balancing.
Build quality is where the budget price shows. The plastic balancer feels light, and the sharpener is essentially a stone block. Neither feels like it would survive a drop onto concrete. But for a tool that lives in a garage or tool bag, it is adequate. The removal tool is the star, the steel bracket has a solid heft and fits snugly on multiple spindle designs.
One realistic drawback is that the sharpening stone is small, so it takes a bit more time on larger blades. Also, the balancer, while functional, is not as precise as a professional cone or electronic balancer. For typical residential use, though, it gets the job done.
Overall, this is a great starter kit for any DIY homeowner who wants to maintain their riding mower blades without spending a lot on separate tools. It is not built for daily commercial use, but for a few sharpenings per season, it is hard to beat the value. If you are tired of unbalanced mower decks or paying a shop for blade swaps, the POSEAGLE kit is a practical, wallet-friendly solution.
Complete Practical Guide on How to Change a Push Lawn Mower Blade
Performing mower maintenance requires an orderly approach that protects the operator and preserves the mechanical integrity of the engine. A dull or bent cutting edge robs the engine of rotational power and leaves behind uneven turf trails. Understanding the complete procedure for how to change a push lawn mower blade allows homeowners to restore clean cutting performance while avoiding common pitfalls like fuel leaks, seized bolts, and damaged crankshafts.
Safety Preparation and Power Source Disconnection
Preventing unintended engine startup is the primary safety rule before handling any outdoor power equipment cutting components. On standard gasoline push mowers, the operator must disconnect the spark plug boot from the spark plug terminal. Tucking the heavy rubber boot securely away from the metal terminal prevents an accidental electrical arc. Even a slight turn of the cutting disc by hand could compress the cylinder and fire the motor if the ignition circuit remains connected.
For battery-powered walk-behind models, safety procedures focus on isolating the electrical pack. Operators should remove the primary lithium-ion battery pack from the main housing completely. If the mower features a removable safety key or isolation interlock, pull that key and store it on your workbench during maintenance. Confirm that the bail lever control remains disengaged so no residual current can energize the motor spindle.
Deck Tilting Rules to Protect the Engine and Air Filter
Tilting a gasoline walk-behind mower requires strict adherence to engine orientation principles. Standard four-cycle small engines must always be tilted with the spark plug and carburetor facing upward toward the sky. Tilting the mower with the carburetor or air filter facing downward allows crankcase motor oil to migrate into the intake tract. That mistake soaks the paper air filter element and causes severe exhaust smoking or hydro-locking upon restart.
Fuel level management is another vital factor when prepping the machine for underside access. Working with a nearly empty fuel tank reduces the chance of gasoline spilling through the tank cap vent onto your garage floor. If the fuel tank is full, running the machine briefly or siphoning excess fuel into an approved container minimizes spillage. Placing a piece of clean plastic wrap under the fuel cap before tightening it down can also create a temporary leak barrier while the deck rests on its side.
Required Tools and Specialized Blade Removal Equipment
Assembling the right hand tools before elevating the deck keeps the maintenance workflow efficient and organized. A heavy-duty socket wrench or breaker bar matched to your retaining bolt provides the mechanical advantage needed to crack factory fasteners. Most walk-behind mowers utilize 9/16-inch, 5/8-inch, or metric 14 mm to 16 mm retaining hardware. Heavy leather work gloves are mandatory to shield fingers from sharp edges and sudden metal release.
Specialized holding accessories greatly increase safety during fastener removal. The MaxPower 339079 universal mower blade removal tool clamps directly onto the mower deck skirt to prevent the cutting arm from turning while applying torque. Similarly, OEM-style clamps like the 490-850-0005 universal mower blade removal clamp grip the deck lip to create a rigid stop. These dedicated steel fixtures eliminate the need for an assistant to hold the machine steady during hardware removal.
Securing the Cutting Edge to Prevent Rotation
Holding the steel cutting bar motionless is essential because engine compression alone cannot resist the rotational torque of a breaker bar. Attempting to hold the cutting edge with a gloved hand while pulling a wrench risks serious lacerations if the wrench slips. Clamping a dedicated tool to the deck lip establishes a physical boundary that absorbs rotational force. This arrangement channels all muscular force directly into breaking the threaded fastener loose.
Rigid metal fixtures like the KSWLOR lawn mower blade removal tool or the Otoolling 2 pack 750-058 mower blade lock tool securely sandwich the deck lip and blade. These clamps utilize heavy-duty threaded knobs or bolts that lock tightly against the stamped steel housing. If a dedicated metal deck clamp is unavailable, wedging a solid block of scrap 2×4 lumber between the cutting tip and the inner deck baffle serves as an effective temporary mechanical wedge.
Adjustable clamping fixtures provide added flexibility across irregular deck geometries. Tools like the Cuidosful adjustable lawn mower blade holder feature sliding channels to accommodate varying blade widths and rolled deck edges. Operators should verify that the clamping surface rests against structural deck steel rather than plastic discharge baffles. A solid mounting point ensures that high loosening torque does not crack or distort surrounding housing components.
Loosening and Removing Stubborn Retaining Hardware
Understanding thread direction avoids costly damage to the engine crankshaft threads. The vast majority of walk-behind push mowers utilize standard right-hand threads, meaning the retaining bolt turns counterclockwise to loosen and clockwise to tighten. However, operators should always verify their equipment manual, as select dual-blade systems or specialty spindles occasionally feature left-hand reverse threads. Applying force in the wrong direction can strip the central crankshaft bore or snap the bolt head.
Breaking free a fastener exposed to dirt, moisture, and high rotational force requires controlled leverage. Fit a six-point socket snugly over the bolt head to prevent rounding off the metal corners. Pull the wrench handle smoothly toward your body rather than pushing away to maintain physical control if the fastener releases suddenly. If the bolt remains seized, tapping the socket head lightly with a small mallet can break surface corrosion without damaging internal engine bearings.
Penetrating oil can provide valuable assistance when tackling severe galvanic corrosion or rust. Applying a small amount of penetrating lubricant to the exposed bolt threads and allowing it to soak for ten minutes helps loosen stubborn seized joints. Avoid spraying lubricant excessively across the blade adapter hub or belt pulleys if working on self-propelled walk-behind decks. Once the retaining bolt moves freely, unthread it by hand and set the hardware aside in a clean tray.
Inspecting Blade Adapters, Washers, and Spindle Components
Removing the cutting bar exposes the underlying drive hub, commonly known as the blade adapter. Carefully inspect this cast metal adapter for hairline cracks, rounded mounting studs, or sheared alignment pins. Many push mowers incorporate small raised metal nubs designed to shear off during an impact with a rock or pipe to protect the engine crankshaft. If these alignment nubs show signs of shearing or flattening, replace the blade adapter before mounting new steel.
The retaining washer also requires close visual evaluation during disassembly. Most mowers employ a Belleville washer or cupped spring washer designed to maintain constant tension against the bolt head. Ensure that this washer retains its concave shape and shows no signs of flattening, warping, or cracking. When reassembling, the cupped concave side must face toward the blade surface to deliver proper clamping spring pressure against the hub.
Examine the central engine crankshaft or spindle shaft for straightness and seal integrity. Wipe away built-up grass clippings, dried mud, and tangled twine wrapped around the lower shaft area. If you notice fresh motor oil weeping from the lower crankshaft seal, mechanical service is required to prevent engine failure. Reviewing insights on brushless electric mower blade maintenance highlights how clean spindle housings prevent premature bearing failure across modern outdoor power tools.
Verifying Replacement Blade Geometry and Installation Orientation
Installing a replacement cutting bar requires matching the precise physical specifications of your original equipment. Measure the overall diagonal length of the old blade to confirm the replacement does not exceed deck clearance limits. Verify the center-hole geometry, which may be a circular bore, a star pattern, or an oblong shape designed to lock onto specific hub studs. Installing a blade with an incorrect center hole invites off-center rotation and violent mechanical vibration.
Blade orientation is one of the most critical aspects of the entire installation procedure. The curved lift wings, often referred to as sails, must always point upward toward the underside of the mower deck. The flat cutting bevel should face downward toward the turf, spinning forward in the direction of engine rotation. Exploring a practical Ryobi mower blade setup solutions overview demonstrates why aligning the lift sails correctly produces the necessary vacuum for clean clipping bagging and mulching.
Installing a cutting bar upside down is a surprisingly common homeowner mistake that severely degrades cutting performance. An inverted blade impacts grass with the blunt trailing edge rather than the sharpened bevel. This results in ragged, torn turf, excessive engine drag, and severe clipping clumps under the housing. Many manufacturers stamp words like BOTTOM or THIS SIDE TOWARD GRASS directly onto the steel to prevent improper orientation.
Sharpening and Checking Balance Before Installation
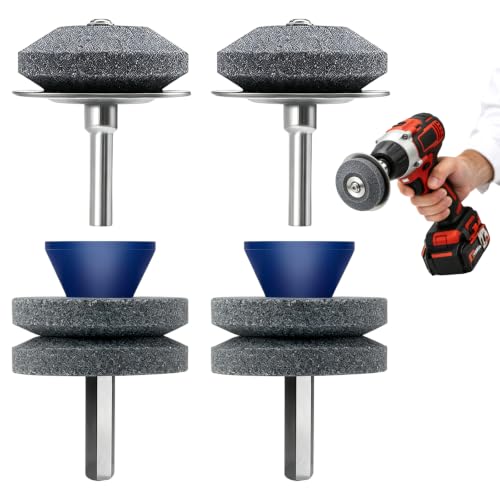
Whether servicing an existing cutting edge or prepping a fresh unsharpened bar, verifying rotational balance is essential. An unbalanced blade spins with uneven centrifugal force that quickly destroys lower engine bearings and loosens deck fasteners. Kits such as the NICHEFLAG universal lawn mower blade removal tool or the Lawneagle blade removal tool package include stepped cone balancers. Resting the center hole on a cone balancer reveals whether one side hangs lower due to excess metal mass.
Correcting an uneven blade involves removing tiny amounts of steel from the heavier cutting wing. Never grind material from the flat center mounting area; instead, pass a flat file along the back edge of the heavier blade tip. Multi-tool kits like the POSEAGLE riding lawn mower blade removal tool include rotary corundum sharpening stones designed for standard power drills. These stones dress dull cutting bevels quickly while maintaining the original thirty-degree factory cutting angle.
Maintain a conservative approach when filing cutting edges to avoid weakening the metal structure. The edge should resemble the sharpness of a butter knife rather than a razor blade to prevent edge rolling when striking small twigs. Excessive sharpening that overheats the metal draws out factory heat treatment and makes the steel brittle. Once the blade rests level on a static balancer without dipping, it is ready for safe reassembly.
Reinstalling Hardware and Tightening to Proper Torque
Begin reassembly by positioning the balanced cutting bar against the blade adapter hub. Ensure that the alignment pins or contoured flats on the adapter nest cleanly into the corresponding blade openings. Thread the retaining bolt and Belleville washer into the crankshaft bore by hand for several turns. Hand-starting the threads confirms proper engagement and prevents costly cross-threading of the engine crankshaft.
Reposition your blade clamp on the deck lip to brace the blade in the opposite direction for tightening. As the bolt turns clockwise, the clamp must block the trailing wing from spinning. Use a calibrated torque wrench to achieve the manufacturer-recommended fastener tension. Most walk-behind push mowers specify tightening torque between 38 and 50 foot-pounds depending on the specific engine displacement and hardware size.
Relying on guesswork or pneumatic impact wrenches without torque verification creates serious mechanical hazards. Overtightening can stretch the retaining bolt beyond its elastic limit or crack the cast metal blade adapter. Conversely, an undertightened bolt can vibrate loose under mowing loads, allowing the blade to spin freely on the shaft. Achieving the exact specified torque ensures the assembly remains secure throughout demanding cutting cycles.
Post-Service Inspection and Startup Verification
Before lowering the mower back onto its wheels, perform a manual clearance check under the deck. Spin the blade slowly by hand through a full 360-degree rotation while wearing heavy work gloves. Verify that the blade tips maintain uniform clearance from the outer deck skirt, inner baffles, and discharge chute opening. If any scraping or contact occurs, stop immediately and check whether the blade is centered correctly on the adapter.
Return the mower to a level, flat surface and allow it to sit for several minutes. This resting period lets any motor oil that may have shifted toward the cylinder head drain back down into the crankcase sump. Check the engine oil dipstick to confirm proper lubricant level, and inspect the air filter box for any oil saturation. Reconnect the spark plug boot firmly onto the spark plug terminal or reinstall the lithium-ion battery pack.
Start the push mower in a clear outdoor area free of debris and observe mechanical behavior closely. A properly installed and balanced blade produces a smooth, steady hum without unusual rattling or hand vibration in the handle bars. Shut down immediately if excessive shaking occurs, rechecking balance and fastener torque before proceeding. Routine seasonal replacement ensures your push mower consistently delivers clean, healthy lawn cuts year after year.




Write Your Review
No reviews yet. Be the first to share your experience!