


Bucking through fallen timber or clearing storm blowdown quickly turns frustrating when a saw refuses to self-feed and produces fine sawdust instead of thick wood chips. Forcing a dull chain through dense hardwood accelerates guide bar rail wear, generates excessive friction heat, and places unnecessary strain on the clutch drum and crankshaft bearings. Understanding how do u sharpen a chainsaw blade allows woodcutters to restore clean cutting geometry, maintain brisk chain speed, and eliminate dangerous kickback tendencies during firewood processing. A properly filed cutter bites crisply into wood grain under its own weight, keeping the operator from applying awkward downward leverage that compromises balance and control.
Maintaining razor-sharp cutters also protects your powerhead from undue mechanical stress, especially when operating high-revving equipment that demands proper two-stroke chainsaw engine maintenance to avoid excessive cylinder heat. Whether you use a traditional handheld round file or attach a specialized high-speed grinder guide to a rotary tool, mastering cutting angles and raker clearances remains essential for safe timber work. Regular field touch-ups preserve the lifespan of expensive guide bars and keep cutting teeth aligned for straight, predictable cuts across every log.
Complete Technical Guide to Restoring Chainsaw Cutters and Depth Gauges
Restoring a dull saw chain requires understanding how cutting teeth interact with timber grain before picking up workshop files. While operators frequently ask how to sharpen a chainsaw blade, chainsaws do not cut with a solid blade like a circular saw or brush cutter. Cutting action actually relies on a specialized loop of riveted steel chain that travels along a grooved guide bar. Restoring this cutting loop demands precise sharpening of both the chisel cutting tooth and the leading depth gauge that regulates chip thickness.
Anatomy of Saw Chain Cutters and Working Geometry
Each individual cutter on a modern saw chain features several distinct surfaces working together to sever and clear wood fibers. The horizontal top plate slices the primary severance line across the grain, while the curved side plate scoops out the severed wood chip from the kerf. Beneath these cutting edges sits the curved gullet, which acts as a miniature clearance channel directing chips away from the working corner. Understanding these components helps woodcutters visualize why filing angles directly govern cutting speed and smoothness.
Directly in front of each cutting tooth sits a rounded metal projection known as the depth gauge or raker. The depth gauge does not cut wood; rather, it regulates the exact depth the cutting corner can bite into the log during rotation. When a depth gauge sits too high, the cutter cannot contact the wood, leaving the saw spinning uselessly while generating fine powder. If a depth gauge is filed too low, the tooth grabs too aggressively, causing violent kickback risks and severe engine bogging.
Connecting tie straps and drive links complete the structural loop by riding securely inside the guide bar track. The drive link tangs engage the internal teeth of the drive sprocket, receiving mechanical power from the clutch drum while distributing lubricating bar oil. When cutters become dull or misshapen, the resulting uneven cutting forces twist the drive links against the bar rails, producing burred metal edges. Keeping teeth sharp ensures that mechanical cutting stresses remain balanced across the entire guide bar assembly.
Recognizing Dull Teeth and Guide Bar Friction
Recognizing when a chain requires sharpening prevents unnecessary operator fatigue and protects powerhead components from premature failure. The most reliable indicator is the consistency of the wood waste expelled from the side cover during bucking. Sharp cutters slice cleanly through fibers, producing thick, rectangular wood chips that fly freely from the cut. In contrast, dull cutters scrape and grind, yielding powdery sawdust that clogs engine cooling fins and air filter elements.
Physical resistance during timber cutting provides another clear warning sign that teeth have lost their keen edge. A properly sharpened chain pulls itself steadily through the log under the powerhead weight with minimal down-pressure on the handlebar. When an operator must push down firmly or rock the saw to make progress, the cutters are dull. Forcing a blunt chain through dense timber generates high friction heat, scorches the guide bar rails, burns bar oil, and stretches drive links prematurely.
Matching Tooling to Specific Chain Pitch Specifications
Saw chains are manufactured in distinct pitch classes that dictate the exact round file diameter or grinding burr required for maintenance. Chain pitch represents the distance between any three consecutive rivets divided by two, with common sizes including three-eighths inch low profile, point-three-two-five inch, and standard three-eighths inch. Selecting the wrong tool diameter ruins the cutter profile, creating either a weak undercut hook that dulls instantly or a blunt face that refuses to cut.
Lightweight residential chainsaws typically run three-eighths inch low-profile chain, which strictly pairs with a five-thirty-seconds inch (four-point-zero millimeter) round file or stone. Mid-sized ranch and farm saws frequently utilize point-three-two-five pitch chain, requiring a three-sixteenths inch (four-point-eight millimeter) file to maintain proper curvature. Heavy-duty commercial chainsaws running standard three-eighths pitch chain generally require a seven-thirty-seconds inch (five-point-five millimeter) or thirteen-sixty-fourths inch file depending on tooth wear.
Modern cutting setups extend well beyond traditional gas saws, meaning operators running cordless battery and electric chainsaws must be equally vigilant about cutter sharpness to prevent rapid pack depletion. Battery saws rely heavily on narrow-kerf chains to conserve electrical energy, making precise five-thirty-seconds inch tooling critical for maximizing battery runtime per charge. Checking the stamped identification numbers on the drive links or consulting manufacturer documentation confirms your chain pitch before introducing abrasive files.
Workspace Preparation and Powerhead Safety Protocols
Sharpening cutting teeth requires absolute stability and deliberate powerhead isolation before beginning any abrasive filing work. Turn off the saw engine and disconnect the spark plug lead on gas models, or remove the lithium battery pack on electric saws. Clamping the guide bar securely in a bench vise or field stump vise prevents shifting while leaving both hands free to handle tools. Always wear heavy cut-resistant gloves to protect your hands from sharp teeth and burred guide bar edges.
Disengage the chain brake during maintenance so the chain can rotate freely along the top guide bar rail as you work. Inspect the entire chain loop to identify the master cutter, which is the tooth showing the most severe damage or shortest top plate. Mark this reference cutter clearly using a felt-tipped marker, paint pen, or piece of chalk. Every cutter on the chain will ultimately be filed down to match the dimensions of this shortest reference tooth.
Sharpening with a Rotary Tool Grinding Guide
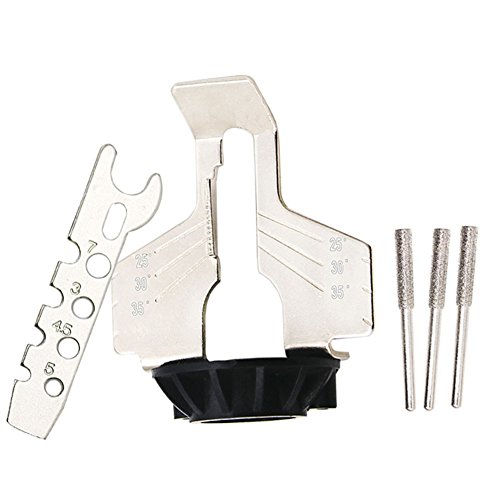
Electric rotary tool adapters offer an efficient alternative to hand filing, especially when restoring rock-dulled cutters that require significant metal removal. The Chainsaw Sharpening Guide with Ruler by cyclamen9 screws directly onto standard rotary tools in place of the tool housing cap. This specialized attachment provides a stable guide plate stamped with clear angle marks, holding the grinding head at the precise angle required for factory-level sharpness.
The attachment kit utilizes high-speed steel grinding heads designed with high hardness, impact resistance, and heat tolerance to dress hardened saw teeth effectively. After locking the appropriate diameter grinding head into the rotary collet, seat the guide firmly against the guide bar and cutter top plate. Set your rotary motor to a moderate speed, aligning the stamped angle guide with the cutting line to maintain a consistent thirty-degree profile across every tooth.
Apply light, steady contact against the inside of the cutter edge, holding the spinning grinding stone in place for only two or three seconds per pass. Excessive pressure or extended contact overheats the cutter, turning the steel blue and softening the factory temper necessary for edge retention. Sharpen all cutters facing one direction along the top rail first, then reverse your working angle to dress the opposing cutters with identical passes.
Manual Hand Filing Step-by-Step Technique
Traditional hand filing remains a dependable method for field maintenance, providing excellent tactile control without any risk of thermal metal damage. Fit your round file into a rigid file guide or roller guide to ensure accurate thirty-degree top-plate and horizontal filing angles. Place the round file into the gullet of your marked master cutter, aligning the guide lines parallel to the centerline of the guide bar. Approximately twenty percent of the file diameter should extend above the top plate to form the correct hook profile.
Push the file smoothly across the tooth face, moving strictly from the inside of the cutter outward toward the exterior corner. Never pull or drag the file backward across the tooth, as file teeth cut in only one direction and reverse friction quickly ruins the file. Lift the tool cleanly away from the cutting face at the end of each forward stroke before repositioning it for another pass.
Count the exact number of forward strokes needed to produce a sharp, shiny, nick-free cutting edge on the master cutter. Apply this identical stroke count to every subsequent cutter facing that direction to ensure all teeth maintain consistent length. Once the first side is finished, reposition yourself to sharpen the opposite-facing cutters using the same stroke count and matching thirty-degree angle markings.
Measuring and Lowering Depth Gauges Correctly
Filing cutter teeth naturally lowers their overall height, which gradually decreases the vertical distance between the cutting edge and the leading depth gauge. If depth gauges are ignored during routine maintenance, the cutters will eventually sit lower than the rakers, preventing the chain from biting wood. Checking depth gauge clearance every two or three sharpenings ensures each tooth takes a uniform bite without stalling the powerhead.
Place a progressive depth gauge tool directly over the chain cutters to check the clearance between the top plate and the raker tip. Standard woodcutting chains require a depth gauge clearance of twenty-five thousandths of an inch (zero-point-zero-two-five inches) for general firewood bucking. Any steel protruding above the slot in the depth gauge guide must be filed down flush using a fine-cut flat file.
Older machines often feature heavier clutch assemblies and fixed oil output rates, which makes sharp teeth vital when running vintage farm and utility chainsaws through dense timber. After leveling the depth gauge flush with the guide, use your flat file to gently round off the leading edge of the raker. Maintaining a contoured leading shoulder on the depth gauge reduces cutting chatter and allows the chain to glide over tough knots smoothly.
Correcting Curved Cuts and Unequal Cutter Lengths
When a chainsaw repeatedly pulls to one side or curves during straight bucking cuts, mismatched cutter geometry is almost always responsible. If cutters on one side of the chain are filed shorter than those on the opposite side, the longer teeth bite deeper, steering the bar off course. Uneven depth gauge heights also produce lateral drift, causing the guide bar to bind tightly inside the wood kerf.
Correcting this problem requires measuring the top plate lengths of all cutters using a small ruler or dial caliper to spot variations. Carefully file down the longer teeth until all cutters match the length of the shortest tooth on the entire chain loop. Additionally, inspect the guide bar rails for uneven wear or pronounced exterior burrs that cause the chain to lean. Truing the bar rails with a flat file restores square edges and ensures straight tracking through heavy logs.
Post-Sharpening Inspection, Tensioning, and Cut Verification
After filing all teeth and depth gauges, thoroughly clean away metal filings and abrasive debris from the guide bar groove and sprocket area. Reconnect the spark plug wire or reinsert the battery pack, then adjust the chain tension to eliminate any bottom rail sag. A properly tensioned saw chain fits snugly against the lower bar rails while pulling smoothly around the bar by gloved hand when the chain brake is off.
Start the powerhead in a safe outdoor location while wearing approved cut-retardant chaps, eye protection, cut-resistant gloves, and hearing protection. Hold the guide bar tip a few inches above a clean log at half throttle to verify that lubricating oil sprays cleanly from the nose sprocket. Complete a test cut into a solid log without pushing down on the handles, confirming that the saw self-feeds smoothly and ejects large, crisp wood chips.
Field Maintenance Routine for Long-Term Cutter Life
Routine preventative maintenance yields far better cutting performance than waiting for a chain to become completely blunted before attempting repairs. Spending two minutes performing two or three light file strokes per tooth at every fuel refill keeps cutting edges sharp while removing minimal steel. Whether using manual round files on the tailgate or high-speed rotary attachments in the workshop, disciplined angle consistency preserves cutter longevity and ensures safe, efficient timber processing.






Write Your Review
No reviews yet. Be the first to share your experience!