


Bucking firewood or clearing storm blowdown quickly turns hazardous and exhausting when a chainsaw loses its keen cutting edge. Dull cutter teeth generate powdery sawdust rather than thick wood chips, forcing the operator to lean heavily into the guide bar and risk severe engine bogging or thermal bar rail discoloration. Learning how to sharpen chainsaw blade with dremel rotary tools provides a rapid, consistent method to restore factory edge geometry without spending hours pushing a manual round file. Maintaining sharp cutting teeth also protects engine health across regular two-stroke chainsaw maintenance schedules by letting the powerhead maintain its optimal operating RPM under load.
Rotary tool sharpening systems utilize high-speed aluminum oxide grinding stones or durable high-speed steel cutters guided by specialized angle jigs. These guides thread directly onto the rotary tool housing cap to hold precise 25-degree to 35-degree top plate angles against the cutter edge. Using accessories like the Dremel A679-02 Sharpening Attachment Kit or the Chainsaw Sharpening Guide with Ruler simplifies edge restoration for homeowners, rural landowners, and firewood processors alike. Consistent cutter sharpness minimizes operator fatigue, reduces kickback tendencies, and ensures that every cutting pass tracks straight and true through seasoned hardwood or resinous pine.
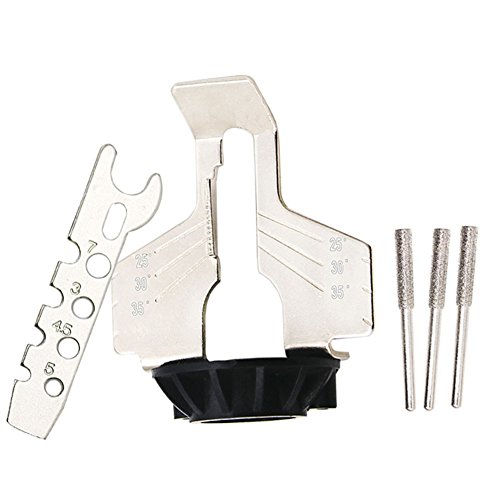


Pros
- Simple to set up and use, even if you have no sharpening experience
- Delivers sharp, consistent edges on chainsaws, mower blades, pruners, and shears
- Affordable way to maintain tools instead of buying new ones
- Works with a wide range of Dremel tools, both corded and cordless
Cons
- Requires a compatible Dremel rotary tool, which is sold separately
- Not effective for severely damaged or heavily dulled blades; some manual filing may be needed first
- Chainsaw stone sizes are limited; specialty chains may require additional stones
The Dremel A679-02 Sharpening Attachment Kit is a versatile accessory set designed to turn your Dremel rotary tool into a precision sharpener for common outdoor tools. It comes with three dedicated attachments for chainsaws, lawn mower blades, and garden tools like shears and pruners, plus four grinding stones. This kit is ideal for homeowners, gardeners, and DIY enthusiasts who want to keep their cutting equipment in top shape without learning complicated manual sharpening techniques.
In real-world use, this kit shines at routine maintenance. The attachments lock onto the Dremel tool quickly and include guides that set the correct sharpening angle automatically. Users report that a dull lawn mower blade can be restored to a clean cutting edge in under ten minutes. The chainsaw attachment works well for standard chains, though very worn or damaged chains may need initial filing before the stone can do its job. The included stones cut efficiently and leave a smooth finish, and swapping between attachments is straightforward.
Build quality is solid for an accessory kit. The plastic attachments feel durable enough for occasional to regular use, and the stones hold up well over multiple sharpenings. The screw-on mounting system is secure and doesn't wobble during operation. Because the kit is small and lightweight, it stores easily in a toolbox or drawer. It pairs with most Dremel tools, which is a big plus if you already own one. The instructions are clear, making setup a breeze even for a beginner.
The main drawback is that you need a Dremel rotary tool to use it. Also, if your blades are extremely dull or nicked, the stones alone may not grind away enough material quickly; you might need to do some heavy work with a file first. That said, for regular upkeep of moderately used tools, this kit is a fantastic value. It saves you the hassle and expense of professional sharpening and helps your equipment last longer. If you own a Dremel and care for your garden or workshop tools, this attachment kit is a worthwhile addition.
Rotary Tool Chainsaw Sharpening Technical Guide
Maintaining sharp saw chain teeth represents the single most important preventative task for safe, efficient timber bucking and felling. When cutters lose their keen edge, wood cutting friction spikes, guide bar temperatures surge, and the powerhead consumes significantly more fuel or battery pack energy. Mastering how to sharpen chainsaw blade with dremel attachments enables operators to achieve consistent cutter geometry and clean gullets in minutes. Understanding the interplay between stone diameter, sharpening angle, and depth gauge height ensures optimal chip clearance and prolonged cutting attachment life.
Anatomy of Chainsaw Cutters and Recognizing Dull Teeth
A modern chainsaw loop features cutting links configured with precise angles designed to sever and clear wood fibers cleanly. Each cutter consists of a flat top plate, an outer chrome-plated cutting corner, a curved side plate, and a hollow gullet where severed wood curls accumulate. Positioned directly in front of each cutting tooth sits the depth gauge, also known as the raker, which limits how deeply the top plate bites into the log. When the thin chrome layer on the cutting corner encounters rocks, soil, or abrasive bark, the sharp edge rolls over and cutting performance degrades rapidly.
Identifying dull cutting teeth early prevents severe guide bar rail damage and unnecessary powerhead strain. A sharp chain pulls itself smoothly into the wood, ejecting thick, rectangular wood chips across the work zone. In contrast, dull teeth produce fine, powdery sawdust and require the operator to bear down on the handlebar with significant physical force. Additional warning signs include the guide bar smoking from excessive friction, the saw pulling unevenly to one side, or the engine bogging down during routine bucking cuts.
Safety preparation must always precede any cutting attachment inspection or sharpening procedure. Operators must turn off the powerhead, allow the hot muffler to cool, and firmly engage the manual chain brake. For two-stroke gasoline saws, pull the spark plug boot from the terminal to eliminate accidental engine turnover. On battery-powered electric units, remove the lithium-ion battery pack entirely from the housing, and always slip on cut-resistant gloves before touching the cutters.
Selecting Grinding Stone Diameters for Chain Pitch Specifications
Chainsaw chain pitch defines the distance between any three consecutive rivets divided by two, determining the physical scale of the cutters. Matching the rotary grinding stone diameter to the specific chain pitch ensures the stone fits the cutter gullet perfectly without altering factory tooth curvature. Installing an incorrect stone diameter ruins the cutter profile by either grinding away too much top plate steel or leaving a dull, blunted cutting edge. Most consumer and professional chains conform to standardized pitch sizes, including 1/4 inch, 3/8 inch Low Profile, .325 inch, and standard 3/8 inch.
Manufacturers produce color-coded and numbered rotary stones designed specifically for outdoor power equipment maintenance. The Dremel 453 grinding stone measures 5/32 inch (4.0 mm) in diameter, making it suitable for 1/4 inch pitch loops and 3/8 inch Low Profile chains commonly found on residential pruning saws. For mid-sized farm and ranch chainsaws utilizing .325 inch pitch chain, the Dremel 454 stone provides the required 3/16 inch (4.8 mm) profile. Larger professional saws running standard 3/8 inch pitch chain require the Dremel 455 stone, which features a 7/32 inch (5.5 mm) diameter designed to reshape heavy-duty cutters accurately.
Abrasive composition also plays an important role in grinding efficiency and heat management during sharpening. Traditional aluminum oxide stones, such as those included in Dremel sharpening attachments, wear slowly while leaving a smooth, polished finish on tempered steel teeth. Alternative accessories like the Chainsaw Sharpening Guide with Ruler incorporate high-speed steel grinding heads offering high wear resistance and thermal stability. Maintaining proper stone dimensions is essential across all drive configurations, ensuring that equipment discussed in our electric chainsaw performance overview maintains fast chain speed without motor overload.
Rotary Sharpening Attachments, Spacers, and Angle Guides
Threaded attachment guides convert standard high-speed rotary tools into dedicated, angle-consistent chain sharpeners. To install the guide, the operator unscrews the plastic nose housing cap from the rotary tool to expose the threaded metal collar. The sharpening attachment then threads directly onto the tool body, securing the grinding stone firmly within a slotted guide shoe. The Dremel A679-02 Sharpening Attachment Kit fits rotary tool models such as the 100, 200, 3000, 4000, 7760, 8220, 8240, 8250, and 8260, as well as model 4300 when equipped with a collet.
Clear angle indexing marks stamped onto the guide attachment establish the correct sharpening path relative to the guide bar. Most guide attachments feature raised 30-degree and 35-degree alignment lines, representing standard factory top plate angles for general crosscut chains. Holding the stamped line parallel to the guide bar ensures that the spinning stone passes across the cutter tooth at an exact, repeatable angle. This mechanical indexing removes the guesswork inherent in freehand filing, preventing irregular tooth bevels that cause the saw to drift off course.
Calibrating vertical stone depth prevents the abrasive surface from grinding into the chain tie straps or drive links below the cutter. Attachment kits supply specialized plastic spacers and depth gauge plates that raise or lower the stone relative to the guide shoe. A properly positioned stone should contact the cutting edge and gullet with roughly one-tenth of its diameter extending above the top plate. If the stone rests too low, it cuts dangerous notches into structural chain links; if it sits too high, it creates an ineffective backward-leaning cutting corner.
Step-by-Step Procedure for Sharpening Chainsaw Cutters with a Dremel
Proper preparation begins by stabilizing the chainsaw and cleaning the cutting attachment thoroughly before grinding. Mount the guide bar securely in a bench vise fitted with soft wooden jaw liners, or clamp the bar nose to a sturdy wooden bench in the field. Use a wire brush and biodegradable degreaser to strip away sticky sap, dried bar oil, and embedded grit from the cutters and tie straps. Tighten the chain tension slightly beyond normal operating tension to prevent cutter teeth from rocking backward under grinding stone pressure.
Inspect the loop to locate the master cutter, which is the tooth with the most damage, chipping, or shortest remaining top plate. Mark the top of this master cutter with a bright paint marker or grease pencil so you can identify where sharpening began and ended. All subsequent cutters must be ground back to match the length of this master tooth to maintain balanced cutting action. Turn on the rotary tool and set the speed control to a moderate operating window, typically between 15,000 and 20,000 RPM, to maintain clean abrasive action without overheating.
Place the flat shoe of the sharpening guide against the top plate of the master cutter, aligning the 30-degree stamped guide mark parallel to the guide bar. Bring the rotating stone into light, steady contact with the cutter face, moving gently from the inside of the tooth toward the outer cutting edge. Apply light pressure for two to three seconds at a time, pulsing the contact rather than bearing down continuously on the steel. Inspect the cutter face; once the rolled chrome edge disappears and a bright, uniform silver line emerges, the cutter is sharp.
Sharpen all cutters facing the same direction first along the top rail of the guide bar before moving to the opposing cutters. Disengage the chain brake, pull the chain forward using a gloved hand to position the next tooth against the guide, and re-engage the brake if needed. Count the grinding pulses on each tooth to ensure uniform metal removal across all right-hand cutters. Once you complete the first sequence, reposition the rotary tool to match the opposing angle marks, and sharpen all left-hand cutters to identical lengths.
Depth Gauge Calibration and Raker Maintenance
The depth gauge, commonly called the raker, plays an essential role in regulating cutting chip thickness and saw stability. As the cutter tooth is ground back horizontally, its sloped top plate becomes progressively lower relative to the fixed depth gauge in front. If an operator sharpens the teeth several times without lowering the rakers, the cutting edges cannot contact the timber, causing the saw to dust and skate. Conversely, grinding rakers down too far causes the teeth to grab aggressively into the grain, causing severe kickback and engine stalling.
Standard raker clearance varies depending on the intended cutting application and wood species being processed. General firewood bucking in mixed hardwoods requires a clearance gap of approximately .025 inch between the top of the raker and the cutter edge. Softwood cutting in green pine or cedar can tolerate a slightly deeper setting of .030 inch to maximize cutting speed. Operators should verify this clearance using a slotted steel depth gauge tool laid flat across two adjacent cutters.
Filing rakers requires a standard flat bastard file rather than the high-speed rotary grinding stone used for cutter teeth. Place the depth gauge tool over the cutters and file down any portion of the raker that protrudes above the slotted opening until it rests flush. After flattening the top, use the flat file to gently round the leading front corner of the raker back to its original sloping profile. Maintaining a smooth, rounded front slope on the raker prevents cutter snagging and reduces severe vibration during heavy bucking cuts.
Avoiding Thermal Steel Damage and Common Grinding Pitfalls
The most prevalent error when using a high-speed rotary sharpener involves generating excessive friction heat on the cutter tooth. Forcing the grinding stone against the metal or holding it in place for too long quickly heats the steel past its critical tempering threshold. When cutter steel overheats, it displays a distinct blue or straw-colored discoloration known as heat bluing. Annealed steel loses its hardened structural integrity, causing the razor edge to fold over and dull after only two or three cuts in dry oak.
Inconsistent cutter lengths represent another frequent pitfall that degrades saw handling and cut accuracy. When teeth on one side of the loop are ground shorter than teeth on the other side, the chain encounters uneven wood resistance. This imbalance causes the guide bar to curve off the cut line, pinching the bar inside the kerf and causing uneven rail wear. Periodically measuring top plate lengths with a pocket ruler or dial caliper ensures all cutters share equal workloads during crosscuts.
Stone glazing can also compromise sharpening results if aluminum oxide abrasives become clogged with wood resin and ground metal filings. A glazed stone burns the cutter tooth rather than slicing clean metal chips, generating intense heat with minimal sharpening progress. Use a small dressing stone or abrasive cleaning block periodically to strip away glazed residue and expose fresh, sharp aluminum oxide grit. When grinding heads show significant grooving or diameter reduction, discard them promptly to maintain accurate gullet curvature.
Comparing Rotary Grinders to Hand Files and Dedicated Bench Grinders
Choosing between rotary sharpening, manual hand filing, and stationary bench grinders depends on workspace conditions and production volume. Traditional round files equipped with clamp-on filing guides deliver excellent tactile feedback and generate zero friction heat on cutter chrome. However, hand filing demands significant physical effort and strict muscle memory to maintain consistent angles across twenty or thirty teeth. Rotary tools provide a fast, mechanized middle ground, restoring damaged teeth rapidly without demanding the repetitive arm motions of hand filing.
Dedicated electric bench grinders offer hydraulic chain clamping, micrometer depth stops, and reversible motor rotations for high-volume saw shops. Despite their precision, bench grinders remain bulky workshop appliances that require uncoupling the chain from the powerhead for every sharpening. Rotary tool kits like the Dremel A679-02 Attachment Kit for Sharpening allow operators to touch up cutters directly on the mounted guide bar in seconds. This on-the-saw convenience proves valuable for rural property owners maintaining legacy yard chainsaws or estate woodlot equipment away from the workshop bench.
Regardless of the sharpening method employed, every saw chain loop reaches a mechanical end of service life. Chainsaw cutters feature stamped witness lines on the top plate showing the manufacturer’s maximum wear threshold. Once sharpening grinds the cutter back to this angled witness mark, the tooth becomes structurally thin and risks breaking during operation. Retiring worn loops prevents severe chain derailment, broken drive links, and sudden chain breakage that can damage powerhead crankcases.
Operational Verification and Post-Sharpening Inspection
Conducting a systematic inspection after sharpening ensures the cutting attachment operates safely before touching timber. Wipe down the entire guide bar, chain links, and drive sprocket cover with a clean rag to remove residual grinding grit and abrasive dust. Abrasive particles left behind in the bar groove act like sandpaper, accelerating wear on guide rails and drive link tangs. Recheck chain tension carefully; the tie straps should snap back snugly against the underside of the bar rails without binding when pulled by hand.
Proper chain lubrication is vital to flush away micro-filings and reduce friction during initial high-RPM operation. Check that the bar oil reservoir is filled with clean, seasonally appropriate bar and chain lubricant. Point the guide bar nose toward a clean tree stump or cardboard sheet and run the powerhead at half-throttle for ten seconds. A crisp, distinct line of oil droplets flung off the bar nose confirms that the automatic oiler and guide bar oil ports are flowing freely.
Execute the initial test cuts on clean softwood or fallen branch wood to evaluate chain behavior under moderate load. Observe the discharge from the side cover; properly sharpened cutters should throw clean, curly shavings rather than fine powdery dust. The guide bar should track perfectly straight through the timber without wandering or requiring lateral steering pressure from the operator. If the powerhead pulls smoothly and cuts rapidly under its own weight, the rotary sharpening procedure was successful and the saw is ready for heavy firewood bucking.
Mastering rotary tool sharpening provides an accessible, highly effective maintenance solution for anyone operating outdoor power equipment. Selecting the correct stone diameter, setting accurate guide angles, and avoiding aggressive grinding pressure preserves cutter temper and extends chain longevity. Pairing sharp cutter teeth with properly calibrated depth gauges guarantees smooth chip ejection, straight tracking, and safe powerhead performance across demanding cutting jobs. Maintaining cutting equipment proactively minimizes operator fatigue, prevents premature engine wear, and keeps every woodcutting session productive and safe.




Write Your Review
No reviews yet. Be the first to share your experience!