


Removing a lawn mower blade is a straightforward maintenance task that becomes manageable once you address the primary challenge: preventing the blade from rotating while you loosen the retaining bolt. The core method involves securing the blade in place using a specialized locking tool or a safe, improvised holding method, then applying the correct torque direction to the center nut. This process is essential for sharpening, balancing, or replacing worn components to ensure your equipment continues to operate efficiently and safely.
Homeowners often hesitate to perform this task due to concerns about the weight of the blade or the risk of injury from a spinning component. However, with the right preparation, the procedure is a standard part of seasonal upkeep.
Whether you are using a walk-behind push mower or a riding lawn tractor, the fundamental steps remain consistent. The key is to verify your specific mower’s safety features and use the appropriate tools for the job. By following a structured approach, you can complete the removal process without damaging the spindle or the deck.

Pros
- Extremely affordable and widely compatible with most residential mower blades.
- Simple to use: just chuck it in a drill and run along the blade edge.
- Including both sharpener and balancer means you get a complete blade maintenance solution.
- Lightweight and portable, perfect for small workshops and home garages.
Cons
- Requires a drill to operate, so you need one on hand.
- Manual balancing takes a bit of patience to get right compared to electronic balancers.
- Not ideal for heavy commercial use or high-volume shops where speed is critical.
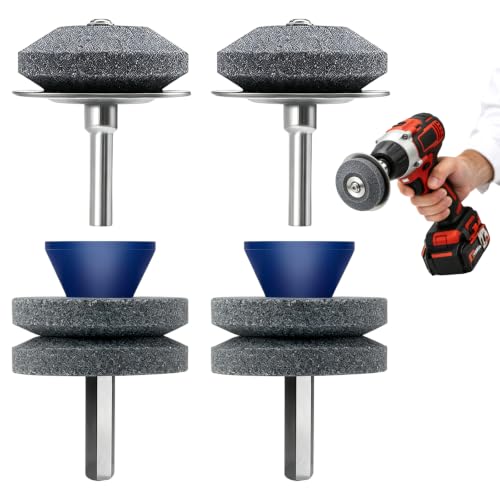
The Arnold BSK-1 is a straightforward sharpening and balancing kit designed for lawn mower blades. It turns your regular electric drill into a reliable sharpening tool, making it easy to maintain a clean cutting edge without investing in a dedicated grinder. The kit includes a cone-shaped sharpening stone and a simple static balancer, both built to handle blades from walk-behind mowers, lawn tractors, and zero-turn machines.
This kit is best suited for homeowners and DIYers who prefer to handle their own mower maintenance rather than taking blades to a shop. It's also useful for small engine mechanics who need an affordable backup method. But if you're a professional landscaper sharpening dozens of blades a week, you'll likely want a faster, more automated system.
In real-world use, the sharpener works quickly. Chuck it into a drill, run the stone along the blade's edge at a shallow angle, and you'll see burrs form within seconds. The vibration-free claim holds up -- the stone spins smoothly, which helps avoid gouging the blade. The balancer is straightforward: hang the blade on the cone and see which side drops. Rotate a few times to confirm. It's not fancy, but it effectively reveals if the blade is heavy on one side.
Build quality is typical for a budget tool. The sharpening stone is abrasive and should last through several sharpenings. The balancer is made of plastic and a metal cone. It's lightweight (just over two ounces) and stores easily in a drawer. For the price, durability is acceptable for occasional weekend usage. You won't hesitate to toss it in a toolbox or tool bag.
The main drawback is that you need a drill, and the process is manual. Balancing requires patience -- you'll have to grind off material from the heavy side and recheck. It's not as precise as a professional blade balancer, but it's more than enough to get a decently balanced blade. Overall, the Arnold BSK-1 is a smart buy for anyone who wants to keep their mower cutting cleanly on a budget. It's a practical addition to any workshop, especially if you already own a drill.
Color: Black
Dimensions: 3 x 7 x 10 inches
Weight: 0.24 pounds
Product Group: Outdoors
Binding: Lawn & Patio

Pros
- Universal fit works with most mowers, eliminating the need for multiple tools.
- Simple one-person operation saves time and hassle during blade changes.
- Compact and easy to store, so you can keep it in your truck or shed.
- Sturdy build with protective caps to prolong tool life.
Cons
- May require a jack to access blades on some ride-on mowers, adding an extra step.
- Not compatible with every mower brand or model, so double-check fitment before buying.
- Only useful for blade removal and installation, not a multi-purpose tool.
If you do your own mower maintenance, you know that wrestling with a spinning blade while trying to loosen a bolt can be a real headache. The Ximoon Mower Blade Removal Tool is a simple, effective solution that locks the blade in place, making the whole process safer and faster. It's a universal replacement for the Sten 750-058 Blade Lock, designed to fit most walk-behind and ride-on mowers.
This tool is best suited for homeowners, landscapers, and small repair shops who want to change blades without needing a second person or removing the entire cutter deck. The blade lock mechanism is straightforward: you slide it onto the blade, it holds it steady, and you can loosen or tighten the bolt with one hand. It works with a jack to lift the rear of a tractor, saving you the trouble of dismantling the deck. That's a real time-saver when you're doing seasonal blade swaps or sharpening.
Build quality is solid for the price. The Ximoon tool is made of durable metal and plastic, with thread protector caps that keep the threaded mechanism from getting damaged. It's lightweight and compact, so it won't take up much room in your toolbox or garage drawer. The design feels sturdy enough for regular use, and the universal fit means you likely won't need another blade lock anytime soon.
One realistic drawback is that it may not fit every mower model. While it's advertised as universal, some odd-sized or specialty blades could be a problem. Also, you'll need a jack for ride-on mowers, which adds a small extra step. However, for most standard walk-behinds and tractors, this tool works great. It's not a multi-purpose item, but it does one job very well.
Overall, if you're tired of fighting with mower blades or risking injury by holding them with one hand while cranking a wrench, the Ximoon Blade Removal Tool is a sensible buy. It's affordable, saves time, and makes blade changes a one-person task. For DIYers and pros alike, it's a handy addition to the workshop or shed.
Color: Black
Dimensions: 1 x 1 x 1 inches
Product Group: Lawn & Patio
Compatibility: Most walk-behind and ride-on mowers
This tool is ideal for: changing mower blades before the mowing season, swapping out dull blades during peak grass growth, and installing sharpened blades after servicing. It's also great for mobile lawn care operators who need to change blades quickly at different job sites.

Pros
- Sturdy metal build that won't crack or warp like plastic balancers.
- Accurately detects even small imbalances for improved cut quality.
- Works with a wide variety of blade center hole sizes thanks to the stepped cone design.
- Easy to use: place blade, watch gravity, and remove material from the heavy side.
Cons
- Some users report that the cone steps may not fit every blade perfectly, though most find a suitable step.
- Requires a bit of trial and error to center the blade precisely on the cone.
- The balancer itself has a narrow base that can tip if bumped during use.
The Oregon Precision Mower Blade Balancer (model 42-100) is a simple, no-fuss tool that belongs in every mower maintenance kit. After you sharpen your blade, tossing it back on the mower without checking balance is a gamble. Even a tiny imbalance can cause excessive vibration, rough cutting, and accelerated wear on your mower's engine and spindle bearings. This compact metal balancer solves that problem with a straightforward gravity-based design.
Best suited for homeowners who sharpen their own blades as well as professional landscapers, the balancer works with virtually any rotary mower blade. The stepped metal cone accommodates different center hole sizes, so it fits push mowers, riding mowers, and zero-turn machines from brands like Stihl, Husqvarna, Troy-Bilt, and more. The zinc die-cast body feels solid and substantial easily outlasting cheap plastic alternatives that can crack or warp over time.
Using the Oregon balancer is refreshingly simple. Place the blade flat on the cone, let it settle, and gravity will tell you if one side is heavier. If the blade dips, grind a bit more material off that side and recheck. The process takes only a minute or two but makes a real difference in how your mower runs. Users consistently report noticeably less vibration and a cleaner, more even cut after balancing.
One realistic limitation is that the cone steps might not align perfectly with every blade's center hole, though most users find a step that works. Also, the balancer has a narrow base, so you'll want to set it on a stable surface to avoid tipping. But these are minor tradeoffs for a tool that costs under ten dollars and can extend the life of your mower's engine and deck.
If you maintain your own mower blades, the Oregon Precision Blade Balancer is a smart, low-cost investment. It helps you get professional-level results at home, reduces vibration that leads to premature wear, and keeps your lawn looking its best. For the price and performance, there's little reason not to add one to your workshop gear.
Brand: Oregon
Model: 42-100
Material: Zinc die-cast metal
Weight: 0.2 pounds
Dimensions: 10 x 6 x 1 inches
Power Source: Manual
Color: Original Version
Compatibility: Fits most push mower and riding mower blades

Pros
- Fits a wide range of popular mower brands without modification.
- Sturdy alloy steel holds an edge longer than basic stamped blades.
- Easy install with no assembly required – just swap out the old blade.
Cons
- Only fits 21-inch decks; not compatible with larger or smaller mowers.
- May need to verify your old part number against listed predecessors to ensure match.
The Husqvarna 532406712 replacement blade is a straightforward, no-nonsense option for anyone who owns a 21-inch push mower from Husqvarna, Poulan, Craftsman, Weed Eater, or Roper. If you are a homeowner or DIYer who handles your own lawn maintenance, this blade gives you a reliable way to restore cutting performance without breaking the bank. It replaces several earlier part numbers like 165833, 175064, and 406712, so checking compatibility is simple.
Out in the yard, this blade handles thick grass and occasional debris well. The alloy steel construction keeps the edge sharp through several mowings, and the 0.130-inch thickness provides enough stiffness to prevent flexing during tough cuts. You will notice a cleaner slice versus older, worn blades, which means less tearing and a healthier lawn. The right-hand cut direction works seamlessly with standard bagging and mulching setups, so you do not have to change your mowing routine.
Build quality is what you would expect from Husqvarna – solid, consistent, and designed for longevity. The blade is lightweight at just 1.5 pounds, which reduces stress on the mower deck and engine over time. Installation is straightforward: remove the old blade, center the new one on the 5/8-inch hole, and torque it down. No modding or adapters needed.
One realistic limitation is that this blade only fits 21-inch decks. If you have a 20-inch or 22-inch mower, you are out of luck. Also, double-check your current part number against the list of predecessors to avoid a mismatch. But for the vast majority of standard push mowers in its size range, this blade is a dependable performer that delivers good value for the cost.
Overall, the Husqvarna 532406712 is a smart upgrade for anyone wanting a sharp, durable blade without hunting down a dealer. Whether you are a weekend warrior or just keeping your lawn tidy, this blade will get the job done reliably.
Brand: Husqvarna
Model Number: 532406712
Length: 21 inches
Width: 2 1/4 inches
Thickness: 0.130 inches
Center Hole Diameter: 5/8 inch
Outer Hole Diameter: 5/8 inch and 1 7/8 inch
Material: Alloy Steel
Weight: 1.5 pounds
Cut Direction: Right
Compatible Brands: Husqvarna, Poulan, Poulan Pro, Roper, Sears/Craftsman, Weed Eater
This blade is ideal for routine mowing on 21-inch push mowers in residential lawns. It works well for homeowners who prefer to bag clippings or mulch leaves thanks to the right-hand cut design. DIYers maintaining medium-sized yards will appreciate the durability and easy swap-out when the old blade dulls. Not suited for commercial zero-turn mowers or larger decks.


Pros
- Extremely easy to use, even on stubborn bolts
- Saves significant time compared to traditional methods like deck removal or clamps
- Durable build with a thick steel pipe that lasts for years
- Excellent customer support from the manufacturer
Cons
- Price is higher than DIY alternatives or simpler clamp-style tools
- Only compatible with blades 2-3/4 inches wide or wider, not for standard push mower blades
- May not effectively stabilize three-blade decks on some mower models
The BLADZ-LOK XL is a purpose-built blade removal tool for riding lawn mowers, specifically designed for blades that are 2-3/4 inches wide or larger. Unlike generic clamps or the old wood-block trick, this tool locks two blades together, letting you break stubborn bolts loose without removing the mower deck. It's a simple but effective solution for anyone who maintains a zero-turn, garden tractor, or other large mower with wide blades.
This tool is best suited for homeowners and DIYers who sharpen or replace their own blades regularly. If you've ever wrestled with a deck removal just to swap blades, you'll appreciate the time savings. The XL coupler works on wing-tipped blades and standard wide blades alike. Installation takes about 30 seconds: slide it over one blade, rotate to catch the second blade, and tighten the knob. That's it.
In real-world use, the BLADZ-LOK delivers consistent performance. Reviewers report that it holds blades securely even at high torque settings (90 ft-lbs), and it's much faster than clamp-on tools that can slip or strip. The carbon steel construction feels solid, and the powder coating resists rust. At 2.75 pounds, it's heavy enough to feel durable but not cumbersome to handle under the deck.
Build quality is excellent. The tool is made in the USA and backed by a 5-year limited warranty. Customer service gets high marks for responsiveness and fairness. However, the price is a sticking point for some. It's more expensive than a piece of pipe you could cut yourself, but the precision cut and finish justify the cost for most users. A minor drawback: it only works on blades 2-3/4 inches and wider, so it won't help with standard push mower blades. Also, one reviewer noted it didn't stabilize three blades on a Scag Tigercat II, so check your deck configuration.
Overall, the BLADZ-LOK XL is a worthwhile investment for anyone with a large riding mower who values efficiency and safety. If you change blades more than once a season, this tool will pay for itself in saved time and frustration. Just measure your blade width before ordering to ensure compatibility.


The primary objective of this procedure is to safely detach the cutting component from the spindle assembly. This allows for inspection of the blade’s condition, the spindle’s integrity, and the mounting hardware. A clean removal ensures that when you reinstall the blade, it is seated correctly and balanced, which is critical for preventing vibration and engine wear. The process differs slightly between walk-behind and riding mowers, but the logic of securing, loosening, and removing remains the same for both types of equipment.
| Mower Type | Typical Access Method | Blade Orientation |
|---|---|---|
| Walk-Behind | Tip on side, deck up | Usually single, right-hand cut |
| Riding Tractor | Jack rear, deck up | Often dual, opposing cuts |
| Zero-Turn | Jack rear, deck up | Often dual, opposing cuts |
Before you begin, it is crucial to understand the specific safety mechanisms of your machine. Most modern mowers have a safety interlock system that prevents the engine from running if the operator is not seated or if the blade control is not engaged. You must ensure the engine is completely off and the spark plug wire is disconnected to eliminate any risk of accidental starting. This step is non-negotiable for personal safety. Additionally, check the owner’s manual for any specific warnings regarding the deck’s weight or the blade’s tension.
Securing the blade is the most critical step in the removal process. If the blade is not held firmly in place, it will rotate in the opposite direction of the bolt loosening, which can cause the wrench to slip and potentially injure your hand.
Several methods exist for this, ranging from specialized tools to household items. The goal is to create a solid barrier that prevents the blade from moving while you apply force to the center nut. This barrier must be sturdy enough to withstand the torque required to break the bolt loose.
- Use a dedicated blade lock tool for the most secure and professional result.
- Insert a sturdy wooden block between the blade and the deck to stop rotation.
- For riding mowers, use a coupler to lock both blades together.
- Ensure the locking method is tight and will not slip under pressure.
- Keep your hands clear of the blade’s path at all times during this step.
Preparation and Safety Protocols
Preparation begins with clearing the work area of any debris, children, or pets. You need a stable, flat surface to work on, such as a concrete driveway or a garage floor. For walk-behind mowers, you will typically tip the machine on its side with the air filter and carburetor facing up to prevent oil leaks.
For riding mowers, you will need a jack and safety stands to lift the rear of the tractor. Never work under a mower supported only by a jack; always use safety stands to support the weight.
Disconnecting the spark plug is a vital safety measure. Pull the spark plug wire off the plug to ensure the engine cannot start. This is especially important if you are working on a mower with a pull-start mechanism, where a stray pull could potentially engage the engine.
Once the power is disconnected, you can focus on the mechanical aspects of the removal. It is also a good time to clean the area around the blade and the deck to ensure you can see the hardware clearly and to remove any grass clippings that might be holding the blade in place.
Securing the Blade for Removal
There are several effective ways to secure the blade. The most reliable method is using a blade lock tool, which is designed to fit around the blade and clamp it to the deck. These tools are inexpensive and provide a high level of safety.
Alternatively, you can use a sturdy wooden block, such as a piece of 2×4, placed between the blade and the deck. The block must be thick enough to prevent the blade from rotating but thin enough to fit in the space. For riding mowers with dual blades, a coupler tool is ideal as it locks both blades together, preventing either one from moving.
When using a wooden block, ensure it is dry and free of cracks. A wet or cracked block may splinter under pressure, which could be dangerous. Place the block firmly against the blade and the deck, ensuring it is centered and will not slip. You can also use a large C-clamp to secure the block in place if you have one available.
This adds an extra layer of security. The key is to ensure that the blade cannot move in any direction while you are working on the bolt. Take your time to set up the locking mechanism properly; rushing this step is the most common cause of injury during blade removal.
Loosening the Center Bolt and Nut
Once the blade is secured, you can begin loosening the center bolt or nut. Most mower blades are secured with a standard hex nut, though some may use a bolt with a lock washer. Determine the direction of rotation required to loosen the fastener.
For most mowers, the nut is right-hand threaded, meaning you turn it counter-clockwise to loosen it. However, some mowers use left-hand threaded nuts on one of the blades to prevent them from loosening during operation. Always check the manufacturer’s specifications or feel the threads to determine the direction before applying full force.
Use a socket wrench or a breaker bar for the best leverage. A socket wrench allows you to apply more torque than a standard wrench, which is helpful if the bolt is tight. Apply steady, firm pressure in the loosening direction. If the bolt does not move, do not increase the force abruptly; instead, tap the end of the wrench with a hammer to break the rust or corrosion.
You can also apply a penetrating oil to the threads if the bolt is stuck. Once the bolt begins to turn, continue loosening it until it is completely removed. Keep the bolt and any washers in a safe place so you do not lose them.
Removing the Blade and Inspecting the Spindle
After the bolt is removed, the blade should slide off the spindle. It may be slightly tight due to the weight of the blade or the fit of the spindle. Gently wiggle the blade to free it from the spindle. If it is stuck, you can tap the edge of the blade with a rubber mallet to loosen it.
Avoid using metal hammers, as they can damage the blade’s edge or the spindle. Once the blade is off, inspect the spindle for any signs of wear, rust, or damage. A worn or damaged spindle can cause vibration and affect the mower’s performance.
Also, inspect the mounting hardware, including the bolt, nut, and washers, and check for any signs of wear, rust, or deformation.
- If the hardware is damaged, it is best to replace it with a new set to avoid the blade coming loose during operation, which is a serious safety hazard.
- You can also use this opportunity to clean the spindle and the deck area by removing any grass clippings, dirt, or rust that has accumulated.
- A clean spindle and deck ensure that the new blade seats correctly and operates smoothly, providing a safe and efficient mowing experience for the user.
- If you are planning to sharpen the blade, now is the time to do so, or if replacing it, ensure the new blade is the correct size and type for your mower.
Reinstallation and Final Checks
Reinstalling the blade is the reverse of the removal process. Ensure the blade is oriented correctly, with the cutting edge facing the direction of rotation. The blade should sit flat against the deck and the spindle. Place the washers and the bolt or nut in place. Tighten the fastener to the manufacturer’s recommended torque specification.
Overtightening can strip the threads or damage the spindle, while undertightening can cause the blade to come loose during operation. Use a torque wrench if you have one to ensure the correct tension. If you do not have a torque wrench, tighten the bolt firmly and then give it a final check to ensure it is secure.
Before running the mower, perform a final safety check. Ensure the blade is securely fastened and that the locking mechanism is removed. Reconnect the spark plug wire and lower the mower to the ground. Start the engine and let it run for a few minutes to ensure the blade is balanced and there is no excessive vibration.
If you notice any vibration or unusual noise, stop the engine immediately and recheck the blade’s tightness and balance. A balanced blade is essential for a smooth cut and for protecting the mower’s components. By following these steps, you can safely and effectively remove and reinstall your mower blade, extending the life of your equipment and ensuring a healthy lawn.
If you are looking to maintain the sharpness of your blade between removals, our guide on filing lawn mower blades provides detailed instructions on how to keep your cutting edge in top condition. This regular maintenance can help you avoid the need for frequent blade replacements and ensure consistent cutting performance.
For those dealing with a stubborn fastener that will not budge, our article on loosening stuck mower blade bolts offers additional techniques and tools that can help you overcome this common maintenance challenge. These methods can save you time and frustration when performing routine maintenance on your lawn care equipment.
Proper blade maintenance is a key component of overall mower care. By regularly inspecting, sharpening, and replacing your blades as needed, you can ensure that your mower operates at its best. This not only results in a cleaner cut but also reduces the strain on your engine and other mechanical components. Take the time to perform these tasks correctly, and you will enjoy a well-maintained mower and a beautifully cut lawn for years to come.


Write Your Review
No reviews yet. Be the first to share your experience!