


A clogged carburetor is the most common reason a Toro 7.25 HP walk-behind mower fails to start after sitting through the winter. The direct answer to how to clean carburetor on toro 7 25 lawn mower is to disconnect the fuel source, remove the assembly, soak it in a dedicated cleaner, and reassemble it with new gaskets. Old fuel leaves varnish that blocks the tiny passages needed for the engine to run.
Many homeowners assume that simply adding fresh gas will fix the problem, but this rarely works if the internal jets are already blocked. The 7.25 HP engine found in many Toro models is a Briggs and Stratton unit, which has specific maintenance requirements.
Understanding the difference between a dirty filter and a clogged carburetor saves time and prevents unnecessary part purchases. If your mower cranks but won’t start, or starts and then stalls, the fuel delivery system is the primary suspect. This guide outlines the practical steps to address this issue safely and effectively.

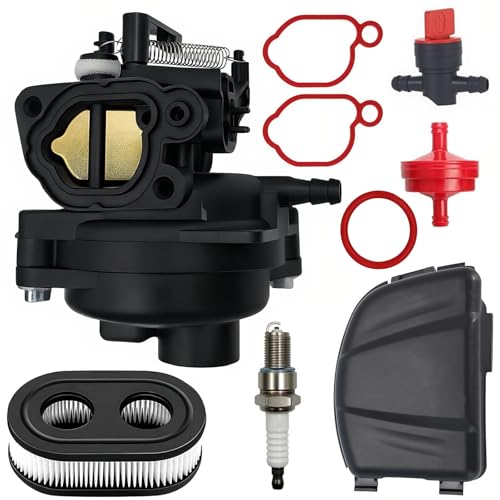


Restoring Fuel Flow in Toro 7.25 HP Mowers
The goal of cleaning the carburetor is to remove varnish and debris from the fuel passages so the engine can receive the correct air-fuel mixture. Before touching any parts, ensure the mower is on a flat surface and the engine is completely cool. You will need a basic socket set, a screwdriver, and a carburetor cleaning kit or aerosol cleaner. Safety is critical; always disconnect the spark plug wire to prevent accidental starting while you work on the engine components.
| Component | Function | Common Issue |
|---|---|---|
| Float Bowl | Holds fuel for the engine | Varish clogging the needle valve |
| Main Jet | Controls fuel flow at full throttle | Debris blocking the passage |
| Idle Jet | Controls fuel flow at idle | Carbon buildup restricting flow |
| Choke Plate | Enriches mixture for cold starts | Stuck or corroded linkage |
Start by draining the fuel tank and the float bowl. Old fuel is the root cause of most carburetor issues, so removing it is the first step in the cleaning process. Disconnect the fuel line from the carburetor and let any remaining gas drain into a safe container. Once the fuel is gone, you can focus on the physical cleaning of the internal components without the risk of fire or mess.
- Disconnect the spark plug wire and cap the plug to prevent starting.
- Drain the fuel tank and float bowl into a designated container.
- Remove the air filter to access the carburetor top.
- Disconnect the fuel line and throttle linkage from the carburetor.
- Unscrew the carburetor from the engine intake manifold.
Disassembling the Carburetor Assembly
Once the carburetor is removed from the engine, place it on a clean work surface. You will need to separate the float bowl from the main body to access the internal jets. Use a screwdriver to remove the screws holding the bowl together. Be careful not to drop the small gaskets or the float pin, as these are easy to lose and essential for proper function. The float should move freely; if it is stuck, the fuel level will be incorrect.
Inspect the float for any signs of fuel absorption or damage. If the float is waterlogged, it will sink and cause the engine to flood. A healthy float should float upright in water. Next, remove the main jet and idle jet from the carburetor body. These are small brass or steel components that can be removed with a small screwdriver or a specialized tool. Keep track of which jet goes where, as they have different sizes and functions.
Cleaning Internal Passages and Jets
Soak the removed components in a carburetor cleaning solution for at least 15 minutes. This helps dissolve the varnish and gum that accumulates over time. After soaking, use a soft brush to scrub the exterior of the parts. For the internal passages, use a can of carburetor cleaner with a straw attachment. Spray the cleaner into the main jet, idle jet, and all visible passages. The goal is to ensure that fuel can flow freely through every channel.
Compressed air is the best tool for clearing the final bits of debris. Blow through the jets and passages from the clean side to push out any remaining dirt. Do not use a wire to poke the jets, as this can enlarge the hole and alter the fuel mixture. The jets are precision-machined, and even a slight change in size can cause the engine to run rich or lean. A lean mixture can overheat the engine, while a rich mixture wastes fuel and fouls the spark plug.
- Soak parts in cleaner for at least 15 minutes to dissolve varnish.
- Use a soft brush to clean the exterior of the float bowl.
- Spray cleaner into all internal passages using a straw attachment.
- Blow through the jets with compressed air to remove debris.
- Inspect the float for water absorption or physical damage.
Reassembly and Gasket Replacement
After cleaning, dry all parts thoroughly before reassembling. Moisture in the carburetor can cause starting issues and rust. Replace the gaskets between the float bowl and the main body. Old gaskets harden and crack over time, leading to fuel leaks and air intake problems. A new gasket ensures a tight seal and proper fuel level. If you are replacing the entire carburetor, ensure the new unit is the correct model for your engine.
Reinstall the float and the float pin, ensuring it moves freely. Screw the float bowl back onto the main body, tightening the screws evenly to avoid warping the gasket. Reconnect the fuel line and the throttle linkage. Make sure the choke linkage moves smoothly and that the choke plate closes fully. A stuck choke can prevent the engine from starting or cause it to stall once warm. The throttle should also move freely without binding.
Testing the Engine After Cleaning
Refill the fuel tank with fresh, clean gasoline. Do not use old fuel that has been sitting in the tank, as it may still contain varnish. Reconnect the spark plug wire and attempt to start the engine. The engine should start within a few pulls and run smoothly at idle. If the engine runs rough, check the air filter and the spark plug. A dirty air filter can restrict airflow, while a fouled spark plug can cause misfires.
Let the engine run for a few minutes to warm up. Observe the exhaust for any unusual colors or smells. Black smoke indicates a rich mixture, while blue smoke may indicate oil burning. If the engine stalls or surges, the idle screw may need adjustment. Turn the idle screw in small increments until the engine runs smoothly at the lowest stable RPM. Always follow the manufacturer’s guidelines for idle adjustment to ensure proper performance.
Preventing Future Carburetor Clogs
The best way to prevent carburetor clogs is to use fresh fuel and add a fuel stabilizer. Old fuel breaks down and leaves deposits that clog the carburetor. If you plan to store the mower for more than 30 days, treat the fuel with a stabilizer. Run the engine for a few minutes to circulate the treated fuel through the system. This ensures that the stabilizer reaches the carburetor and protects the internal components.
Regular maintenance also plays a key role in preventing issues. Clean the air filter every 25 hours of operation, or more often if you mow in dusty conditions. A clean air filter ensures proper airflow and prevents dirt from entering the engine. Check the fuel filter regularly and replace it if it appears dirty or clogged. By following these simple steps, you can extend the life of your carburetor and ensure reliable starting every season. If the problem persists after cleaning, consider replacing the carburetor with a compatible aftermarket unit.
For more information on maintaining your mower’s cutting system, our lawn mower blade guide explains how to handle blade removal and installation safely. Proper maintenance of all components ensures your mower performs at its best throughout the season.


Write Your Review
No reviews yet. Be the first to share your experience!