


Ragged grass tips, frayed turf edges, and unexpected clumping often point directly to an improper cutting edge orientation under the mowing deck. Homeowners frequently ask are my lawn mower blades on upside down after finishing routine spring maintenance, changing dull metal, or reinstalling a freshly sharpened edge. When a cutting assembly is flipped, the blunt trailing sail impacts the grass before the sharpened bevel can slice it cleanly. Learning the distinct physical indicators helps restore neat cutting performance before damaged turf turns brown or engine strain increases.
Verifying the orientation requires knowing which direction the lift wings point and how the mounting hardware seats against the spindle assembly. If you recently reviewed how to remove a lawn mower blade, reversing the removal steps accurately is critical for safety and turf health. Tools such as specialized deck clamps and magnetic balancers can assist throughout the inspection and reinstallation process. By recognizing the telltale signs of inverted hardware, you can quickly reset your cutting deck and protect your lawn from unnecessary tearing.

Pros
- Dual-pendulum linkage keeps grinding passes flat and parallel without lateral arm wander
- Angle scale features positive detents at common angles like 30 degrees for fast repeatability
- Vertical magnetic balancer seats blades securely from 0 to 35mm center hole sizes
- All-metal framework provides solid rigidity once bolted down to a workbench
Cons
- Angle grinder and grinding flap discs must be supplied separately
- Requires a permanent or securely clamped benchtop mounting spot for stable operation
- Severely curved or bent mulching blades require patience and repositioning to clamp evenly
This sharpening jig and magnetic balancing set converts an ordinary 4-1/2-inch angle grinder into a dedicated mower blade maintenance station. Rather than balancing a grinder freehand on a workbench or using a hand file, this setup holds your tool on a guided track. It is aimed directly at acreage owners, DIY mechanics, and commercial lawn care crews who want factory-consistent cutting edges on their equipment without buying a costly standalone machine.
In practical workshop use, the dual-pendulum articulated arm does a commendable job absorbing lateral vibration. Grinding discs want to kick and climb along the blade edge when operated freehand, but the pinned linkage keeps the disc moving across a uniform plane. The indexed adjustment bracket locks cleanly between 15 and 45 degrees, allowing you to match the original factory bevel on standard flat blades as well as high-lift mulching profiles. The included M8 and M10 pins thread straight into standard auxiliary handle holes on most major grinder brands, creating a firm mechanical coupling.
Blade maintenance is only half-done if you do not check balance, and the included vertical magnetic balancer is one of the strongest parts of this bundle. Using magnetic hold on an L-rod with a built-in bubble level, it quickly highlights heavy ends down to a single gram of variance. Running a well-balanced blade on your deck dramatically reduces high-RPM vibration, which extends the life of deck spindles, belts, and engine crankshaft seals.
On the downside, this is not a fully standalone sharpening tool. You still need a quality grinder, ideally fitted with a 40-grit or 60-grit zirconia flap disc to keep from burning the steel temper. You also must take the time to mount the base securely to a rigid work surface with the included fasteners, as any flex in your bench will telegraph through the grind angle. For anyone looking to speed up seasonal lawn prep or maintain multi-blade commercial decks, this kit delivers consistent shop-level results at a very reasonable investment.
For the best results, bolt the base bracket directly to the front corner of a heavy wooden workbench or a thick piece of mobile jobsite plywood. Positioning the unit near the edge gives you sufficient clearance on both sides to swing long 21-inch walk-behind blades or 30-inch commercial deck blades without bumping into shop walls or tool racks.
Pair the jig with an angle grinder that has a clean, undamaged side-handle thread (M8 or M10). Using a standard flap disc rather than a rigid bonded stone wheel yields a smoother bevel and generates far less heat, helping preserve the hardness of your blade's cutting edge.

Pros
- Heavy-gauge metal construction feels solid and durable.
- Dual functionality as both a blade lock and balancer adds real value.
- Wide compatibility with popular mower brands and series.
- Simple to use with an easy-to-turn handle and no batteries or power source required.
Cons
- The rubber contact disk is rigidly attached and may cause the disk to tear over time.
- Paint finish can chip easily, as noted in user feedback.
- Only works on mowers with a deck width of 42 inches or less.
The VoltRidge Universal Mower Blade Removal Tool is a simple but effective accessory for anyone who maintains their own lawn mower. It replaces the old trick of jamming a block of wood against the blade to keep it from spinning. Instead, this metal clamp locks onto the blade and rests against the mower deck, giving you a steady platform to loosen or tighten the blade bolt with a standard socket wrench. That alone makes blade swaps faster and a lot safer.
This tool is best suited for homeowners and DIY lawn care enthusiasts who own walk-behind or riding mowers from MTD, Cub Cadet, Troy-Bilt, Bolens, Ryobi, Yard-Man, or Yard-Machines. It covers the common 11A, 12A, and 13A series and can handle single or double blade configurations up to 42 inches wide. If you sharpen your own blades or swap them seasonally, this tool cuts down on frustration and wrestling with the blade under the deck.
Beyond blade removal, the tool also includes a built-in balancer. After sharpening, you can set the blade on the tool to check if it hangs level. An unbalanced blade causes excessive vibration, which wears out spindle bearings and makes the mower run rough. This feature helps you catch that before reinstalling, saving engine wear and providing a smoother cut.
Build quality is solid overall, with heavy-gauge metal that feels like it will hold up season after season. The clamp handle is easy to turn, even with greasy gloves. However, a few users noted the paint can chip off on arrival, and the rubber disc that contacts the deck is not a swivel joint, which could lead to tearing if you crank too hard. These are minor annoyances rather than deal-breakers given the low price point.
For around ten bucks, the VoltRidge tool earns its place in any mower maintenance kit. It simplifies a dirty job and adds blade balancing to boot. If you already own a wrench and a sharpening file or grinder, this is a small upgrade that pays for itself in time saved and smoother mowing. Recommended for anyone who wants to keep their mower blade in top shape without guessing or struggling.
Pros
- Works well for light dethatching and leaf pickup
- Simple to install with no special tools
- Compatible with a wide range of popular mower brands
Cons
- Nylon tines wear down quickly on heavy thatch or rough terrain
- Not recommended for battery powered mowers due to extra load
- Some users report tines can fly off during first use
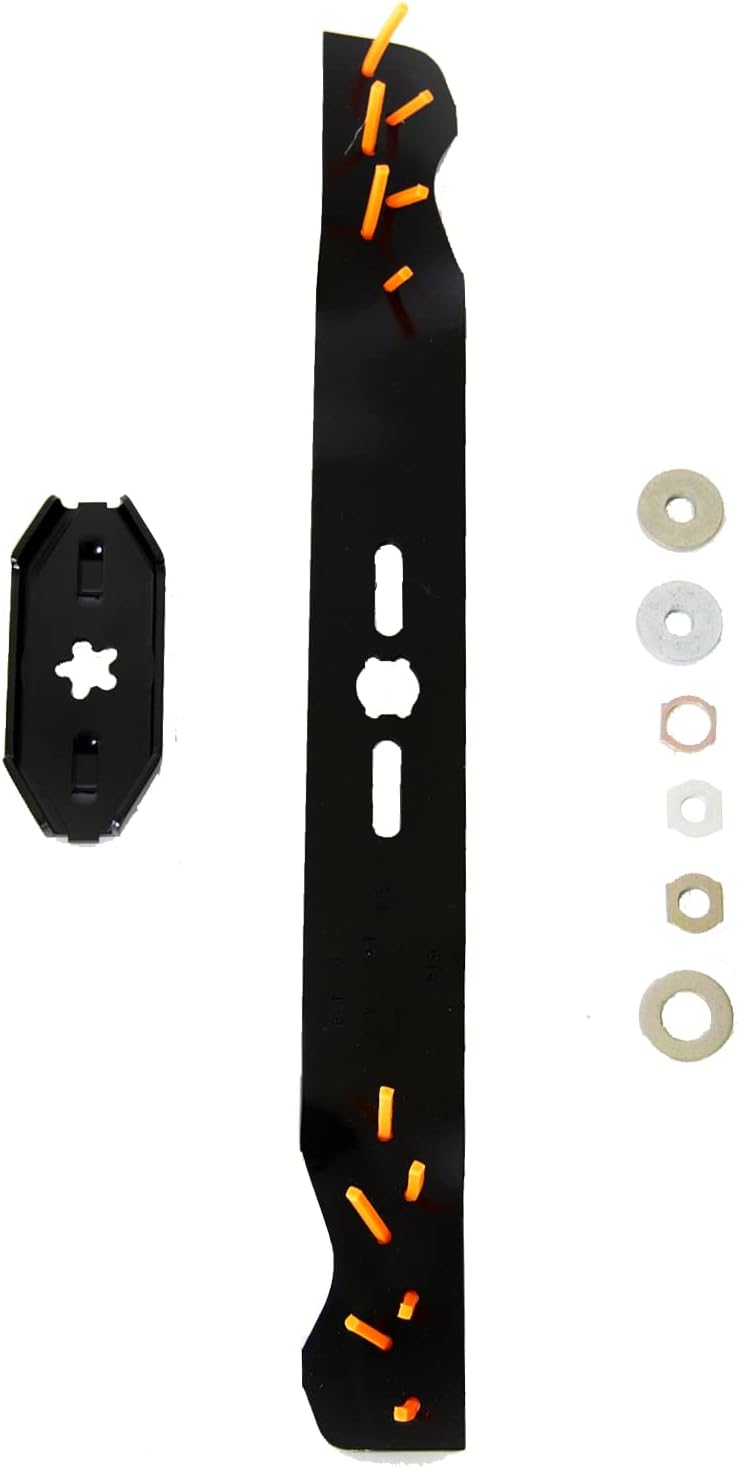
The Arnold 490-100-0083 is a universal replacement blade designed for 21, 22, and 23 inch walk-behind lawn mowers. It combines a standard cutting blade with nylon dethatching lines, letting you mow and clean up your lawn at the same time. This is a smart upgrade for homeowners who want to reduce manual raking and dethatching without investing in a separate machine.
This blade is best suited for DIY homeowners with medium sized lawns. It fits most popular mower brands including Troy-Bilt, Craftsman, Honda, Husqvarna, Toro, Snapper, and Yard Machines. The included adapters make it easy to install on different center hole sizes. Just note that it's not designed for battery powered mowers, as the extra load can drain batteries quickly or strain the motor.
In real world use, the blade cuts grass cleanly while the nylon lines help lift and break up leaves and light thatch. Many users report it saves hours of raking each season. The dethatching effect is mild, so it works best for light to moderate thatch buildup. For heavy thatch, the nylon lines can wear down fast, and some users have reported tines breaking off on the first pass. Replacing the lines with thicker trimmer string can improve durability.
Build quality is solid for the price. The steel blade is sturdy, and the nylon lines are easy to replace. Installation is straightforward, though you should always refer to your mower's manual for torque specs and safety. The blade is lightweight and stores easily. One drawback is that the tines are not aggressive enough for serious dethatching, so if your lawn has thick thatch, you might need a dedicated dethatcher or a metal tine blade.
Overall, the Arnold 490-100-0083 is a practical, budget friendly way to add dethatching and leaf cleanup to your mowing routine. It's not a heavy duty solution, but for routine yard maintenance, it gets the job done. If you have a gas powered mower and want to save time on fall cleanup, this blade is a solid choice.

Pros
- Strong under-deck airflow prevents clumping and improves bagging efficiency
- Thick steel construction resists nicks from small sticks, gravel, and rough turf
- Direct fit replacement makes blade swaps quick with standard workshop tools
- Factory balance minimizes spindle vibration to protect deck bearings
Cons
- Strictly designed for 5-point star spindles and will not fit 6-point star or round arbor mounts
- Thick factory protective paint on the bevel edge may benefit from a light touch-up before first use
- High-lift blade wings can pull extra horsepower in unusually overgrown or damp grass
Worn mower blades rip and tear grass rather than slicing it clean, leaving your lawn vulnerable to browning tips and fungal issues. This Oregon 42-inch replacement blade set is built specifically for riding mowers and lawn tractors equipped with twin 21-inch cutting setups. It serves as a direct upgrade for homeowners, property caretakers, and DIY mechanics tired of thin OEM factory steel that bends or loses its edge after half a season of yard maintenance.
Out in the yard, cutting performance hinges on airflow and steel hardness. These blades feature a pronounced lift wing on the trailing edge that creates aggressive draft inside the cutting deck. This vacuum pulls flattened turf upright right before the cutting edge hits, resulting in an even carpet finish without stray stragglers. The added air volume also excels at processing grass clippings into tiny mulch fragments that settle deep into the turf canopy, saving you countless trips to empty bagging bins.
Oregon manufactures these from hardened alloy steel measuring nearly 0.150 inches thick, giving them substantial heft and rigidity. That extra mass resists bending when you accidentally catch an exposed tree root or small garden rock. Swapping them out in the workshop is straightforward: elevate your deck safely, secure the blade with a wooden block, and loosen the spindle bolt. The 5-point star center matches spindle splines tightly without slop, ensuring no wobble during spin-up.
Keep in mind that these are purpose-built high-lift units. While they clear clippings effectively, the aggressive air displacement does place a slight extra load on your tractor engine compared to low-profile discharge blades. Verify your spindle shaft pattern carefully before ordering, as they will not fit 6-point star or circle-bore decks.
For anyone running a compatible 42-inch deck from Husqvarna, Craftsman, Poulan, or AYP, these Oregon blades deliver an immediate improvement in cut quality, bagging velocity, and durability over standard stock metal.
Always check your tractor owner manual and confirm spindle hole shape before purchasing. This pair of 21-inch blades is engineered for 42-inch cutting decks utilizing a 5-point star spindle pattern.
Direct replacement for OEM part numbers: 127843, 138498, 138971, 138971X431, 532138971, 53-21278-43, 53-21384-98, 53-21389-71, 532 13 84-98, 532 13 89-71, and Craftsman CMXGZAM110136.
Commonly compatible brands include Craftsman, Husqvarna, AYP, Poulan, Poulan Pro, Roper, Weed Eater, and Ariens models featuring the matching 5-point arbor pattern.
Understanding Mower Blade Orientation and Diagnosing Upside-Down Installation
Installing a cutting blade backward is surprisingly easy to do during rushed seasonal deck maintenance. An inverted blade spins in the correct rotational direction, but the blunt back edge of the steel strikes the grass instead of the sharp cutting bevel. This mechanical reversal creates distinct performance problems across your turf and puts unnecessary strain on your mower spindle. Determining whether your cutting hardware is installed upside down requires analyzing visible lawn symptoms and performing a direct mechanical inspection.
Immediate Telltale Symptoms of an Upside-Down Mower Blade on Your Lawn
The most obvious sign of an upside-down mower blade appears directly on the tips of the grass blades within a day of mowing. When the dull trailing edge impacts grass stems, it smashes and tears the plant tissue rather than slicing it cleanly. These frayed tips quickly turn a pale whitish-brown, giving the lawn an uneven, scorched appearance. Cleanly severed grass heals rapidly, while ripped grass leaves turf vulnerable to heat stress and disease.
Clipping discharge problems provide another clear operational symptom. Mower blades rely on curved rear wings to create an upward vacuum that lifts grass upright and pushes clippings into the discharge chute or collection bag. When installed upside down, these wings blow air downward toward the ground instead of pulling it upward. This downward draft flattens uncut turf, kicks up excess dust, and leaves heavy clumps of crushed grass behind.
Engine behavior and sound also change when blades spin in the wrong orientation. Because blunt steel edges create substantial resistance when plowing through grass, the motor must work harder to maintain cutting speed. You may notice the engine bogging down in thin turf that normally presents no challenge. Increased vibration across the deck housing and handle bars often accompanies this unnecessary mechanical strain.
Physical Anatomy of a Mower Blade: Cutting Edges Versus Lift Sails
Understanding basic rotary blade geometry makes orientation errors simple to spot. A standard rotary blade features a central mounting hole and two opposing cutting ends on a horizontal plane. Each cutting end has a sharpened bevel along the leading edge and a raised aerodynamic sail along the trailing edge. The sharpened bevel must always lead into rotation, while the curved sail sits behind it to generate airflow.
The vertical direction of the curved lift sail serves as the most reliable indicator under the deck. When a blade is positioned correctly, the curved sails must point upward toward the underside of the mower deck. If you look under the machine and see the curved fins pointing downward toward the soil, the blade is inverted. The flat side of the blade faces the lawn, while the raised contours face the mower deck shell.
Rotational direction also helps verify correct physical orientation. Walk-behind mowers and multi-blade tractor decks typically spin clockwise when viewed from the operator seat, which appears counter-clockwise from underneath. The sharpened cutting bevel must face the rotational travel path so that the sharp edge strikes each grass blade first. If the curved wing or blunt spine leads into the rotational path, the cutting mechanism cannot function properly.
Identifying Manufacturer Markings and Center-Hole Alignment
Equipment manufacturers often stamp orientation text directly into the metal to assist during maintenance. You can frequently find words such as “BOTTOM,” “GRASS SIDE,” or “THIS SIDE DOWN” stamped near the center hole. If you look underneath your mower and see “TOP” or find that “BOTTOM” rests against the spindle, the blade is backward. Stamped part numbers and brand markings are also commonly placed on the bottom surface facing the lawn.
Center-hole patterns provide mounting alignment, though they do not always prevent an inverted fit. Standard blades use circular holes, star shapes, or universal mounting patterns designed for specific spindle shafts. Replacement options like the Oregon 42 Inch Lawn Mower Blades feature a five-point star center hole engineered for Craftsman and Husqvarna models. While keyed star spindles prevent rotational slipping, symmetrical center holes still permit accidental inverted installation if an installer does not check the sail direction.
Universal replacement blades require careful attention to washer seats and mounting adapters. The Arnold 490-100-0083 21-Inch/ 22-Inch Walk-Behind replacement blade includes sizing hardware to fit 3/8-inch, 7/16-inch, and 5/8-inch shaft patterns. When installing universal hardware, the adapter recess must seat completely flush against the spindle without rocking. An inverted blade can prevent the adapter washer from seating correctly, leading to loose mounting hardware during operation.
Step-by-Step Inspection: How to Check Blade Orientation Safely
Safe inspection requires disconnecting all power sources before touching the mower deck. Disconnect the spark plug wire on a gas mower, or remove the safety key and battery pack on a cordless electric model. This step ensures that the engine cannot accidentally ignite if you rotate the blade by hand. You should also check that the fuel tank is relatively low to prevent accidental fuel leaks during inspection.
Tipping the mower properly prevents motor oil from contaminating internal engine components. Gas push mowers must be tilted with the carburetor and air filter facing upward toward the sky. If you tilt the deck toward the carburetor side, crankcase oil can seep into the intake, soaking the air filter and causing heavy smoke. For riding mowers, drive the front wheels onto stable service ramps and engage the parking brake before inspecting underneath.
Once the underside of the deck is visible, inspect the lift wings on both sides of the spindle bolt. Check the trailing edge of each cutting end to verify that the curved metal fins point toward the deck ceiling. Confirm that the sharpened bevel faces upward toward the deck housing with the flat surface facing the lawn. If the wing points down toward the grass, your blade is upside down and requires immediate reinstallation.
Correcting an Inverted Blade: Safe Removal and Reinstallation Procedure
Correcting an upside-down blade is a simple mechanical fix using basic hand tools. Always wear heavy leather work gloves to shield your hands from sharp metal edges. Immobilizing the blade is necessary when loosening fasteners, as the cutting edge rotates freely with applied torque. Wedging a scrap block of wood between the blade tip and the deck wall provides an effective manual lock.
Using a dedicated blade clamp offers even greater security during removal and installation. The VoltRidge 490-850-0005 Universal Mower Blade Removal tool clamps over the deck rim to stop blade rotation reliably. Once the blade is secured, loosen the center bolt or spindle nut using a proper socket wrench. Most mower bolts use standard right-hand threads that loosen counter-clockwise, though you should check your manual for left-hand thread exceptions.
Lower the blade and take note of the order of all washers and friction plates. Clean away accumulated grass clippings and dirt from the spindle face and mounting hub. Orient the blade so that the lift sails point upward into the deck and any grass-side text faces downward. Tighten the retaining bolt firmly according to manufacturer recommendations so the blade sits flush against the spindle.
Utilizing Dedicated Tools: Blade Clamps, Sharpeners, and Balancers
Routine blade service offers an ideal time to check orientation while sharpening the cutting edge. Homeowners often check whether mower blades come pre-sharpened before installing replacement steel. When reorienting an inverted blade, inspect the cutting edge for damage caused by spinning backward against debris. Operating an upside-down blade can round the trailing edge and dull the cutting surface through abnormal friction.
Restoring a damaged edge requires maintaining consistent factory bevel angles. The Sinpiode Lawn Mower Blade Sharpener & Mower Blade balancer kit provides an adjustable frame with indexed angles from fifteen to forty-five degrees. Its dual-pendulum arm stabilizes an angle grinder to prevent freehand shaking during sharpening. Uniform sharpening keeps cutting edges even across standard straight, mulching, and high-lift blades.
Checking blade balance is just as important as ensuring correct vertical orientation. Spinning an unbalanced blade causes severe high-speed vibration that can damage spindle bearings and deck hardware. The magnetic balancer in the Sinpiode maintenance kit detects minute imbalances using vertical magnetic adsorption and an integrated bubble level. Removing slight material from the heavier side restores balance, allowing your properly installed blade to run smoothly.
Comparing Standard, Mulching, and High-Lift Blade Geometries
Different blade styles feature distinct shapes that can occasionally confuse DIY homeowners during installation. Standard high-lift options, such as Oregon 42-inch blades, have pronounced rear sails designed to maximize airflow for bagging and side discharge. Because high-lift sails are tall, spotting an inverted blade is straightforward since downward-pointing wings crowd ground clearance. When mounted properly, those tall wings sit deep inside the deck dome to channel clippings toward the chute.
Mulching blades feature curved contours and stepped cutting surfaces along the blade body. These specialized contours are designed to recut clippings repeatedly before dropping them into the turf. Because mulching blades have multiple curves, some owners mistakenly think a curved section should dip toward the ground. The extreme outer trailing wings on mulching blades must still rise upward toward the underside of the deck dome.
Specialty blades and dethatching assemblies introduce additional design features that require careful observation. Some replacement models include dethatching lines or serrated mulching teeth along the spine. Regardless of extra teeth or nylon lines, the primary cutting edge remains the leading bevel that enters rotation first. Checking the relative height of the cutting bevel against the trailing sail ensures that multi-purpose blades are never installed backward.
Long-Term Consequences of Running Blades Upside Down
Operating your mower with an inverted blade leads to noticeable turf damage and progressive mechanical issues. Because the blunt steel edge tears through grass stems, ripped leaf tips turn brown within days of mowing. Jagged grass wounds heal slowly, leaving your lawn vulnerable to fungal infections and pest damage. Matted, torn clippings also settle unevenly across the lawn, blocking sunlight from reaching the root zone.
Mechanical stress on the mower engine and drive system also increases over time. The extra drag created by swinging blunt steel through dense grass causes the engine to run hotter and burn more fuel. If you want to keep lawn mower blade replacement costs and repair bills low, avoiding chronic strain on belts and spindles is essential. Correcting blade orientation promptly protects internal engine components and prevents premature deck drive failures.
Spindle assemblies absorb the worst effects of downward airflow and abnormal cutting resistance. When inverted lift sails blow downward toward the soil, dust and abrasive grit are forced upward into spindle seals. This grit degrades bearing grease, resulting in loud grinding noises, shaft play, and eventual spindle failure. Catching an upside-down blade early preserves spindle bearings and keeps maintenance costs manageable.
Practical Verification Checklist Before Restarting Your Mower
Before restarting your mower after fixing blade orientation, complete a quick verification check. Rotate the blade by hand through a full circle with the spark plug wire disconnected to ensure adequate deck clearance. Make sure the blade tips clear the deck walls, discharge chute, and internal baffles evenly. A blade that contacts the deck indicates an unseated adapter or a bent spindle shaft that must be resolved before mowing.
Check that all mounting fasteners are tightened securely to the spindle shaft. If you used a removal tool such as the VoltRidge clamp, remove it from the deck lip before lowering the machine. Reconnect the spark plug boot or reinsert the battery pack once the mower rests upright on level ground. Start the engine in a clear area and listen for unusual vibration or rattling sounds.
Finish your check with a brief test pass across a small section of lawn. Inspect the severed grass tips immediately to confirm that they show crisp, clean cuts without shredded edges. Verify that clippings discharge freely without collecting into wet clumps beneath the deck. Confirming proper blade orientation restores lawn health, maximizes cutting efficiency, and protects your mowing equipment.


Write Your Review
No reviews yet. Be the first to share your experience!