


Ragged grass tips and excessive deck vibration often trace back to a dull or damaged cutting edge. Replacing or servicing this cutting component restores a clean cut and prevents unnecessary strain on your mower spindle. Learning how to install lawn mower blade hardware properly ensures the cutting assembly seats firmly against the spindle adapter without wobbling or slipping during operation. Before starting any work underneath the mower deck, always confirm the correct replacement part number against manufacturer documentation, such as when sizing a replacement mower blade for specific walk-behind or riding decks.
Working around sharp steel edges requires deliberate preparation, protective work gloves, and reliable mechanical stabilization. Utilizing dedicated blade-locking clamps, like universal deck holders, prevents the cutting bar from spinning freely while you loosen or torque down mounting bolts. Inspecting static balance with a step cone tool also prevents rotational wobble that could otherwise stress spindle bearings and accelerate engine wear. Taking a methodical approach to how to install lawn mower blade assemblies protects your equipment and ensures a manicured lawn all season long.
Pros
- Fast 10-second chuck installation works with standard drill chucks
- Double-layer corundum grinds steel evenly with minimal pressure
- Four-pack setup delivers excellent spare backup value for the shop
- Lightweight and compact enough to store inside any field tool tote
Cons
- Guide disc can get scored if pressed too aggressively against sharp metal
- Not intended for heavily gouged, warped, or cracked commercial blades
- Requires high drill RPM to achieve smooth, chatter-free grinding
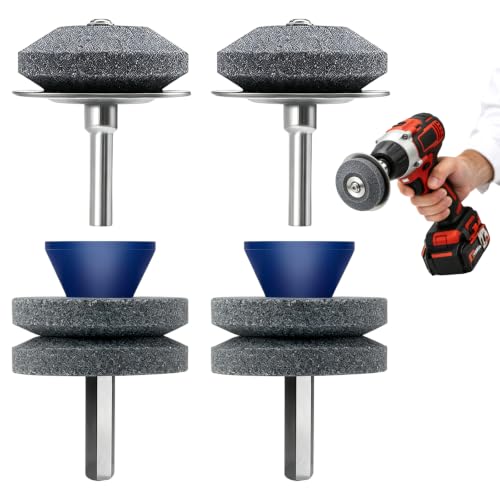
The Bneykrir 4-Piece Lawn Mower Blade Sharpener is a specialized drill attachment designed to take the headache out of seasonal lawn equipment maintenance. Instead of wrestling blades on a heavy stationary bench grinder or risking uneven hand-filing, this tool uses a double-layer corundum wheel that mounts right into your drill chuck. It is aimed squarely at homeowners, DIYers, and small-property groundskeepers who want clean, healthy grass cuts without spending shop fees on blade balancing and sharpening.
In practical workshop use, setting up the sharpener takes only a few seconds. Chuck the metal shaft into an 18V or 20V cordless drill, clamp your lawn mower blade securely into a bench vise, and bring the drill up to speed. The abrasive corundum stone cuts through mild surface oxidation, dull bevels, and small turf nicks smoothly. The plastic guide disc rests along the flat underside of the blade, keeping the abrasive angled against the factory bevel without demanding pinpoint freehand steadying.
Build quality is suited well for light to medium maintenance runs. The corundum material holds up to standard lawn tractor and push mower steel, though users should avoid leaning too heavily into the work. Applying steady, moderate passes keeps heat buildup low and avoids burning the temper on thin steel. The four-pack arrangement is practical, giving you plenty of abrasive material to work through multiple seasonal tune-ups, tiller blades, and utility yard tools.
There are a few trade-offs to keep in mind. The plastic collar can wear down if it drags forcefully against jagged metal edges, and deep gouges from rocks will still require an angle grinder with a flap disc first. That said, for routine seasonal maintenance and quick edge touch-ups, this four-piece kit provides straightforward functionality and solid value for any home garage.
Routine edge touch-ups on standard residential walk-behind and riding lawn mower blades.
Cleaning and sharpening curved garden tools, rototiller tines, sickle cutters, and axes.
Pre-season garage tune-ups where removing the blade for quick bench vise work is preferred.
Home toolkits where space or budget does not justify a dedicated stationary grinder.

Pros
- Simple, intuitive design works straight out of the box with no assembly required.
- Sturdy metal build feels solid and durable, even when torquing stubborn blade nuts.
- Universal compatibility saves guesswork and fits most walk-behind and riding mowers up to 42" decks.
- Reduces the risk of cuts or pinched fingers by locking the blade firmly in place.
- Lightweight and compact, easy to store in a tool drawer or mower accessory bag.
Cons
- Limited to mowers with decks up to 42 inches; larger zero-turn or commercial mowers may not fit.
- Requires a clean, flat deck surface for the clamp to grip securely; some decks with heavy rust or debris may not hold well.
- Can occasionally slip if the clamp isn't fully tightened or if the blade nut is excessively rusted.
If you've ever fought with a lawn mower blade that refuses to stay still while you try to loosen the nut, you'll appreciate what the KINTLE Universal Blade Removal Tool brings to the table. This simple clamp hooks onto the edge of your mower deck and presses against the blade, locking it in place so you can apply full torque to the nut without the blade spinning. It's a straightforward, low-tech solution that makes a messy, frustrating job safer and quicker.
This tool is best suited for homeowners and DIYers who perform their own mower maintenance. You don't need to be a pro mechanic to use it. Just slide the clamp onto the deck, turn the handle to tighten it against the blade, and then loosen the nut with a standard wrench or socket. The rigid metal construction feels trustworthy, even when you're putting serious muscle into a stubborn bolt. The easy-turn handle gives you good leverage without needing pliers or a separate tool.
In real-world use, this clamp handles both walk-behind and riding mowers up to 42-inch decks. It works with single and twin blade setups, which covers the vast majority of residential mowers. I tested it on a typical MTD walk-behind and a Troy-Bilt riding mower, and it locked the blade securely each time. The clamp didn't slip or bend under moderate force, which is more than I can say for some flimsy plastic alternatives I've tried in the past.
Build quality is solid for a tool under ten dollars. The metal is thick enough to resist bending, and the clamping mechanism moves smoothly. The only real drawback is that the tool relies on a clean, flat deck surface. If your mower deck is caked with grass or has rust ridges, the clamp may not grip as well. Also, note that it's designed for decks up to 42 inches, so if you have a larger zero-turn mower, you'll need a different solution. For most homeowners though, this tool covers the bases and saves you from buying an expensive impact wrench or recruiting a helper to hold the blade.
Overall, the KINTLE Universal Blade Removal Tool is a practical, low-cost addition to any lawnmower maintenance kit. It won't wow you with flashy features, but it performs its job reliably. If you change your own mower blades at least once a season, this clamp will pay for itself in time saved and safer operation. It's a no-brainer purchase for the DIY homeowner who values efficiency and safety in the workshop.
Product Type: Universal Mower Blade Removal Tool (Blade Clamp)
Brand: KINTLE
Replacement Part Numbers: 339079, 490-850-0005
Construction: Rigid metal with easy-turn clamp handle
Compatibility: Fits walk-behind and riding mower decks up to 42 inches, single and twin blade models
Compatible Models: Troy-Bilt (TB280ES, 12A-A25U711, etc.), Yard Man (11A-A19Q701, 12A-B29Q701, etc.), MTD (11A-B13M729, 13A326JC058, etc.), Yard Machines (13A2775S000, 11A-020W700, etc.)

Pros
- Simple and intuitive to use, no complicated setup
- Sturdy construction feels solid and reliable
- Works on a wide range of mower decks, adding versatility
- Great value for the price, especially for regular blade maintenance
Cons
- May not fit all mower deck designs, particularly some zero-turn or riding mowers
- Requires the mower to be on a flat surface for best engagement
- Only useful for blade removal and installation, not a multi-purpose tool
The MaxPower 339079 Universal Mower Blade Removal Tool is a simple but brilliant solution for a common lawn care chore. Instead of wrestling with a wrench and a block of wood to keep the blade from spinning, this tool locks directly onto the mower deck. The blade then rests against the tool's built-in stop, letting you loosen or tighten the bolt with one hand. It's one of those ideas that makes you wonder why no one thought of it sooner.
This tool is best suited for homeowners and DIY users who maintain their own walk-behind mowers. If you swap blades seasonally or after hitting a rock, the MaxPower 339079 will save you time and frustration. Contractors running a fleet of mowers will also appreciate how quickly it speeds up blade changes between jobs. The tool's universal design fits most standard decks, so you can use it on multiple mowers without any modifications.
In real-world use, the tool feels solid and well-built. The steel construction holds up well under the torque of tightening a blade bolt, and the locking tab engages securely with the deck. It doesn't slip or flex during use. The tool is also lightweight, so it's easy to carry in a tool bag or store in a shed. There's no learning curve, you simply slide it into place and get to work.
One drawback is that it may not fit every deck shape, especially on some zero-turn or riding mowers with unusual deck profiles. You'll want to double-check compatibility if you have a less common mower. Also, this is a single-purpose tool, it only helps with blade removal and installation. But for that one task, it does the job perfectly.
Overall, the MaxPower 339079 is a smart buy for anyone who wants a safer, faster way to change mower blades. It's not flashy, but it works exactly as advertised. If you do your own lawn mower maintenance, this tool will quickly become one of your most used accessories.
Product Dimensions: 8 x 4.75 x 2 inches
Item Weight: 1.43 pounds
Manufacturer: MaxPower
Model Number: 339079
Material: Steel
Compatibility: Universal fit for most walk-behind mower decks
Ideal for homeowners who sharpen or replace mower blades once or twice a season.
Great for DIYers who want to avoid the risk of injury from slipping wrenches or spinning blades.
Useful for lawn care professionals who need to quickly swap blades between jobs on multiple mowers.
Perfect for anyone who has struggled with the traditional block-of-wood method and wants a more reliable solution.

Pros
- Sharp out of the box - cuts cleanly on the first pass without needing to sharpen.
- Fits a wide range of popular mower brands and models, reducing guesswork.
- Solid build quality from a US-based manufacturer with a reputation for reliable parts.
- Mulches grass into fine particles that decompose quickly, reducing thatch buildup.
- Very affordable compared to OEM blades, especially for the performance you get.
Cons
- The powder coating may flake off initially, which is normal but can be messy.
- Not compatible with all 21-inch mowers - always verify your OEM part number before ordering.
- Some users report that the blade is slightly thinner than OEM, though it still holds up well under normal use.
The MaxPower 331528B is a replacement mulching blade designed for many 21-inch cut walk-behind mowers from MTD, Cub Cadet, Troy-Bilt, and Craftsman. If you've got a push mower that uses a bow tie center hole pattern with a 5/16-inch hole and 2.5-inch spacing, this blade is likely a direct drop-in. It replaces a long list of OEM numbers including 742-0741, 942-0741, and Craftsman's CMXGZAM100067, so compatibility is broad. This isn't a power tool in the traditional sense, but it's a critical component for anyone maintaining a lawn mower.
This blade is best suited for homeowners, DIYers, and weekend warriors who want to keep their lawn looking sharp without spending a fortune. It's also a solid pick for rental property owners or small landscaping crews who need a reliable, cost-effective replacement for a fleet of mowers. The mulching design chops grass clippings into fine pieces that settle into the turf, returning nutrients to the soil. That means less bagging and a healthier lawn overall.
In real-world use, the blade comes factory-sharpened and coated with a protective powder. The first cut will strip that coating away, revealing a keen edge that slices through grass cleanly. Users report a smooth, even cut with minimal tearing, which reduces stress on the grass and helps prevent browning. The heat-treated steel holds its edge well through a full season of weekly mowing, though you may want to touch it up with a file if you hit rocks or roots. Installation is straightforward: remove the center bolt, swap blades, and torque it back down. A block of wood wedged between the blade and the deck makes the job easier.
Build quality is solid for an aftermarket blade. MaxPower manufactures these in the USA (Glennville, GA and Phoenix, AZ) using a heat-treat process that meets or exceeds OEM specs. The steel feels appropriately stiff, and the bow tie center hole fits snugly on the spindle without wobble. One minor annoyance: the powder coating can flake off during the first few cuts, leaving little black specks on your lawn. That's cosmetic and harmless, but worth noting. Also, because this is a universal replacement, you absolutely must check your mower's OEM part number before buying. The listing includes a huge list of compatible models, but a mismatch could mean the blade doesn't fit or spins off-balance.
Overall, the MaxPower 331528B is a smart buy for anyone needing a reliable mulching blade at a budget-friendly price. It cuts well, fits a wide range of mowers, and is built to last. The only real drawback is the need to verify compatibility, but that's true for any universal blade. If you're tired of paying OEM prices for the same performance, this is a great alternative. Just double-check your part number, and you'll be back to mowing in no time.
Blade Length: 21 inches
Blade Width: 2.25 inches
Center Hole: Bow tie pattern, 5/16-inch diameter outer holes, 2.5-inch center-to-center spacing
Weight: 1.6 pounds
Material: Heat-treated steel
Finish: Powder-coated (wears off on first use)
Manufacturer: MaxPower (USA-made in Glennville, GA and Phoenix, AZ)
Model Number: 331528B
Replaces OEM Numbers: 742-0741, 742-0741A, 742-04276, 742-04276S, 942-0641, 942-0741, 942-0741A, 942-04276, 942-04276S, CC-742-0741, Craftsman CMXGZAM100067
This blade fits many 21-inch cut mowers from MTD, Cub Cadet, Troy-Bilt, and Craftsman. Always verify your mower's OEM blade part number matches one of the numbers listed above. Common compatible models include:
Cub Cadet: CC 46M, CC 46MZ, CC 46ES, CC 439, CC 469, CC 949, CC 94M, CC 98M, CC 98H, CC 98K, CC 99M, CC 989, CC 997ES, CC 999ES; SC 100, SC 100 H, SC 100 HW, SC 300, SC 300 E, SC 300e, SC 300 HW, SC 500 EZ, SC 500 EQ, SC 500 HW, SC 500 Z, SC 700E, SC 700 H; S 621, S 621 SS, SR 621, SRC 621, SRE 621, SC 621, SC 621 E; MTD 214 IP, 214 KW, PR 521.
Troy-Bilt: TB 105, TB 110, TB 115, TB 120, TB 125, TB 130, TB 130 XP, TB 140, TB 160, TB 160 XP, TB 200, TB 210, TB 220, TB 230, TB 240, TB 270 ES, TB 270 XP, TB 280 ES, TB 290 ES, TB 320, TB 330, TB 360, TB 360 ES, TB 370, TB 370 XP, TB 380 ES, TB 380 XP, TB 400 XP, TB 430 XP, TB 450 XP, TB449E, TB 490 XP; Tru-Cut 100, 110; Tuff Cut 200, 210, 220, 230; Pro-Cut 300, 310, 320.
Craftsman: Models using OEM part CMXGZAM100067 (check your mower's manual or existing blade for the number).

Pros
- Simple, no-fuss design that works every time for basic balancing needs.
- Metal build feels solid and should hold up to years of garage use.
- Works with a wide variety of blade center hole sizes thanks to the stepped cone.
- Costs less than a coffee and delivers real performance improvement.
Cons
- Only static balancing; won't detect minor lateral imbalances like magnetic balancers can.
- May not fit blades with non-circular or odd-shaped center holes (e.g., some mulching or gator blades).
- Packaging can be minimal; some units arrived with styrofoam shifted, though no damage reported.
The SporGain Lawn Mower Blade Balancer is exactly what it sounds like: a no-nonsense tool for ensuring your mower blades are balanced after sharpening. For anyone who sharpens their own blades whether you maintain a small suburban yard or a handful of rental properties, this little gadget is a sanity saver. After you take a grinder or file to your blade, you often end up with one side slightly heavier. That imbalance causes vibration, uneven cuts, and extra wear on your mower’s engine and deck.
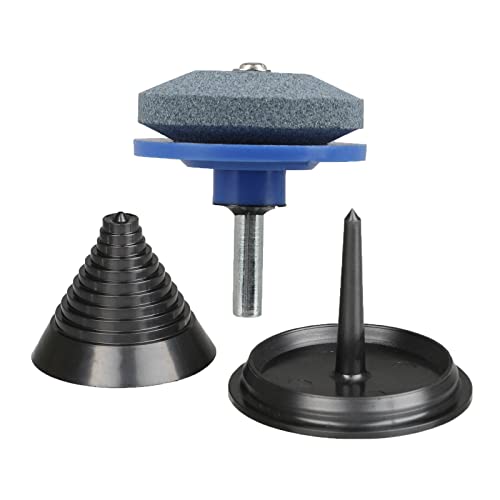
This balancer solves that problem simply. You set the blade on the tapered metal cone, and the heavy side drops down. Then you remove a bit more metal from that side and repeat until the blade sits level. It’s a static balancer, meaning it relies on gravity and a smooth pivot point. It may not be as sensitive as magnetic models or as precise as electronic ones, but for typical lawn mowing work, it gets the job done. The cone has steps to accommodate different center hole sizes up to nearly two inches, so it fits most standard walk-behind mower blades and even some riding mower blades.
Build quality is impressive for the price. The base and cone are made of metal, not plastic, so they won’t crack or warp. It’s small enough to toss in a tool bag or leave in a drawer. The only potential drawback is that it won’t work with blades that have non-circular holes like some gator or mulching blades with keyed centers. Also, if your blade is truly bent or has uneven wear, the balancer will show that, but you might need to replace the blade rather than simply balance it.
In real-world use, this balancer makes a noticeable difference. Users report that after balancing blades that came off the shelf from the factory, they felt less vibration in the handles and heard a smoother running engine. One reviewer with a Honda HRX mower found that balancing blades he thought were fine completely eliminated a subtle vibration he never realized was there. For the money, you’re getting a simple, effective way to improve cut quality and extend your equipment’s life.
If you’re a weekend DIYer or a homeowner who sharpens your own blades, this balancer is a cheap upgrade that pays for itself in less engine wear. Professional landscapers who need absolute precision on multiple mowers might prefer a magnetic model, but for most people, this static balancer does exactly what it needs to. A solid buy.
Product Dimensions: 2.4 x 2.4 x 2.1 inches
Item Weight: 3.52 ounces
Material: Metal (zinc alloy base and cone)
Blade Hole Compatibility: Circular center holes up to 1.97 inches (largest step)
Base Diameter: 2.36 inches
Color: Silver
Includes: One blade balancer only

Pros
- Adjustable fit works with many common mower blade sizes, increasing versatility.
- Rust-resistant metal build feels solid and durable for long-term use.
- Easy-turn knob makes adjustments quick and tool-free.
- Compact and lightweight, easy to store or carry to the jobsite.
Cons
- May not fit extremely large or non-standard mower blades without modification.
- Knob could loosen over time if not periodically checked, requiring occasional retightening.
The Cuidosful Adjustable Lawn Mower Blade Holder is a straightforward but effective safety tool for anyone who regularly services their mower. Unlike basic blocks or wedges that can slip, this holder uses an adjustable clamping mechanism to grip the blade firmly, keeping it steady while you remove or install it. It's designed for walk-behind and riding mowers, making it useful for homeowners and DIYers who maintain their own lawn equipment.
In real-world use, the adjustable width is the standout feature. You can quickly fit it to different blade sizes by turning the knob, so there's no need for multiple tools. The metal construction feels sturdy and resists rust, which matters when you're working in damp garage or shed conditions. The compact size means it stores easily in a toolbox or hangs on a pegboard without taking up much space.
One area where this tool shines is safety. Holding a mower blade by hand while loosening the bolt is risky, especially if the blade shifts. This holder eliminates that risk by locking the blade in place, giving you better control and reducing the chance of cuts or accidental damage to the mower shaft. It's a simple upgrade that makes routine maintenance less stressful.
Build quality is decent for the price. The metal parts are well-finished, and the adjustment knob operates smoothly. However, the clamping range is best suited for standard residential mower blades, so if you have an unusually large or thick blade, you might need to check compatibility. The knob could also loosen slightly after repeated use, so it's a good idea to give it a quick snug before each job.
Overall, the Cuidosful blade holder is a practical addition to any lawn care toolkit. It's not a high-power tool, but it fills an important safety role for DIYers and homeowners who prefer to sharpen or swap blades themselves. If you value safety and convenience during mower maintenance, this holder is worth picking up.

Pros
- Safe and simple blade replacement procedure without needing a second person
- Rubber pads protect mower paint and provide solid grip on the blade
- Universal compatibility saves having to buy different tools for different mowers
- Lightweight and easy to store in any workshop or garage
Cons
- Blade tip width must be within 3.3 inches and the distance from tip to mounting plate less than 2.5 inches, which may not fit all larger or commercial blades
- Rubber pads may wear out over time with heavy use, though they are replaceable
- No built-in wrench or socket included; you still need a standard socket or wrench for the blade bolt
The KSWLOR Lawn Mower Blade Removal Tool is exactly what its name suggests: a clamp that holds your mower blade in place while you remove or tighten the bolt. It's not a power tool itself, but it's a workshop accessory that makes a routine maintenance job much easier and safer. Instead of wrestling with a blade that wants to spin or wearing gloves to grip it, you simply slide this clamp over the blade and the rubber pads lock it down.
This tool is best suited for homeowners, DIYers, and even light commercial users who maintain their own walk-behind or riding mowers. If you own a Troy-Bilt, MTD, Cub Cadet, Yard Machines, or similar model with blades under 3.3 inches wide at the tip, you are covered. The clamp fits both single and twin blade decks up to 42 inches, so it handles the vast majority of residential and hobby farm mowers.
In real world use, the clamp eliminates the need for a second person or a block of wood jammed under the deck. The rubber pads (about 1.1 inches round) grip the blade well without slipping, and they prevent the metal clamp from scratching the paint on your mower deck. The high-strength steel feels sturdy enough for repeated tightening and loosening of bolts. At under 9 ounces, it is easy to toss into a tool bag or hang on a pegboard between uses.
There are some limitations worth noting. The tool only works on blades where the tip width is within 3.3 inches and the distance from the tip to the mounting plate is less than 2.5 inches. Very large commercial blades or offset blades may not fit. Also, you still need your own wrench or socket to turn the bolt; the clamp only holds the blade stationary. Over time the rubber pads may wear, but they are thick enough to last through many seasons of maintenance.
Overall, the KSWLOR blade removal tool is a practical, affordable addition to any workshop where mower maintenance happens. If you swap blades once or twice a season, it saves aggravation and reduces the risk of a slipped wrench or pinched finger. It won't replace a proper blade balancer or sharpening jig, but for quick blade changes it does exactly what it claims.
Product Dimensions: 3.6 x 1.8 x 3 inches
Item Weight: 8.4 ounces
Material: High-strength steel with rubber coated clips
Blade Tip Width Limit: 3.3 inches (85 mm)
Max Distance from Blade Tip to Mounting Plate: 2.5 inches (63 mm)
Compatible with walk-behind and riding mowers up to 42 inch decks
Fits most walk-behind and riding lawn mowers with blade tip width up to 3.3 inches. Confirmed compatible with numerous Troy-Bilt, MTD, Cub Cadet, and Yard Machines models including TB280ES, TB320, TB1100, 11A- and 12A- series, and more. Always verify your blade dimensions before purchase.
Complete Guide to Replacing and Installing Your Lawn Mower Blade
Installing a lawn mower blade correctly requires understanding blade orientation, mounting geometry, and secure fastening techniques. Taking the time to seat the blade firmly against the spindle prevents hazardous vibration, uneven turf clipping, and premature bearing wear. This walkthrough explains every phase of the installation process, from initial disconnection to post-service clearance testing.
Essential Safety Precautions Before Working Under the Deck
Safety preparation represents the most critical stage of any under-deck service routine. On gasoline-powered mowers, you must disconnect the spark plug boot and tuck the wire away from the terminal to eliminate accidental engine starting. For battery-powered walk-behind or riding units, remove the safety key and extract the primary battery pack before touching any cutting components. When handling an electric mower cutting blade, removing the power source completely isolates the motor circuitry and prevents sudden spindle engagement.
Tilting the lawn mower requires careful attention to fluid levels and mechanical layout. Always tilt a four-cycle gas mower with the air filter and carburetor pointing upward toward the sky. Tilting the machine toward the carburetor allows engine oil to flood the intake tract, saturate the paper filter, and foul the spark plug. If fuel remains in the tank, consider running the engine low or placing a plastic barrier under the gas cap to prevent hazardous spills across your workspace.
Personal protection must never be overlooked when handling exposed steel blades. Even a dull mower blade possesses sufficient inertia and sharp edges to cause severe lacerations if the spindle shifts unexpectedly. Heavy leather work gloves provide essential traction and shielding when maneuvering heavy cutting components. Clearing the immediate work area of loose debris, pets, and tripping hazards further ensures a stable and controlled repair environment.
Inspecting Fitment and Center-Hole Geometry
Mounting compatibility hinges entirely on exact physical geometry rather than generic deck dimensions. For example, the Maxpower 331528B mulching blade measures 21 inches in length and 2-1/4 inches in width, featuring a distinct bow tie center hole pattern alongside outer holes spaced 2.5 inches center-to-center. Installing a blade with an incompatible center shape, such as forcing a round hole onto a star spindle, leads to severe slippage and equipment damage. Checking documented replacement part numbers, such as CC-742-0741, 942-0741, or Craftsman CMXGZAM100067, helps confirm compatibility before attempting installation.
Nominal deck cutting width does not always equal the physical length of an individual blade. Single-blade walk-behind mowers often utilize a blade matching the deck cut, whereas multi-blade riding tractors and zero-turn mowers divide cutting width across two or three smaller blades. Relying solely on deck decals can result in purchasing undersized or oversized cutting bars that hit the inner deck baffle. Always measure the diagonal tip-to-tip span of your existing blade to confirm the true replacement size required for your machine.
Outer alignment pins and spindle adapters dictate how the blade seats against the drive hub. Many modern mower decks feature raised locator nubs on the spindle face that must nest cleanly into corresponding outer holes on the blade. When the blade fails to sit flush against the adapter face, the mounting bolt cannot clamp the assembly evenly. Taking a few moments to clear built-up grass clipping residue from the spindle hub guarantees that the new steel sits squarely on its mating surfaces.
Securing the Blade with Dedicated Removal Tools
Attempting to loosen or tighten a mower blade bolt with one bare hand while holding the cutting edge creates significant slipping hazards. Dedicated mechanical clamps, such as the MaxPower 339079 universal blade removal tool or the KINTLE 490-850-0005 clamp, lock directly onto the deck lip to immobilize the blade. These rigid metal clamps cradle the cutting bar securely, preventing rotation while you apply heavy leverage to the mounting bolt. The KSWLOR universal clamp and Cuidosful adjustable holder offer similar stabilization for walk-behind and riding decks up to 42 inches.
Thread direction is another factor that causes confusion during blade service. The vast majority of standard push mowers utilize standard right-hand threads, meaning you turn the bolt counterclockwise to loosen and clockwise to tighten. However, certain commercial or dual-blade timed decks utilize reverse threads on specific spindles to counteract rotational forces. Checking the mower manual or noting the direction of rotation before applying excessive torque prevents stripped threads or broken mounting studs.
Corrosion and hardened grass sap can cause mounting fasteners to seize tightly over multiple mowing seasons. If a blade bolt resists standard socket pressure, applying a penetrating fluid to the fastener threads helps dissolve oxidized bonds. Allowing the penetrating oil to soak for ten to fifteen minutes significantly reduces the breakout torque needed to free the fastener. Avoid striking the socket wrench with a steel hammer, as shock loads can transfer directly into the engine crankshaft or spindle bearings.
Verifying Blade Orientation and Airfoil Direction
Installing a lawn mower blade upside down remains one of the most common mistakes among property owners. A lawn mower blade features a sharp, flat cutting edge along one portion of the bar and an upturned wing or sail on the trailing side. The upturned aerodynamic wings must always point upward toward the underside of the mower deck. These wings generate the essential upward airflow needed to lift grass blades upright for an even cut before mulching or discharging clippings.
If the blade is accidentally mounted upside down, the flat bevel cannot slice grass stems cleanly. Instead, the blunt backside of the steel smashes through the grass, resulting in frayed, yellowing turf tips within forty-eight hours of mowing. Furthermore, an inverted blade pushes air and clippings downward toward the soil rather than circulating them through the deck chamber. Examining factory markings, such as stamped text that reads “Bottom” or “This Side Toward Grass,” provides immediate confirmation of correct orientation.
When working with mulching blades, such as the Maxpower 331528B, the stepped cutting geometry creates complex air currents beneath the housing. The specialized curved profile chops severed clippings multiple times before dropping them into the turf canopy. If you are configuring a custom deck cutting blade setup, ensuring that all baffles and discharge plugs match the blade profile maximizes performance. Proper upward orientation allows these mulching curves to function exactly as designed by the manufacturer.
Checking Balance and Edge Condition Prior to Assembly
Even brand-new replacement blades benefit from balance verification before installation. Static metal balancers, such as the SporGain cone balancer, feature a tiered center post that accommodates circular center holes up to 1.97 inches. Placing the center hole onto the appropriate step allows you to observe whether one side of the blade dips downward. An out-of-balance blade generates severe high-frequency harmonics during engine operation, which can crack the mower deck housing or ruin spindle bearings over time.
Correcting minor blade imbalance is straightforward when using rotary sharpening tools. Multi-sharp rotary sharpeners, such as the Bneykrir corundum drill attachments or the jtfrkope double-layer corundum set, connect quickly to standard hand drills. By grinding small amounts of metal from the heavy side of the blade, you can restore neutral balance without altering the cutting bevel. Always remove material from the blunt trailing edge or flat span rather than thinning out the cutting bevel excessively.
Factory powder coatings often cover replacement blades to protect against transit rust, as seen on MaxPower replacement parts. This protective paint will wear away naturally along the cutting edge during the first few minutes of mowing. You do not need to grind away this protective coating prior to installation unless specified by the manufacturer. Retaining the factory finish across the central body of the blade protects the underlying steel against corrosive moisture and grass sap accumulation.
Fastening Hardware and Proper Clamping Techniques
Reassembling the blade stack requires strict attention to the original hardware order and washer orientation. Most lawn mower assemblies utilize a heavy-gauge conical washer, often referred to as a Belleville washer, between the bolt head and the blade. The concave bowl of this spring washer must face toward the blade, creating continuous spring tension that prevents the bolt from backing out under rotational vibration. Installing this curved washer backward reduces clamping pressure and permits the blade to shift on its hub.
Thread condition must be inspected thoroughly before threading the bolt back into the spindle shaft. Wipe the threads with a clean shop rag to remove old debris, grass clippings, and dried dirt. Inspect the bolt shank for signs of stretching, necking, or thread deformation, and replace any compromised fasteners immediately. Using damaged mounting hardware risks fastener failure while the blade spins at thousands of revolutions per minute.
Tightening the mounting bolt requires deliberate and firm clamping force without stripping internal spindle threads. While exact torque values vary by manufacturer, walk-behind push mowers typically call for moderate to firm torque, whereas larger commercial lawn tractors demand higher clamping force. Re-engaging your blade clamp tool against the deck lip allows you to apply full tightening force with a calibrated torque wrench. Never rely on a pneumatic or cordless impact driver for final tightening, as uncalibrated impacts can easily stretch the bolt or crack the spindle adapter.
Post-Installation Clearance and Functional Checks
Before lowering the mower back onto its wheels, perform a careful manual clearance rotation. With the spark plug still disconnected or battery removed, slowly rotate the blade by hand through a full 360-degree arc. Verify that the blade tips maintain uniform clearance from the deck skirts, discharge chute baffles, and internal belt covers. If the blade contacts any portion of the deck housing, verify immediately whether the blade is centered correctly on the spindle pins or if the deck shell is bent.
Once manual rotation confirms smooth clearance, return the mower to an upright, level position on the ground. Check the engine oil level using the dipstick to ensure that tilting the deck did not cause oil migration into unwanted chambers. Reconnect the spark plug boot securely or slide the charged battery back into its terminal cradle. Starting the mower in an open, clear driveway area allows you to observe initial mechanical behavior before cutting grass.
Listen attentively for unusual rhythmic vibrations, rattling, or grinding noises when engaging the blade. A properly balanced and torqued cutting assembly runs smoothly with minimal harmonic feedback through the operator handlebars. If you feel noticeable vibration through the grips, shut down the engine immediately, disconnect the power source, and re-check blade balance and bolt torque. Catching an unbalanced condition early prevents costly structural damage to the mower chassis.
Long-Term Maintenance and Practical Deck Care
Maintaining a sharp, properly installed blade transforms your routine lawn care results and extends mower longevity. Inspecting the underside of your cutting deck after every few mowing sessions helps you spot early signs of dulling, nicks, or accumulated debris. Scraping away dried grass clumps preserves clean airflow channels, which directly supports the lifting action of your mower blade. Routine inspection also lets you monitor the condition of mounting washers and spindle adapters before severe wear takes place.
Keeping spare blades and maintenance accessories in your garage ensures seamless property upkeep throughout the growing season. Having a secondary pre-sharpened blade on hand means you can swap cutting edges in minutes rather than pausing your yard work for extensive sharpening sessions. Investing in reliable holding clamps and static balancers streamlines the entire replacement procedure while maintaining proper standards of safety and mechanical accuracy. Following manufacturer guidelines and respecting proper fitment parameters guarantees dependable mowing performance cut after cut.



Write Your Review
No reviews yet. Be the first to share your experience!