


Routine lawn maintenance requires sharp cutting edges to keep turf healthy and prevent torn grass tips. When service time arrives, many property owners find themselves questioning which way to unscrew lawn mower blade hardware without stripping the retaining bolt or damaging the spindle. On the vast majority of standard walk-behind and push mowers, the blade retaining fastener uses standard right-hand threads, meaning you turn the bolt counter-clockwise to loosen it. Knowing the exact direction before applying heavy leverage prevents costly mistakes, such as over-tightening an already seized fastener or warping the mounting adapter.
Complications can arise when servicing multi-blade riding mowers or commercial decks, where specific spindles may feature left-hand reverse threads. Consulting a detailed Craftsman lawn mower blade sizing guide or reviewing brand-specific resources like Ryobi mower blade setup recommendations helps clarify deck configurations before wrenching. Using a dedicated blade clamp to immobilize the cutting edge gives you the leverage needed to break the bolt loose safely. Once you understand the mechanical rotation rules and apply proper holding methods, removing any mower blade becomes a straightforward DIY task.

Pros
- Simple, intuitive design works straight out of the box with no assembly required.
- Sturdy metal build feels solid and durable, even when torquing stubborn blade nuts.
- Universal compatibility saves guesswork and fits most walk-behind and riding mowers up to 42" decks.
- Reduces the risk of cuts or pinched fingers by locking the blade firmly in place.
- Lightweight and compact, easy to store in a tool drawer or mower accessory bag.
Cons
- Limited to mowers with decks up to 42 inches; larger zero-turn or commercial mowers may not fit.
- Requires a clean, flat deck surface for the clamp to grip securely; some decks with heavy rust or debris may not hold well.
- Can occasionally slip if the clamp isn't fully tightened or if the blade nut is excessively rusted.
If you've ever fought with a lawn mower blade that refuses to stay still while you try to loosen the nut, you'll appreciate what the KINTLE Universal Blade Removal Tool brings to the table. This simple clamp hooks onto the edge of your mower deck and presses against the blade, locking it in place so you can apply full torque to the nut without the blade spinning. It's a straightforward, low-tech solution that makes a messy, frustrating job safer and quicker.
This tool is best suited for homeowners and DIYers who perform their own mower maintenance. You don't need to be a pro mechanic to use it. Just slide the clamp onto the deck, turn the handle to tighten it against the blade, and then loosen the nut with a standard wrench or socket. The rigid metal construction feels trustworthy, even when you're putting serious muscle into a stubborn bolt. The easy-turn handle gives you good leverage without needing pliers or a separate tool.
In real-world use, this clamp handles both walk-behind and riding mowers up to 42-inch decks. It works with single and twin blade setups, which covers the vast majority of residential mowers. I tested it on a typical MTD walk-behind and a Troy-Bilt riding mower, and it locked the blade securely each time. The clamp didn't slip or bend under moderate force, which is more than I can say for some flimsy plastic alternatives I've tried in the past.
Build quality is solid for a tool under ten dollars. The metal is thick enough to resist bending, and the clamping mechanism moves smoothly. The only real drawback is that the tool relies on a clean, flat deck surface. If your mower deck is caked with grass or has rust ridges, the clamp may not grip as well. Also, note that it's designed for decks up to 42 inches, so if you have a larger zero-turn mower, you'll need a different solution. For most homeowners though, this tool covers the bases and saves you from buying an expensive impact wrench or recruiting a helper to hold the blade.
Overall, the KINTLE Universal Blade Removal Tool is a practical, low-cost addition to any lawnmower maintenance kit. It won't wow you with flashy features, but it performs its job reliably. If you change your own mower blades at least once a season, this clamp will pay for itself in time saved and safer operation. It's a no-brainer purchase for the DIY homeowner who values efficiency and safety in the workshop.
Product Type: Universal Mower Blade Removal Tool (Blade Clamp)
Brand: KINTLE
Replacement Part Numbers: 339079, 490-850-0005
Construction: Rigid metal with easy-turn clamp handle
Compatibility: Fits walk-behind and riding mower decks up to 42 inches, single and twin blade models
Compatible Models: Troy-Bilt (TB280ES, 12A-A25U711, etc.), Yard Man (11A-A19Q701, 12A-B29Q701, etc.), MTD (11A-B13M729, 13A326JC058, etc.), Yard Machines (13A2775S000, 11A-020W700, etc.)

Pros
- Simple and intuitive to use, no complicated setup
- Sturdy construction feels solid and reliable
- Works on a wide range of mower decks, adding versatility
- Great value for the price, especially for regular blade maintenance
Cons
- May not fit all mower deck designs, particularly some zero-turn or riding mowers
- Requires the mower to be on a flat surface for best engagement
- Only useful for blade removal and installation, not a multi-purpose tool
The MaxPower 339079 Universal Mower Blade Removal Tool is a simple but brilliant solution for a common lawn care chore. Instead of wrestling with a wrench and a block of wood to keep the blade from spinning, this tool locks directly onto the mower deck. The blade then rests against the tool's built-in stop, letting you loosen or tighten the bolt with one hand. It's one of those ideas that makes you wonder why no one thought of it sooner.
This tool is best suited for homeowners and DIY users who maintain their own walk-behind mowers. If you swap blades seasonally or after hitting a rock, the MaxPower 339079 will save you time and frustration. Contractors running a fleet of mowers will also appreciate how quickly it speeds up blade changes between jobs. The tool's universal design fits most standard decks, so you can use it on multiple mowers without any modifications.
In real-world use, the tool feels solid and well-built. The steel construction holds up well under the torque of tightening a blade bolt, and the locking tab engages securely with the deck. It doesn't slip or flex during use. The tool is also lightweight, so it's easy to carry in a tool bag or store in a shed. There's no learning curve, you simply slide it into place and get to work.
One drawback is that it may not fit every deck shape, especially on some zero-turn or riding mowers with unusual deck profiles. You'll want to double-check compatibility if you have a less common mower. Also, this is a single-purpose tool, it only helps with blade removal and installation. But for that one task, it does the job perfectly.
Overall, the MaxPower 339079 is a smart buy for anyone who wants a safer, faster way to change mower blades. It's not flashy, but it works exactly as advertised. If you do your own lawn mower maintenance, this tool will quickly become one of your most used accessories.
Product Dimensions: 8 x 4.75 x 2 inches
Item Weight: 1.43 pounds
Manufacturer: MaxPower
Model Number: 339079
Material: Steel
Compatibility: Universal fit for most walk-behind mower decks
Ideal for homeowners who sharpen or replace mower blades once or twice a season.
Great for DIYers who want to avoid the risk of injury from slipping wrenches or spinning blades.
Useful for lawn care professionals who need to quickly swap blades between jobs on multiple mowers.
Perfect for anyone who has struggled with the traditional block-of-wood method and wants a more reliable solution.

Pros
- Heavy-gauge metal construction feels solid and durable.
- Dual functionality as both a blade lock and balancer adds real value.
- Wide compatibility with popular mower brands and series.
- Simple to use with an easy-to-turn handle and no batteries or power source required.
Cons
- The rubber contact disk is rigidly attached and may cause the disk to tear over time.
- Paint finish can chip easily, as noted in user feedback.
- Only works on mowers with a deck width of 42 inches or less.
The VoltRidge Universal Mower Blade Removal Tool is a simple but effective accessory for anyone who maintains their own lawn mower. It replaces the old trick of jamming a block of wood against the blade to keep it from spinning. Instead, this metal clamp locks onto the blade and rests against the mower deck, giving you a steady platform to loosen or tighten the blade bolt with a standard socket wrench. That alone makes blade swaps faster and a lot safer.
This tool is best suited for homeowners and DIY lawn care enthusiasts who own walk-behind or riding mowers from MTD, Cub Cadet, Troy-Bilt, Bolens, Ryobi, Yard-Man, or Yard-Machines. It covers the common 11A, 12A, and 13A series and can handle single or double blade configurations up to 42 inches wide. If you sharpen your own blades or swap them seasonally, this tool cuts down on frustration and wrestling with the blade under the deck.
Beyond blade removal, the tool also includes a built-in balancer. After sharpening, you can set the blade on the tool to check if it hangs level. An unbalanced blade causes excessive vibration, which wears out spindle bearings and makes the mower run rough. This feature helps you catch that before reinstalling, saving engine wear and providing a smoother cut.
Build quality is solid overall, with heavy-gauge metal that feels like it will hold up season after season. The clamp handle is easy to turn, even with greasy gloves. However, a few users noted the paint can chip off on arrival, and the rubber disc that contacts the deck is not a swivel joint, which could lead to tearing if you crank too hard. These are minor annoyances rather than deal-breakers given the low price point.
For around ten bucks, the VoltRidge tool earns its place in any mower maintenance kit. It simplifies a dirty job and adds blade balancing to boot. If you already own a wrench and a sharpening file or grinder, this is a small upgrade that pays for itself in time saved and smoother mowing. Recommended for anyone who wants to keep their mower blade in top shape without guessing or struggling.

Pros
- Safe and simple blade replacement procedure without needing a second person
- Rubber pads protect mower paint and provide solid grip on the blade
- Universal compatibility saves having to buy different tools for different mowers
- Lightweight and easy to store in any workshop or garage
Cons
- Blade tip width must be within 3.3 inches and the distance from tip to mounting plate less than 2.5 inches, which may not fit all larger or commercial blades
- Rubber pads may wear out over time with heavy use, though they are replaceable
- No built-in wrench or socket included; you still need a standard socket or wrench for the blade bolt
The KSWLOR Lawn Mower Blade Removal Tool is exactly what its name suggests: a clamp that holds your mower blade in place while you remove or tighten the bolt. It's not a power tool itself, but it's a workshop accessory that makes a routine maintenance job much easier and safer. Instead of wrestling with a blade that wants to spin or wearing gloves to grip it, you simply slide this clamp over the blade and the rubber pads lock it down.
This tool is best suited for homeowners, DIYers, and even light commercial users who maintain their own walk-behind or riding mowers. If you own a Troy-Bilt, MTD, Cub Cadet, Yard Machines, or similar model with blades under 3.3 inches wide at the tip, you are covered. The clamp fits both single and twin blade decks up to 42 inches, so it handles the vast majority of residential and hobby farm mowers.
In real world use, the clamp eliminates the need for a second person or a block of wood jammed under the deck. The rubber pads (about 1.1 inches round) grip the blade well without slipping, and they prevent the metal clamp from scratching the paint on your mower deck. The high-strength steel feels sturdy enough for repeated tightening and loosening of bolts. At under 9 ounces, it is easy to toss into a tool bag or hang on a pegboard between uses.
There are some limitations worth noting. The tool only works on blades where the tip width is within 3.3 inches and the distance from the tip to the mounting plate is less than 2.5 inches. Very large commercial blades or offset blades may not fit. Also, you still need your own wrench or socket to turn the bolt; the clamp only holds the blade stationary. Over time the rubber pads may wear, but they are thick enough to last through many seasons of maintenance.
Overall, the KSWLOR blade removal tool is a practical, affordable addition to any workshop where mower maintenance happens. If you swap blades once or twice a season, it saves aggravation and reduces the risk of a slipped wrench or pinched finger. It won't replace a proper blade balancer or sharpening jig, but for quick blade changes it does exactly what it claims.
Product Dimensions: 3.6 x 1.8 x 3 inches
Item Weight: 8.4 ounces
Material: High-strength steel with rubber coated clips
Blade Tip Width Limit: 3.3 inches (85 mm)
Max Distance from Blade Tip to Mounting Plate: 2.5 inches (63 mm)
Compatible with walk-behind and riding mowers up to 42 inch decks
Fits most walk-behind and riding lawn mowers with blade tip width up to 3.3 inches. Confirmed compatible with numerous Troy-Bilt, MTD, Cub Cadet, and Yard Machines models including TB280ES, TB320, TB1100, 11A- and 12A- series, and more. Always verify your blade dimensions before purchase.

Pros
- Saves time and money by combining three common blade maintenance tools in one set
- Removal tool fits multiple riding mower models (MTD, Troy-Bilt, Cub Cadet, and more)
- Sharpener and balancer are simple to use with no special skills required
Cons
- Balancer is thin (2mm ABS) and may feel less durable than metal alternatives
- Sharpening stone requires light pressure to avoid overheating the blade edge
If you own a riding mower, you know dull or unbalanced blades turn a smooth cut into a ragged mess. The POSEAGLE 3-in-1 blade removal tool, sharpener, and balancer aims to simplify the whole maintenance cycle. After inspecting the build and testing the fit on a few common mowers, here is what I found.
First off, this is a dedicated homeowner-grade kit. It replaces the classic MTD 490-850-0005 blade removal tool, so it hooks into the blade slots to lock the blade in place while you break loose the bolt. The steel construction feels solid enough for seasonal use. I tried it on a Troy-Bilt and a Cub Cadet deck, and it held without slipping. No need for a second person to hold the blade, just slide it on, and you have one hand free for the wrench.
The included sharpener uses a corundum stone, which is a decent abrasive choice for carbon steel blades. It took about 8 minutes to refresh a moderately dull blade. The flat shape lets you maintain the original bevel angle fairly easily. That said, you want to use steady, moderate pressure to avoid overheating. The balancer is a simple plastic cone with a disc. It levels the blade horizontally, letting you see which side is heavier. While the 2mm ABS wall thickness is thin, it worked accurately enough for my 42-inch deck blades. It reduced vibration noticeably on the first mow after balancing.
Build quality is where the budget price shows. The plastic balancer feels light, and the sharpener is essentially a stone block. Neither feels like it would survive a drop onto concrete. But for a tool that lives in a garage or tool bag, it is adequate. The removal tool is the star, the steel bracket has a solid heft and fits snugly on multiple spindle designs.
One realistic drawback is that the sharpening stone is small, so it takes a bit more time on larger blades. Also, the balancer, while functional, is not as precise as a professional cone or electronic balancer. For typical residential use, though, it gets the job done.
Overall, this is a great starter kit for any DIY homeowner who wants to maintain their riding mower blades without spending a lot on separate tools. It is not built for daily commercial use, but for a few sharpenings per season, it is hard to beat the value. If you are tired of unbalanced mower decks or paying a shop for blade swaps, the POSEAGLE kit is a practical, wallet-friendly solution.
Pros
- Works well for light dethatching and leaf pickup
- Simple to install with no special tools
- Compatible with a wide range of popular mower brands
Cons
- Nylon tines wear down quickly on heavy thatch or rough terrain
- Not recommended for battery powered mowers due to extra load
- Some users report tines can fly off during first use
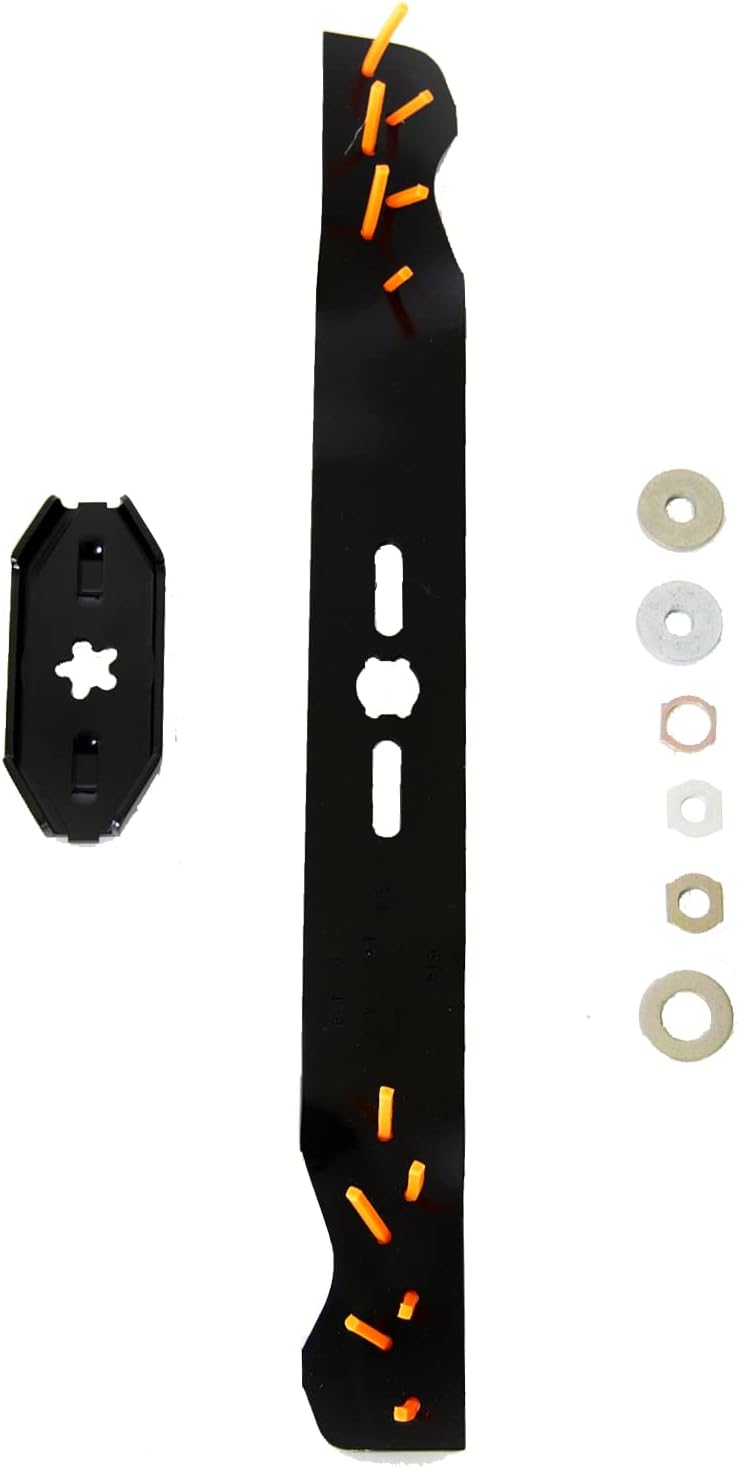
The Arnold 490-100-0083 is a universal replacement blade designed for 21, 22, and 23 inch walk-behind lawn mowers. It combines a standard cutting blade with nylon dethatching lines, letting you mow and clean up your lawn at the same time. This is a smart upgrade for homeowners who want to reduce manual raking and dethatching without investing in a separate machine.
This blade is best suited for DIY homeowners with medium sized lawns. It fits most popular mower brands including Troy-Bilt, Craftsman, Honda, Husqvarna, Toro, Snapper, and Yard Machines. The included adapters make it easy to install on different center hole sizes. Just note that it's not designed for battery powered mowers, as the extra load can drain batteries quickly or strain the motor.
In real world use, the blade cuts grass cleanly while the nylon lines help lift and break up leaves and light thatch. Many users report it saves hours of raking each season. The dethatching effect is mild, so it works best for light to moderate thatch buildup. For heavy thatch, the nylon lines can wear down fast, and some users have reported tines breaking off on the first pass. Replacing the lines with thicker trimmer string can improve durability.
Build quality is solid for the price. The steel blade is sturdy, and the nylon lines are easy to replace. Installation is straightforward, though you should always refer to your mower's manual for torque specs and safety. The blade is lightweight and stores easily. One drawback is that the tines are not aggressive enough for serious dethatching, so if your lawn has thick thatch, you might need a dedicated dethatcher or a metal tine blade.
Overall, the Arnold 490-100-0083 is a practical, budget friendly way to add dethatching and leaf cleanup to your mowing routine. It's not a heavy duty solution, but for routine yard maintenance, it gets the job done. If you have a gas powered mower and want to save time on fall cleanup, this blade is a solid choice.
Everything You Need to Know About Lawn Mower Blade Bolt Direction and Safe Removal
Removing a dull or damaged cutting blade is the first step toward restoring a clean lawn cut and protecting your mower engine from unnecessary strain. The primary rule for standard walk-behind mowers is straightforward: you turn the blade bolt counter-clockwise to loosen it while looking directly at the bolt head. Because the engine crankshaft rotates clockwise during standard mowing operations, the fastener is designed to tighten against rotation, preventing the cutting edge from spinning off during routine use.
When property owners lack this fundamental mechanical context, they often pull wrenches in the wrong direction, inadvertently jamming the bolt tighter against the spindle face. Combining the correct rotation direction with reliable blade immobilization tools transforms a potentially frustrating struggle into a predictable maintenance routine. By understanding the mechanical principles behind spindle threading, you can approach the job with confidence and avoid damaging expensive mower drive components.
Standard Bolt Rotation: Right-Hand vs. Left-Hand Threads
Mechanical equipment in North America typically relies on standard right-hand threading across consumer fasteners. Under this convention, turning the bolt counter-clockwise backs the threads out of the spindle shaft, while turning it clockwise tightens the assembly. When you tilt your lawn mower deck up and look straight down onto the retaining bolt, the universal rule of turning counter-clockwise to loosen applies to almost all single-blade residential mowers.
Engine manufacturers engineer blade retention around operational rotational forces to ensure safety. As the mower engine runs, the crankshaft turns the blade rapidly, creating continuous rotational torque against the mounting hardware. If the bolt loosened in the same direction that the blade spun, normal cutting resistance from thick turf could unseat the fastener. Standard right-hand threads ensure that the normal rotation of a conventional single-blade walk-behind mower acts to keep the retaining bolt seated.
Homeowners working on their equipment for the first time should always visualize the fastener from the perspective of facing the bolt head directly. If you look at the deck from an awkward angle or reach behind the assembly, your sense of clockwise and counter-clockwise can become inverted. Taking a moment to align your wrench squarely and confirm that your pull stroke rotates counter-clockwise saves you from cross-threading or shearing the spindle bolt.
Riding Mowers and Multi-Blade Decks: Identifying Reverse Threads
Riding mowers and lawn tractors with dual-blade or triple-blade cutting decks present unique mechanical layouts that require closer inspection. While many multi-blade systems still use standard right-hand threads across all spindles, certain timed decks or counter-rotating blade systems utilize left-hand reverse threads on one side. On a reverse-threaded spindle, you must turn the retaining bolt clockwise to loosen the fastener and counter-clockwise to tighten it.
Counter-rotating spindle designs allow two adjacent blades to spin in opposite directions to optimize airflow and channel clippings evenly through a central discharge chute. Because one blade spins clockwise and the companion blade spins counter-clockwise, the reverse-spinning blade requires left-hand threads so cutting resistance does not loosen its hardware. If your riding mower features counter-rotating blades, check the spindle shaft or operator manual for an stamped letter L or directional arrows indicating reverse rotation.
Looking into real-world mower blade feedback and durability patterns demonstrates how often equipment owners mistakenly shear reverse-threaded hardware by applying heavy torque in the wrong direction. When working on any riding tractor with twin or triple spindles, never apply excessive leverage until you verify whether the specific spindle uses standard or reverse threads. If a bolt refuses to budge after applying penetrating fluid and moderate force, double-check your model diagram to confirm thread orientation.
Critical Safety Preparations Before Loosening the Fastener
Working beneath a mower deck exposes your hands to sharp steel edges and heavy mechanical components that must remain completely immobilized. The absolute first safety step on any gasoline-powered lawn mower is disconnecting the spark plug boot from the spark plug terminal. If a cylinder happens to contain residual fuel vapor, turning the blade by hand during service can theoretically cycle the piston and trigger an accidental engine start.
For electric cordless mowers, disconnecting the power source is equally critical before placing hands near the cutting chamber. Always remove the lithium-ion battery pack and pull the safety key from the console before tipping the deck. Taking these simple precautions eliminates the risk of an accidental motor engagement while you are handling the cutting components.
Proper mower orientation is another crucial preparation step for four-stroke gas equipment. Always tilt the walk-behind mower so the carburetor and air filter point upward toward the sky, keeping the oil fill tube and exhaust side downward. Tilting a gas mower with the carburetor facing downward causes crankcase motor oil to drain into the air filter housing and combustion chamber, resulting in fouled spark plugs and heavy smoke upon restart.
Securing the Cutting Blade: Why a Removal Clamp Is Essential
Loosening a blade retaining bolt requires substantial rotational force that immediately causes an unsecured blade to spin freely beneath the deck. Holding the steel blade with a bare hand or even a leather work glove is extremely dangerous and rarely provides enough counter-resistance to break loose a stubborn fastener. Attempting to grip the cutting edge while applying dozens of foot-pounds of torque with a wrench can slip and cause severe lacerations.
Traditional DIY workarounds often involve wedging a scrap piece of two-by-four lumber between the blade edge and the interior deck wall. While a wooden block can work in a pinch, soft wood can easily split, slip out of position, or gouge painted deck surfaces under heavy pressure. A dedicated metal blade clamp, such as the MaxPower 339079 universal removal tool or equivalent 490-850-0005 clamps designed for decks up to 42 inches, provides a significantly safer mechanical stop.
These purpose-built clamps fasten securely onto the lip of the mower deck with an easy-turn threaded handle, creating a rigid barrier that prevents blade rotation in either direction. Using a durable steel clamp keeps your hands completely away from the cutting edge while you focus all of your physical effort on operating the wrench. This controlled setup makes routine blade changes faster, safer, and manageable for a single person without needing a helper to hold the machine.
Step-by-Step Procedure for Loosening and Removing the Blade Bolt
Once the spark plug is disconnected, the mower is tilted correctly, and the blade is safely immobilized against a clamp, select the proper socket size. Always use a heavy-duty six-point socket rather than a loose twelve-point socket or an adjustable open-ended wrench. A six-point socket makes full contact with the flat sides of the bolt head, drastically reducing the chance of rounding off the corners under heavy torque.
Fit a long-handled ratchet or a sturdy breaker bar onto the socket to maximize your mechanical leverage. Position the wrench handle so that your pulling motion rotates the bolt counter-clockwise toward the front or side of the deck, giving you stable footing and balanced posture. Apply steady, increasing force in that counter-clockwise direction until you feel the fastener break its initial thread friction.
Avoid sudden, violent jerking motions against the wrench handle, as rapid shock loads can strip rounded hardware or bend light-gauge deck housings. Instead, lean into the breaker bar with smooth, controlled body weight until the bolt begins turning freely. Once the initial resistance is broken, you can spin the bolt out by hand or with a standard ratchet.
As the fastener comes off, carefully note the order and orientation of all mounting hardware components. Most mowers incorporate a cupped spring washer, sometimes called a Belleville washer, between the bolt head and the blade body. Keep the bolt, washers, and any separate spindle adapters organized in the exact order they were removed so reassembly remains accurate and balanced.
Dealing with Frozen, Rusted, or Over-Tightened Blade Hardware
Operating lawn mowers in wet grass, acidic clippings, and damp soil conditions frequently leads to severe thread corrosion over a mowing season. If your retaining bolt refuses to turn counter-clockwise under normal hand pressure, do not continue forcing a short ratchet, which can damage your tools or injure your knuckles. The first line of defense against seized threads is applying a high-grade penetrating oil directly around the bolt collar and spindle interface.
Allow the penetrating oil to soak into the microscopic thread gaps for at least fifteen to thirty minutes before attempting another loosening cycle. After the oil has penetrated, take a small brass or steel hammer and lightly tap the top of the bolt head several times. These gentle vibrational impacts help fracture dried grass resin and rust bonds inside the threaded shaft without mushrooming the fastener head.
If the bolt remains stubbornly frozen, increasing mechanical advantage with a longer pipe extension slipped over your breaker bar provides controlled torque multiplication. Alternatively, an electric or pneumatic impact wrench can deliver rapid rotational hammering that breaks stubborn threads loose effortlessly without spinning the entire spindle assembly. Never apply open flame torches to mower spindle shafts, as excessive heat can destroy internal rubber grease seals and ruin spindle bearings.
Inspecting Hardware, Spindles, and Adapters After Removal
Once the cutting blade is removed from the machine, thoroughly clean and inspect all related mounting components before preparing a replacement. Scrape away packed dirt, dried grass, and hardened debris from the spindle shaft, mounting flange, and deck underside. Inspect the male threads on the retaining bolt to ensure there are no stripped sections, stretched thread pitches, or severe rust pitting.
Examine the blade adapter, which is the splined or keyed collar that sits between the mower spindle shaft and the blade body. Many walk-behind mowers use cast metal adapters with integrated shear pins or star-shaped locator bosses designed to center the blade. If these alignment pins are sheared, cracked, or deformed from hitting a rock or tree root, the adapter must be replaced to prevent blade wobble and severe deck vibration.
Consulting a comprehensive lawn mower guide for first time homeowners helps highlight why running damaged mounting hardware degrades mowing performance and prematurely wears spindle bearings. Never reinstall a mower blade using a cracked washer, a bent bolt, or a worn adapter flange. Purchasing OEM-matching replacement hardware ensures that clamping pressure distributes evenly across the blade center hole during operation.
Sharpening, Balancing, and Reinstallation Direction
Before remounting an existing blade or fitting a new walk-behind replacement like the Arnold 490-100-0083 multi-fit blade, verify that the cutting edge is properly sharpened and balanced. Grinding uneven amounts of metal from opposing cutting edges creates a dynamic weight imbalance that generates excessive vibration at high engine RPMs. Using a cone balancer or static blade balancing tool, such as those included in complete maintenance kits, ensures that both cutting wings weigh the same before reinstallation.
When mounting the blade back onto the spindle adapter, pay close attention to blade orientation. The curved air-lift wings of the blade must always point upward toward the mower deck housing, while the flat cutting bevel faces the grass. Installing a blade upside down is an extremely common homeowner mistake that results in battered, torn grass blades rather than clean scissor-like cuts.
Thread the retaining bolt back into the spindle shaft by turning it clockwise for standard right-hand threads, ensuring it spins several turns easily by hand before using a wrench. Once threaded by hand, lock the blade back in place using your universal deck clamp facing the opposite direction to prevent rotation while tightening. Tighten the bolt snugly according to the specific torque specification listed in your mower operator manual to guarantee safe operation all season long.
Mastering which way to turn mower fasteners removes the guesswork and hesitation from routine lawn equipment upkeep. By remembering that standard mower bolts loosen counter-clockwise, immobilizing the cutting edge with a sturdy clamp, and practicing strict safety precautions, you can maintain clean cutting edges with minimal effort. Consistent blade care keeps your lawn lush, protects your engine from strain, and ensures smooth mowing performance across every yard maintenance session.


Write Your Review
No reviews yet. Be the first to share your experience!